OVERVIEW
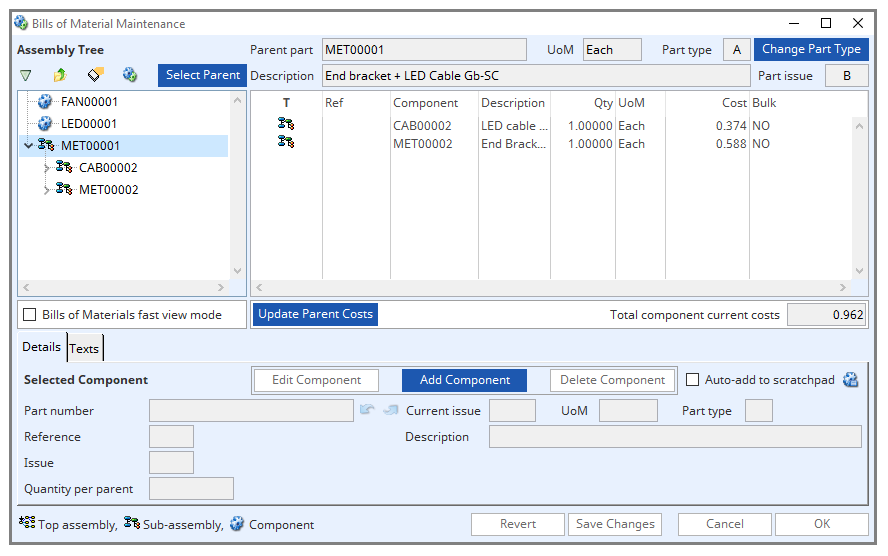
The Bill of Materials Maintenance window contains an assembly tree list that can be populated using drag and drop from the parts ScratchPad or directly by using the Select Parent function on the BoM menu. When an assembly number is selected in the tree list the parent’s component list is built and is displayed. If there are potential conflicts with orders the Parent On-Order Status window will open to warn you.
To create an assembly in the first place, select the part number or drag it into the list and select it. Then add components to the list.
You can add parts to the component list using drag and drop from the Scratchpad or the BoM Listing built from the Scratchpad.
The window shows component current costs under the list and a total for the parent below the list. Note that this is NOT the total cost value for the parent as it ignores costs associated with the assembly process route and any receiving overheads.
File Path
Masters > Bills of Material > Select Parent
This file path takes you to the Bills of Material Maintenance window.
Assembly Tree
Click on the expander to show sub-assemblies. Click on the icon or part number to list components.
If you move the mouse over the tree list, there is a context menu (right-click) which contains the following functions:
Select Parent – has the same function as that on the BoM menu.
Expand All – causes any assembly listed to be fully expanded down to the lowest sub-assembly.
Where-Used – has the same function as the icon button above the tree list.
Clear All – has the same function as the icon button above the tree list.
BoM List – opens the Bill of Materials and Where-Used Listings window.
Component list
List of components in the selected parent’s bill of material.
Parent part
Parent part number.
UoM
Standard stock unit of measure.
Part Type
Part type (A,B,M,N,O,P)
Change Part Type button
Having created a BoM for a parent part you can change that parents type classification with this button.
Expand icon
Clicking this icon causes any assembly listed to be fully expanded down to the lowest sub-assembly.
Higher Parent icon
Clicking this loads the highest parents of the selected part if there are any and they are not already listed.
Clear Assemblies icon
Clears all assemblies from the tree.
Open Report icon
Opens the Bill of Materials and Where Used report for the selected assembly.
Select Parent button
This opens the part selection window to select the Bill of Materials for maintenance.
Description
Description of parent part
Part issue
Engineering issue reference.
Bills of Materials fast view mode
Check this box to activate fast view mode. Fast view mode will supress all parent on-order status messages. Editing will not be permitted while in this mode.
Update Parent Costs
This button opens the Parts Cost Update window.
Total component current costs
The value of all the current costs of all components in the BoM. This is not the same as the total current cost of the assembly as it does not take into account any process route operations that may exist for the assembly.
Details tab
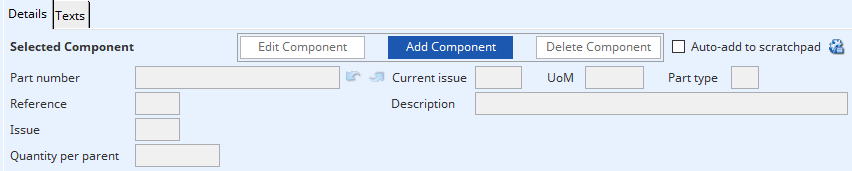
Edit Component button
To edit the selected component from the Bill of Materials component list.
Add Component button
To add a component to a new or existing Bill of Materials.
Delete Component button
To delete the selected component from the Bill of Materials component list.
Auto-add to scratchpad
To auto add selected parts from the Bill of Materials component list to the parts scratchpad.
Scratchpad icon
This opens the parts scratchpad window.
Part number
The Part Number of the Component Part must be defined in the Parts Master File. This Component can have its own BoM. The system protects against entry of a Component that is itself a Parent, at a higher level, of this bill structure. If this were allowed a physically impossible recursive structure would result.
Up and Down arrows
Finds and displays the previous or next record from the appropriate file. The index used may depend on the last Find you executed.
Current issue
Current Engineering issue reference.
UoM
Standard stock unit of measure.
Part type
Component part type.
Reference
Component reference within structure.
This optional 4-character alpha-numeric field is provided for any special Parent-Component link referencing you may wish to apply. BoM reviews and reports can list the components in Reference order. It is often used to provide for sub-kitting to Process Route individual Operations, or as a reference to details on a drawing.
Description
Part description.
Issue
Engineering issue reference.
The part issue for the component when used to manufacture this parent part. This can be different from the current issue for the component stored in the parts master. This enables you to hold historic designs and can be useful in managing engineering changes. However, this is for memo purposes only and is not used in any system processing logic.
Quantity per parent
Component quantity in stock UoM.
The quantity of the Component Part used on each Parent Part. Stock UoM applies to both Parent and Component. i.e. if the Stock UoM of the Parent is “Each” and the Component “Pk 10”, and if the Quantity (per Parent) is 5, then 50 Components are used in making each Parent.
See the Negative BoM Component Quantities section below for more details.
Texts Tab

Special structure comment
Component special structure comment. Up to 10000000 characters.
Show button
Click this button to display a list of alternatives for the field alongside the button. Double-clicking on a list line will enter the value from the list.
Language swap icon
Click to open the Language Swap Maintenance Record or File window as applicable to translate available text into swap languages.
Standard engineering text
Standard engineering text of up to 10000000 characters.
Revert button
Re-reads the modified Bom from file. All changes other than deletes will be lost.
Save Changes button
Saves all component changes and additions to file. Consequential adjustments will also be made.
Cancel button
Aborts the process currently in session. The keyboard equivalent is the Esc key for Windows computers and Command-.(full stop or period) for the Mac.
OK button
The OK button updates the data you have entered, or confirms the selection and/or processes the function you have called.
Negative BoM Component Quantity
There are two reasons why you may want to create BoM Structures where some components have negative component quantities.
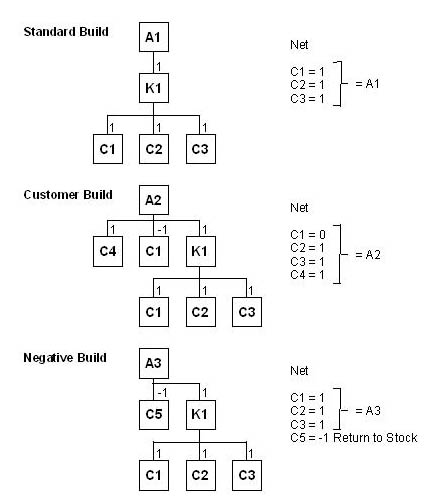
One example (A) is a non-obvious way of handling final assembly exceptions or customisation. In this case, suppose we are making a standard car with black tyres and a customer comes along and says that he will place a large order but only if we provide the car with green tyres. The tyres are on the axles which are on the chassis, so they are deep within the BoM structure, but as we have anticipated this possibility and our car is made on a production line as a single large BoM Assembly it is easy for us to make the standard car with black tyres a phantom kit. Then we create an end product with a single BoM component of the standard phantom kit assembly. To make the green-tyred car all we need to do is to duplicate the standard black-tyred car end-product assembly and add two components to it’s BoM; 4 green tyres and minus 4 black tyres. When the kit is issued the minus 4 and plus four black tyres in the phantom kit resolve to zero black tyres and we are left with the standard kit without tyres plus 4 green tyres (substitute 5 for 4 if there is a spare!). The main value of this is data efficiency and transparency as the ‘specials’ are all in the top level BoM which will be small, having only the standard phantom kit and any variants. Also any change to the basic common design means only a change to the phantom kit after which all end-product variants will reflect the change.
Another example (B) is where the production process results in a predictable return of stock, perhaps where it has been consumed at a deeper level of production, such as tooling or complex by-products that fall outside the normal by-product functionality.
The following illustrates a non-negative simple build followed by A and B scenario illustrations.
Caliach Vision (V3.1013 onwards) allows negative component quantities through a system option optBoMAllowNegQty which can take the value 1, 2 or 3. This option works in conjunction with the optBoMZeroQty system option which, if 1 or YES permits the entry of zero quantity components. The rules are as follows:
- You can create/edit/import negative component quantities if optBoMAllowNegQty=1, 2 or 3.
- If optBoMAllowNegQty=1, 2 or 3 the File — System Manager — System Preference, Bill of Material tab, “Do not consolidate common BoM components in lists” preference will be turned off and disabled; you must view and operate on consolidated kit lists only.
- You cannot have a zero-component quantity unless optBoMZeroQty=1.
- The costing system takes account of any negative BoM quantities regardless of any option settings.
- In the Bills of Material task (BoM Maintenance) all BoM structures are shown in full, as that is what is stored in the data. There are two exceptions to this: the BoM Report – Lowest-Level Component Breakdown and Trial Kit as both of these reports simulate stock movement activity which abide by the following additional rules:
- optBoMAllowNegQty=1 negative component quantities are permitted but any net negative results are ignored in any stock movements or reviews. This means that case A in the preamble will operate fine if the main BoM assembly is a phantom kit. Any net negative quantities will not complicate stock movements when kitting but will affect costing, so such entries that produce net negatives may well be validly used. In this case if optBoMZeroQty=1, the kitting lists will show net zero components but not negatives. This may be useful if the net zero is an optional kit component.
- optBoMAllowNegQty=2 negative component quantities are permitted, and any net negatives will be listed in kit lists, etc. But by default, the return quantity during a kit issue or an issue quantity in a kit return will default to zero. The user will have to manually enter a negative quantity to affect a return/issue. optBoMZeroQty=1 has the same effect as in 6.
- optBoMAllowNegQty=3 negative component quantities are permitted, and any net negatives will be listed in kit lists, etc. By default, the return quantity during a kit issue or an issue quantity in a kit return will default to the negative value so the reverse transaction will typically be made. optBoMZeroQty=1 has the same effect as in 6.
- The Allocated quantity of a component will go negative if there is a net negative on a WO kit list but only if optBoMAllowNegQty=2 or 3 and Part Process Analysis and Reset Part Process Quantities will reflect this rule. If at any time you change the optBoMAllowNegQty setting, it would be wise to do a File — Advanced — Re-Set Data File and Reset Part Process Quantities for all parts to correct any Allocated balances on part records.
- Net negative kit components can never be inverse shortages regardless of option settings.
- Net negative kit components will show up as negative dependant demand in MRP Results and will supplement supply, but only when optBoMAllowNegQty=2 or 3.
- In subsequent kit issues or returns of net negatives the stock movement type will remain the type of the function but it’s direction will be the reverse of normal (movement quantity sign opposite to normal). So, a positive WO Kit Issue movement will result from a net negative kit issue component.
- Multi-Location, Batch Tracked and Serial Numbered parts will behave in the same way as stock movements, with reflected logic.
- Sales Orders and Jobs cannot have negative line-item quantities, as before, but can have net-zero or negative component quantities in single or multi-level phantom kits.
- Changing the optBoMAllowNegQty or optBoMZeroQty setting or removing either will not change any BoM stored data or any already recorded transactions. However, it will affect future transactions, reset part process quantities, BoM Maintenance activities and, in particular, a Re-Unite Missing Relatives operation on the BOMFILE. In the latter case a check is made on component quantity and if it is found incompatible to the option settings the record is deleted. So, if you have negative (or zero) quantity components, they will be removed by the re-unite process if the option settings no longer permit negative (or zero) quantities.
Compiled in Program Version 6.00. Help date last modified on 24 August 2022
Class wbommaint last modified 25 May 2022