Contact Maintenance Subwindow
![]() Reference Contents > Customers > Contact Maintenance Subwindow
Reference Contents > Customers > Contact Maintenance Subwindow
This subwindow provides for maintenance of Addresses and is always associated with the Address Maintenance Subwindow on a master record maintenance window.
Windows that use this subwindow are:
- Marketing Maintenance
- Customers Maintenance
- Suppliers Maintenance
- Goods-Inwards Delivery Details Maintenance
For general information on the Address and Contact system, see the Address Maintenance Subwindow help.
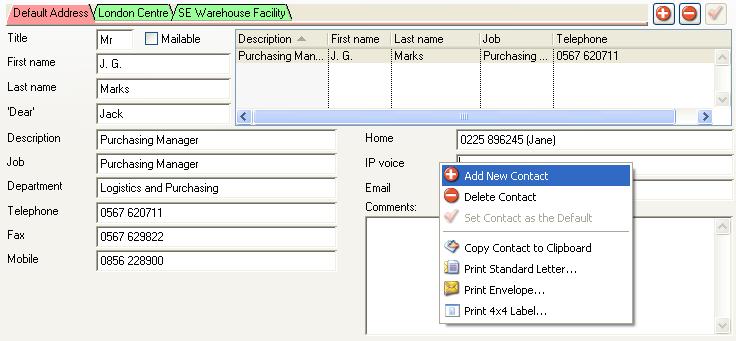
Customers, Suppliers and Marketing addresses can have any number of contacts associated with them. The contact maintenance subwindow provides for viewing and editing a single contact record after selecting an address and then a contact from the list. If there are 5 or less addresses, select an address from the tab strip. If there are 6 or more addresses a dropdown list is provided for address selection.
To manage contact data use the three button functions or the context menu. With these you can ![]() add and
add and ![]() delete records and identify which is default to the address. Each master record (customer, supplier, etc) has one address that is used when others are not specified. This is known as the default address. Similarly for each address, if there are contacts, one will be default to that address. Use the
delete records and identify which is default to the address. Each master record (customer, supplier, etc) has one address that is used when others are not specified. This is known as the default address. Similarly for each address, if there are contacts, one will be default to that address. Use the ![]() Set To Default button to set which contact is the default.
Set To Default button to set which contact is the default.
When changes are made, including deletes, no changes are made permanent until the master record is saved. Note that deleting a master record will lead to all it’s addresses, contacts and links being deleted as well. Similarly, as contacts belong to specific addresses, deleting an address will lead to all it’s contacts being deleted.
Contacts are optional to an address, whereas each master record must have an address.
|
Field |
Description |
|---|---|
|
Contact List |
A list of all contacts for the selected address. |
|
Mailable |
Contacts. Contact can be mailed to (the default contact is always mailable). {ADCFILE.ADCMAIL boolean} |
|
Title |
Contacts. Salutation (eg Mr). {ADCFILE.ADCSALU char 15} |
|
First name |
Contacts. First name. {ADCFILE.ADCFIRS char 20} |
|
Last name |
Contacts. Last name. {ADCFILE.ADCLAST char 20 Idx} |
|
‘Dear’ |
Contacts. ‘Dear’ salutation for letters. {ADCFILE.ADCDEAR char 20} The name that would be used to address the individual in a letter (e.g. Dear “Jack” or Dear “Mr. Marks”). |
|
Description |
Contacts. Contact description for internal identification. {ADCFILE.ADCDESC char 60} |
|
Job |
Contacts. Job title. {ADCFILE.ADCJOB char 40} |
|
Department |
Contacts. Department within the business. {ADCFILE.ADCDEPT char 40} |
|
Telephone |
Contacts. Telephone number (typically copied from ADRTEL). {ADCFILE.ADCTEL char 60} |
|
Fax |
Contacts. Fax number (typically copied from ADRFAX). {ADCFILE.ADCFAX char 60} |
|
Mobile |
Contacts. Mobile telephone number. {ADCFILE.ADCMOBI char 60} |
|
Home |
Contacts. Home telephone number. {ADCFILE.ADCHOME char 60} |
|
IP voice |
Contacts. IP voice over Internet ‘telephone’ number. {ADCFILE.ADCIPTE char 60} |
|
|
Contacts. Email address (typically copied from ADREMAI). {ADCFILE.ADCEMAI char 120} |
|
Comments |
Contacts. Comments. {ADCFILE.ADCCOMM char 100000000} |
|
Button |
Action |
|---|---|
|
|
Add a new contact. |
|
|
Delete the current contact. |
|
|
Click to set the current contact as the default for the address. |
|
Context Menu Item |
Function |
|---|---|
|
|
Add Contact. Performs the same function as the Icon button. |
|
|
Delete Contact. Performs the same function as the Icon button. |
|
|
Set Contact as the Default. Performs the same function as the Icon button. |
|
|
Using the formatting rules, copies the Address and Contact to the clipboard so that you can use it in other programs. |
|
|
Prints a Standard Letter for the selected Address and Contact. It opens the Standard Letter Selection window so you can select a letter to print. |
|
|
Prints an Envelope for the selected Address and Contact. |
|
|
Prints a 4×4 Label for the selected Address and Contact. It opens the 4 by 4 Label Position window so you can select a label position. |
|
|
There are options that control the automatic addition of contacts for new master records that typically can form departmental document links, such as Accounts Department. optAdcCusAutoNew, optAdcDeaAutoNew and optAdcSupAutoNew apply to new Customers, Marketing records and Suppliers. These options apply when new master records are added. You use them where you want to predictably have separate contact addressing for particular documents. For example, Customer Statements should be addressed to the Accounts Department rather than the normal default contact. To effect an option, set up an appropriate Contact on an existing master record and set up appropriate document links and formatting for it. This will be used as a ‘model contact’ from which the Job and Department and all document links will be copied. This ‘model contact’ can be for any address in the same master file. You can setup multiple contacts that all will be copied to the new master record. Once you have created your ‘model contact(s)’, make a note of their Id Numbers. You then add the option to the System Options and enter a comma-delimited list of the Id Numbers of your ‘model contact(s)’. After a master record is created with these options active the following rules apply:
These options operate with both Add and Duplicate in master maintenance windows, during data import with Data Transfer or within maintenance. It also operates when customers or suppliers are created from marketing records. |
Drag-and-Drop Copy of Addresses and Contacts
You can copy an Address with all associated Contacts from one master record to another, for instance from a Marketing record to a Customer record, or between two Customers. This is achieved by drag-and-drop between to Maintenance windows, both with their Addresses or Contacts tab panes selected and the appropriate master records on view.
First open the master Maintenance window, find the record whose address you want to copy. Now open the Maintenance window of where you want to copy the address too. If it is of the same type, Customer, Supplier, Marketing, use the View menu option to open a second Maintenance window and then find the target master record. Move the windows so that the Addresses tab pane is visible behind the copy-from window.
Now click on the Tab (or address list if there are more than 5 addresses) of the address you want to copy, hold down the mouse and drag it over the Addresses tab of the target master record window, then release the mouse. The copy will be performed and Save and Revert buttons on the changed master record will be available to confirm or revert the process.
You can do the same thing with just a single Contact by dragging a line from the Contact List onto another master maintenance window’s Contact tab.
| See also: – |
Compiled in Program Version 5.10. Help data last modified 4 Jun 2012 04:47:00.00. Class wAdcMaintSub last modified 23 Sep 2017 10:50:50.
![]() Reference Contents > Customers > Contact Maintenance Subwindow
Reference Contents > Customers > Contact Maintenance Subwindow