Stored Report Setup
![]() Reference Contents > General Program Functions > Stored Report Setup
Reference Contents > General Program Functions > Stored Report Setup
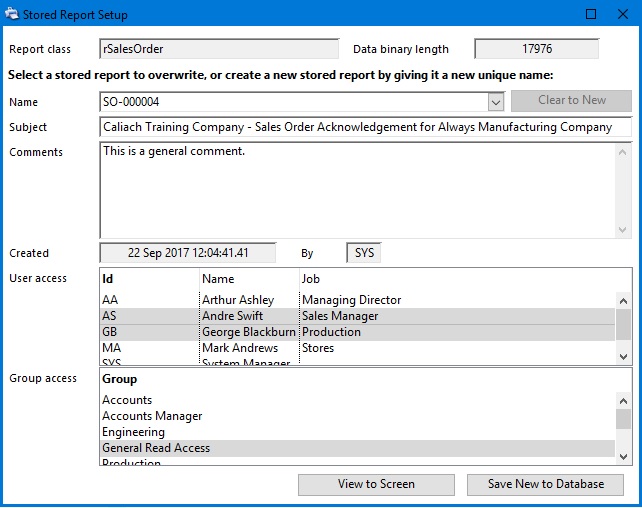
The Stored Report Destination exploits a capability of the system to create an internal binary image of a report before passing that to a devise that will in turn pass it to a physical printing device or file format. It is in effect a low-level definition of the report’s output. When you chose the Stored report destination the output of the report subsequently printed is captured (along with other data that would have been used for an email at the time, for example). This is then made available on this window where you can enter or change the name, subject and comments.
This window also allows you to overwrite an existing Stored Report by selecting from the Name drop-down list, rather than entering a new name. Only Stored Reports with the same Classname that the current user can view are listed. The bottom right button will indicate which you have chosen to do.
![]() TIP: The ability to overwrite a Stored Report is designed to facilitate routing latest report situations. For example, each week many users may wish to view a “Last Week’s Sales Report”. Rather than each user generating the report themselves, an early bird can overwrite last week’s stored report and other users can then print it from the File — Print Stored Report function.
TIP: The ability to overwrite a Stored Report is designed to facilitate routing latest report situations. For example, each week many users may wish to view a “Last Week’s Sales Report”. Rather than each user generating the report themselves, an early bird can overwrite last week’s stored report and other users can then print it from the File — Print Stored Report function.
The window will open while the report is being prepared by the system. When that is complete the window will become active and you can enter details. Select who else can view and print the report using the Users and Groups lists, then Save or Overwrite.
If you do not want to save the report, simply close the window. After creating a Stored Report details and privileges can be changed and stored reports can be deleted in File — Advanced — Stored Report Maintenance.
![]() TIP: As a special case, when printing either a MRP Results and/or an ABC Analysis report at the time of a MRP Run this window will open before any processing. The View to Screen button will not be visible. They will be named respectively Last MRP Results (s5953) and Last ABC Analysis (s5952) and by default will overwrite a previously Stored Report, if one exists. This makes it very convenient and efficient as all users can view or print these reports without having to run the reports explicitly or know when the MRP Run has taken place.
TIP: As a special case, when printing either a MRP Results and/or an ABC Analysis report at the time of a MRP Run this window will open before any processing. The View to Screen button will not be visible. They will be named respectively Last MRP Results (s5953) and Last ABC Analysis (s5952) and by default will overwrite a previously Stored Report, if one exists. This makes it very convenient and efficient as all users can view or print these reports without having to run the reports explicitly or know when the MRP Run has taken place.
|
Field |
Description |
|---|---|
|
Classname (specific to a report design) |
Reports stored output. Report classname. {REPFILE.REPCLAS char 60} |
|
Uncompressed length in bytes |
The binary length of the report data to be stored. |
|
Name given to the Stored Report |
Select an existing report to overwrite or enter a new name for a new stored report. If you do not have Adminstrator privilege, only those stored reports that you have created or have access to. |
|
Subject |
Reports stored output. Subject details. {REPFILE.REPSUBJ char 255} |
|
Comments |
Reports stored output. Comments. {REPFILE.REPCOMM char 100000000} |
|
Creation |
Reports stored output. Creation timestamp. {REPFILE.REPDATT date datetime} |
|
User Id |
Reports stored output. User ID of creator. {REPFILE.REPINIT char 3} |
|
Users |
List of Users that can log on. Select those you want the stored report to be seen by. |
|
Group access |
List of Groups. Select those you want the stored report to be seen by. |
|
Button |
Action |
|---|---|
|
Clear to New |
Click to clear your report list selection so that it can be stored as a new stored report. |
|
Save New to Database |
Click to save the report as new to the database. |
|
Overwrite to Database |
Click to overwrite the report in the database. |
|
View to Screen |
Click to view the report on screen. |
| See also: – |
Compiled in Program Version 5.10. Help data last modified 28 Sep 2017 07:05:05.97. Class wRepStoredDialog last modified 17 Oct 2017 04:09:50.
![]() Reference Contents > General Program Functions > Stored Report Setup
Reference Contents > General Program Functions > Stored Report Setup