Sales Document Configuration Maintenance
![]() Reference Contents > Manager Controls > Sales Document Configuration Maintenance
Reference Contents > Manager Controls > Sales Document Configuration Maintenance
Introduction to Sales Document Configuration
The Sales Document Configuration system is a programmable arrangement for users to create an entire sales document using a rules-based design. The sales processing user operates a wizard that steps them through a series of choices to produce the document. Within the design of the configuration is a set of rules for how the wizard is to behave, known as Conditions, and another set of rules that determine the contents of the resulting sales document, known as Results.
A configuration design has a number of Pages. The sales user steps through the wizard page by page making choices as she goes. Each page contains a number of Groups delineated with a group box. Within each group are a number of Items. These items can be any one of a number of familiar window objects, such as a checkbox, entry field or list. If the item is a list, a further level of detail is needed to describe the List Lines.

In the illustration above the Page showing contains two Groups Document Choice and Header Details. In the first Group, there are two Radio Button Items and in the second group there are four entry fields.
When a page is displayed the Configuration and Page descriptions are shown above and value totals beside the Back and Next push buttons at the bottom of the window.
As the user moves Back or Next from page to page the groups are cleared and the new page is dynamically rebuilt.
Planning a Configuration Design
When you are considering how to structure your design it is important that you break down user choices into pages that are only affected by choices made on earlier pages. This is because no results are executed until a page has been completed by the user. Therefore conditions placed on pages, groups, items or list lines must depend on data that the user affects on preceding pages only.
For example, you may want to give the user control over whether the document is to be a Quotation or an Estimate. If the user chooses an Estimate, operations at work centres need to be added to the document, whereas if it is a Quotation a single non-part line item is to be added requiring different fields on the wizard. In this case the Quotation/Estimate choice must be on a page preceding any of the line item entry pages so that conditions can be applied that appropriately vary depending on the document choice.
![]() CUSTOM CAPABILITY: You can only disable or enable fields on the same page as a result of user actions only using a Do condition statement placed after a USER ACTION boundary with the following form (one line, no spaces):
CUSTOM CAPABILITY: You can only disable or enable fields on the same page as a result of user actions only using a Do condition statement placed after a USER ACTION boundary with the following form (one line, no spaces):
Do {$topwind.$objs.Scroll.$objs.GroupName.$objs.ItemName.
     $enabled.$assign(##Document##=0)}
Or for entry, multiline entry and combo boxes (one line, no spaces):
$ctask.tEnv.$FieldState($topwind.$objs.Scroll.$objs.
     GroupName.$objs.ItemName,##Document##=0)
This will enable the field for quotations and disable it for any other document types. This condition statement would need to be in the item the user chooses the document type in. In the syntax above GroupName is the Text of the Group and ItemName is the Dataname of the Item you are controlling (in the case of Radio Buttons, this is DatanameN where N is 0, 1, 2, 3.. up to the number of radio buttons in the set. If you want to disable a whole group, you stop the notation at the GroupName but although you can prevent user access to the group’s items, this does not change the look of the items.
![]() NOTE: Caliach Subscription Support does not extend to the design of Sales Document Configurations.
NOTE: Caliach Subscription Support does not extend to the design of Sales Document Configurations.
Programming
To design a document configuration you need to have a working knowledge of the Omnis Studio calculation rules and how the configurator implements them.
Calculations in their most simple form use familiar mathematical symbols. So a calculation of the three characters 2+2 will produce the result 4, 2*6 will produce 12, etc.
Mathematical expressions are evaluated using the operator precedence so that
in the absence of brackets, * and / operations are evaluated before + and -. The
full ordering from highest to lowest precedence is:
    unary minus
    * and /
    + and -
    >, <, >=, <=, <>, =
    & and |
For example, if you execute the command:
Calculate LVAR1 as 10-2*3
the calculation part is evaluated as
10-(2*3) which equals 4
(not 10-2 = 8 * 3 = 24).
In addition to simple operators, a rich set of functions are provided, a sample of the most commonly used is listed in the ScratchPad Calculated Field Definition window help. See the Omnis Studio Help for full details of all functions supported. For example:
    rnd(2.8657,3) returns 2.866
    mid('This is a test',2,6) returns 'his is'
    int(2.8657) returns 2
    con('AB',int(2.8657)) returns 'AB2'
Text in calculations must be quoted with single quote marks. Otherwise, the text is interpreted as a variable and if no variable is available with that name a runtime error will result. For example:
        con(AB,2) will fail
    but con('AB',2) returns 'AB2'
Variables are not quoted and the data they contain is substituted in any calculation. For example:
mid(PTMPTNO,1,3) returns 'AHD' when the part number is AHD00080
In statements and conditions, variables defined by configuration items are accessible using a special ## syntax. The dataname of the item is prefixed and suffixed by double # symbols. Before processing the calculation the appropriate item data element is substituted. So for example, if the item has a dataname of EngHours, this would be an appropriate result statement:
Set Line Value {01Eng,JBIRUNT} to {##EngHours##}
an alternative to ##EngHours## would be iDataRow.EngHours
Dot Notation is a way of addressing the Omnis environment objects and properties and for running methods. In it’s simplest form it is a path to a data element. For example, iDataRow is a row variable (single line list) with a number of columns. The data contents of a particular column can be addressed by iDataRow.ColumnName or iDataRow.2 would return the contents of the second column. Here are other examples of notation:
|
Notation (single line) |
Description |
|---|---|
|
iRow.ColumnName |
Returns the cell contents in a row variable defined by the column name or number. |
|
iMyList.RowNo.ColumnName |
Returns the cell contents in a list variable defined by row number and column name or number. Note that if the list has a current line (clicked by the user, or set programmatically), iMyList.ColumnName will return the cell of the current line. |
|
$topwind.$objs.Scroll.$objs.GroupName. |
Returns the data contents of an item in the wizard. $contents is a property of the object whose path is defined by the notation. See section on Programming How-To below for more details. |
|
$topwind.$objs.Scroll.$objs.GroupName. |
Runs the $assign method to the item $width property on the wizard window and sets the objects width to 60 pixels. See section on Programming How-To below for more details. |
|
iSOCustom.$MyMethod(Parameters, , ) |
Runs a custom method called $MyMethod in the oSOCustom object. |
Any meaningful and logical combination of operators, values, variables and notation can be used in calculations.
Square Bracket Notation is an Omnis notation for interpreting sub-calculations inside normal calculations. Anything surrounded by square brackets is evaluated before the parent calculation is evaluated. For example:
iJbiList.[iJbiList.$linecount].JBIPTNO
$linecount is a property of a list variable and equals the number of lines of data in the list. So the full notation returns the part number column from the last line of the job items list.
Text in Messages are a special case in that they are NOT calculations. However, you can embed a variable or calculation into a message (or page description) using ## syntax to surround the calculation. For example the following condition statements:
Message User with {Today is ##m_MakeDate##.}
will cause the user to receive an Ok message saying something like:
Today is 12 Mar 2005.
Programming How-To
The following is a brief list of how-to explanations to help you with more obscure programming tasks:
|
How-To |
Solution and Example |
|---|---|
|
Set the width of an entry field to a different width than standard. |
You can do this using Do condition statements. However, condition statements are run before the item is created on the window, so you must have your statements on an Item or Group that occurs after the object is created. In this case the attribute of the object that you want to assign is the $width property. It takes an integer number of pixels. Example: to set the data entry field to 100 pixels wide (one line): |
|
Stop a multiline entry field expanding when the window is re-sized. |
You can do this using Do condition statements. However, as above, the object must have been created. In this case the attribute of the object that you want to assign is firstly the $edgefloat property. It takes a constant as follows:
Example: to stop a data entry field expanding with the window (one line): |
|
Make an Item display-only |
You can do this using Do condition statements. However, as above, the object must have been created. In this case the attribute of the object that you want to assign is typically the $enabled property. It takes a value of either kTrue or kFalse or a calculation that evaluates such. Example 1: to make a checkbox display only (one line): Example 2: to make an Entry, Multiline Entry or Combo box display only. This uses an environment method called $FieldState that takes two parameters, a reference to the object and the enabled state (one line): |
|
Make more lines visible on a Droplist or Combo |
The normal number of lines that drop from a Droplist or Combo is 5. You can make this larger using a Do condition statement. However, as above, the object must have been created. In this case the attribute of the object that you want to assign is the $listheight property. It takes a value of the number of lines. Example: to make a droplist display up to 15 lines (one line): |
|
Embed data in the text of an Item |
You cannot do this. |
|
Position several Items side-by-side |
You cannot do this. |
![]() NOTE: In the above examples use is made of the iWizardPaneRef variable, which is an internal item reference to the area of the wizard that objects are placed. It is equal to $topwind.$objs.Scroll when the wizard is the top most window or, as an absolute path, $root.$iwindows.wSOConfigWizard.$objs.Scroll.
NOTE: In the above examples use is made of the iWizardPaneRef variable, which is an internal item reference to the area of the wizard that objects are placed. It is equal to $topwind.$objs.Scroll when the wizard is the top most window or, as an absolute path, $root.$iwindows.wSOConfigWizard.$objs.Scroll.
Configuration Variables
There are a number of system variables that are defined by the configuration and populated with data as the user progresses through the configuration. They can be directly written to or used in If statements to determine whether Conditions are applied or Results processed.
The following are configuration variables:
|
Variable |
Definition |
Example |
|---|---|---|
|
iDocType |
Determines the type of document produced. It takes a value of 0, 1, 2 or 3 that represents:
|
Do {2} returns {iDocType} |
|
iJobRow |
This is the row variable of the Job header and has columns for each JOBFILE and CUSFILE field and SOHBOND (sales orders are data converted jobs). You can address job fields using dot notation in the form iJobRow.Fieldname. |
To set the Customer Reference you would use: |
|
iJbiList |
This list variable contains a row for each document line item created by Include line result statements of previous pages. The list variable contains a column for each JBIFILE and WKCFILE field (plus SOLUSER, SOLDATO, SOLDATX for quotations and sales orders, plus the following parts fields: PTMSTUM, PTMTYPE, PTMMASS, PTMACCO, PTMSNO, PTMSLOC, PTMMLOC, PTMTRAC, PTMMSTO, PTMQATS, PTMSHEL, PTMASTO, PTMPHYQ, PTMENGC, PTMPDAT, PTMCOML in addition to a LineName column). You can address the currently selected line using the iJbiList.Fieldname syntax, or a specific line field using iJbiList.LineNo.Fieldname syntax. In the later case the LineNo is the line in the list NOT the document line number, so to use this you must keep track of the line items that have been Included and Excluded. |
If you are confident of the current line you can set the account code using:
|
|
iNewPtmList |
This list variable contains a row for each new part to be created with a column for each PTMFILE field plus a LikePart column. A line is added for each Create part like statement is run. If the part is to be assigned a SO-999999-999 number in the same way as Order Item Configuration, you should use ???? as the first four characters of the number. Any other characters will be added to SO-999999 after the document is created.
|
If you are confident of the current line, you can set the stock units using: |
|
iNewBomList |
This list variable contains a row for each new BoM record to be created with a column for each BOMFILE field. iNewBomList lines are automatically added when a Create part like result statement is run and the LikePart BoM is copied to the list. In addition, lines can be added using the result statement: |
Use the result statement: |
|
iNewProList |
This list variable contains a row for each new Process Route record to be created with a column for each PROFILE field. iNewProList lines are automatically added when a Create part like result statement is run and the LikePart Route is copied to the list. In addition, lines can be added using the result statement: |
Use the result statement: |
|
iNewQapList |
This list variable contains a row for each new Quality Test record to be created with a column for each QAPFILE field. iNewQapList lines are automatically added when a Create part like result statement is run and the LikePart Quality Test is copied to the list. In addition, lines can be added using the result statement: |
Use the result statement: |
|
iNewSnsList |
This list variable contains a row for each new Serial Number Structure record to be created with a column for each SNSFILE field. iNewSnsList lines are automatically added when a Create part like result statement is run and the LikePart Serial Number Structure is copied to the list. In addition, lines can be added using the result statement: |
Use the result statement: |
|
|
|
|
|
iDataRow |
This row variable has a column for each item dataname of the configuration with the datatype and characteristics you defined for it. |
Values for these variables can be set with the following condition statements |
Global Variables and the Current Record Buffer (CRB)
The Omnis Studio environment supports variables of different scope. The scope of a variable is the extent to which it can be seen from different objects in the program. Omnis Studio supports global, task, class, instance and local variables. The only ones of interest here are global and instance.
Global variables can be seen everywhere in the program, whereas instance variables can only be seen within the object, such as a window, in memory. iDataRow, for example, is an instance variable of the configuration wizard window and is destroyed when the window closes, and computer memory released for reuse. Global variables are set up once, can be manipulated anywhere and are only destroyed when the program closes.
There are a number of useful global variables that you can use. They are:
|
Global |
Description |
Example |
|---|---|---|
|
#D |
The current date or date and time. |
Do {#D} returns {iJobRow.JOBDATE} |
|
#T |
The current time. |
Do {con(‘This job was created at ‘,#T,’ on ‘,#D,’.’)} returns {iJobRow.JOBCOMM} |
|
m_UserId |
The current user’s login ID. |
Do {con(‘This job was created by ‘,m_UserId,’ at ‘,#T,’.’} returns {iJobRow.JOBCOMM} |
|
m_MakeDate |
The current make calendar date. |
Do {m_MakeDate} returns {iJobRow.JOBDATE} |
|
m_BuyDate |
The current buy calendar date. |
Do {m_BuyDate} returns {iJobRow.JOBDATE} |
|
MCDFILE values |
Any field from the company details and system preferences file. E.G. MCDSTCU is the local currency symbol. |
Do {MCDSTUM} returns {iJbiList.JBISAUM}
|
The Current Record Buffer is a global memory space containing one record of each database file. To usefully use this you must first populate the CRB for a file with a record from the database. Once a record from the database is in the CRB, any field from that file can be read, or written to, by the program.
To populate the CRB with data from a file in a condition or result statement you can use the following statements:
- Find on {PTMPTNO} where value {‘MyPartNo’}
- Set search as calculation {PTMSUPC=’GRA001′}
- Find on search {PTMPTNO} where value {‘MyPartNo’}
You can only find on a read/write or read-only file and the field you find on must be an indexed field. The find is not exact. In other words, the program will load into the CRB the record where the value is equal to or greater than the value given. If you are to Find on search the search statement must proceed it.
Having found a record, any field in the file will be accessible to a calculation.
![]() WARNING: You should not assume the state of the CRB at the start of Condition or Result processing. The user is free to activate other program functions in the middle of stepping through the order configuration wizard and this activity may well effect the CRB state. For example, you may find a particular part during the first page result statements, the user before stepping to the next page goes into the Parts Master and views a different part. When the user then returns to the order configuration and clicks Next, the part in the CRB will have changed for the processing of that page of results. Instance variables will not have changed, global variables can only be relied upon during the course of statement processing, not between processing events.
WARNING: You should not assume the state of the CRB at the start of Condition or Result processing. The user is free to activate other program functions in the middle of stepping through the order configuration wizard and this activity may well effect the CRB state. For example, you may find a particular part during the first page result statements, the user before stepping to the next page goes into the Parts Master and views a different part. When the user then returns to the order configuration and clicks Next, the part in the CRB will have changed for the processing of that page of results. Instance variables will not have changed, global variables can only be relied upon during the course of statement processing, not between processing events.
Fieldtypes
Fieldtype are the types of object that appear on windows. Most are associated with a data entity that determines the state the object is in. For example, a checkbox is the visual object that controls whether a data value is true (on) or false (off). All fieldtypes other than Information Text and Subwindow must have a datatype (see below).
The following fieldtypes are supported in the order configurator:
|
Fieldtype |
Description and comments |
Example of use |
|---|---|---|
|
Checkbox |
The familiar on/off checkbox. It can only have a Boolean datatype associated with it. |
Print document after creation |
|
Radio button |
The one-of-several radio button type selection device. There must be more than one radio button in a consecutive set for them to be useful. Each radio button must have the same dataname of type Integer. The first radio button of a set, when chosen, sets the variable to 0, the next 1, and so on. |
110V 60Hz power supply |
|
Entry |
The familiar single-line data entry box.This fieldtype has the Uppercase option, which when checked forces uppercase character entry.
|
Date delivery due |
|
Entry multiline |
The data multiline entry box. This fieldtype has the Uppercase option, which when checked forces uppercase character entry. |
Line item description |
|
Droplist |
This fieldtype enables you to have a number of alternative options the user can choose from in the form of a drop-down list. You will need to add a number of list lines associated with it. The first line is set to the current line when the list is first created on the window. A droplist can have multiple columns determined by the first list line entry (columns are entered as comma-separated text). However, only the first column is show to the user. Other columns can be accessed using the syntax iDataRow.Dataname.LineNo.C1 for the first column, C2 for the second, etc.. For the currently selected line, you can omit the LineNo, so column 3 contents would be iDataRow.Dataname.C3 The current line list line result statements are run only. |
Colour scheme alternatives |
|
Combo entry and droplist |
This fieldtype enables you to have a number of alternative options the user can choose from in the form of a drop-down list but the user can also enter a value directly. You will need to add a number of list lines associated with it for the list part of the field. The first non-hidden line is set to the current line when the list is first created on the window and the dataname value set to the first column, first line value. A droplist can have multiple columns determined by the first list line entry (columns are entered as comma-separated text). However, only the first column is shown to the user and loaded into the field when selected. Other columns can be accessed using the syntax iDataRow.DatanameList.Cn (for the currently selected line and where n should be set for the column number) as in the Droplist above. The user can open a combo by clicking on the drop arrow, or tabbing to the field and pressing Alt plus the down arrow key; pressing just the down arrow key cycles through the choices in the list. Selecting a line with the mouse or pressing the Tab or Esc key closes the list. With a combo fieldtype the item result statements are always run. If a list line is selected (or the value entered is equal to a list line value), that list line result statements are also run.
Do {$ctask.tEnv.$Ok('',kFalse,kFalse,kFalse,
     'Free Entered Data')} returns {}
     if {##ItemDataname##List.$line=0}
The Ok message will then only appear when the list has no current line (List.$line=0). If a free entry value is equal to a list line value, or a list line is clicked, then that line’s result statements are executed, and the above will not. |
Packaging alternatives |
|
Headed List |
This fieldtype enables you to have a standard multi-column list. It can be single-line or multi-line selectable by the user. The text determines the headings and if you want more than one column you must provide a comma-separated list of headings. Cell (line and column) data can be accessed using the syntax iDataRow.Dataname.LineNo.C1 as in the Droplist above. For multi-select lists, list line result statements are run only for the selected lines. Otherwise only the current line result statements are run.
|
Parts list |
|
Push Button |
Adding a push button to a configuration enables you to trigger an activity under user control. Typically, a pushbutton will process condition statements only, for example: |
Custom calculator activity |
|
Information Text |
This field type simply adds text to the configurator page to give instructions to the user. It can be controlled with a condition statement:
|
User help |
|
Subwindow |
This is a complex object type that places a window within the configurator window and can provide any sophisticated configuration interface – see the discussion on Customisation below. There are the following available standard subwindows:
|
wSOConfigSubWinDemo
|
Datatypes
Datatypes determine the allowable form of data that the user can enter in an item. Some datatypes have subtypes that need to be defined and character datatypes need to have a maximum number of characters.
The following datatypes are supported:
|
Datetype |
Subtype options |
Data example |
|---|---|---|
|
Character |
none |
‘AAAA’ or ‘Test part to apply to description’ |
|
Number |
0 decimals |
1987 |
|
Integer |
0-255 |
125 |
|
Boolean (Yes/No) |
none |
0 or 1, kTrue or kFalse |
|
Date and Time |
Date |
1 Jun 2008 (format depending on company details) |
Condition Statements
Condition statements are instructions to control entities and values of the variables behind items. They are activated when the entities are tested or created on the window (see When Condition Statements Are Applied below).
The following condition statements are available:
|
Statement |
Action |
Example |
|---|---|---|
|
Set Initial Value to {} |
Sets the initial value of the variable associated with the item. This condition statement is only run once when the page is first opened to the user and not if the user uses the Back button to re-read the window. It only operates on an Item. |
Set Initial Value to {4} |
|
Set Value to {} |
Sets the value of the variable associated with the item. This condition statement is run every time the page is opened. It only operates on an Item. |
Set Value to {‘Created by Order Configurator’} |
|
Set Value to {} if {} |
Conditionally sets the value of the variable associated with the item. The calculation entry must evaluate to a non-zero quantity or a logical true for the value to be set. It only operates on an Item. |
Set Value to {#D} if {##MyVariable##<#D} |
|
Disable If {} |
Conditionally disables a Page, Group or Item. The user can see the object but not operate on it..
|
Disable If {iDocType=2} |
|
Hide If {} |
Conditionally hides a Configuration, Page, Group, Item or List Line. The user will not see the object and any associated result statements within it are ignored.
|
Hide If {iDocType=3}
|
|
Find on {} where value {} |
Places in the Current Record Buffer (CRB) a record of data equal to or greater than the calculated value. It operates on all objects. |
Find on {PTMPTNO} where value {‘DSK01000’} |
|
Set search as calculation {} |
Sets up a search for a subsequent Find on search condition (or result) statement. It operates on all objects. |
Set search as calculation {SAHDDAT>=’1 JAN 2004′} |
|
Find on search {} where value {} |
Places in the Current Record Buffer (CRB) a record of data equal to or greater than the calculated value using a preceding search criteria. It operates on all objects. |
Find on search {SAHPTNO} where value {‘DSK’} |
|
Do {} returns {} |
This is a general purpose calculate and operate statement. The calculation can be any calculation or combination calculation with dot-notation. The return value must be a variable or ## reference to a field in which the evaluated result is placed. It operates on all objects.
Do {5.000} returns {iDataRow.ItemDataname.C2.3}
However this will only work if there are no Hide If statements in lines 1, 2 and 3. If there are, you need to use a special Do statement (one line): Do {iSOCustom.$SetListLineValue
(iDataRow.ItemDataname,'C2',3,5.000)}
returns {}
The reason for this is that you can use the Hide If command to eliminate lines inappropriate to a previous choice, so the list line number will become different from the design. |
Do {con(‘This job was created by ‘,m_UserId,’ at ‘,#T,’ on ‘,#D,’.’} returns {iJobRow.JOBCOMM} A more sophisticated statement using customisation could be: See also warning in Do result statement. |
|
Message User with {} |
This causes an Ok type message to be presented to the user with the entered text. Unlike other statements, the text of the message is not evaluated as a single calculation. I.E. Do not use quoted text or a con() function. However, you can embed variables in your text with the ##MyVariable## syntax. You use the ## syntax for any global or instance variable or calculation thereof. It operates on Page, Group or Item objects. |
Message User with {Today is ##m_MakeDate##.} |
|
Message User with {} if {} |
Conditional Ok message to the user (same rules as above apply). |
Message User with {Today is ##m_MakeDate##.} if {m_MakeDate<>#D} |
|
USER ACTION boundary |
This is a boundary in the conditions and does not actually perform any action itself. It only operates on an Item. All statements above this boundary statement are operated on when an Item is built. While those after this boundary statement are operated when a user event takes place on the Item. |
|
|
Comment {} |
This is a condition that does not perform any action, but provides the designer with the ability to document the condition statements with comments. |
Comment {The following was added to accommodate engineering design time – CR 12/2/2005} |
When Condition Statements Are Applied
The following activities activate different sets of conditions:
|
Element |
Action |
Condition Statements Actioned |
Purpose |
Example |
|---|---|---|---|---|
|
Configuration |
When testing an order configuration to decide whether the configuration will be offered to the user. |
Hide If |
To control access or relevance. |
Hide if {#D>dat(’30 DEC 2005′)}, |
|
Configuration |
When opening an order configuration. |
Find On |
Provides special actions before the first page, typically with Do statements. |
Do {1} returns {iDocType} |
|
Page |
When opening the first page and other pages with both Next and Back buttons. |
Disable If |
To disable or hide the page or message users when opening the page. |
Message User {Take great care with this page!} |
|
Group |
When placing a group on a page. |
Disable If |
To disable or hide the group. |
Disable If {iDocType=1} |
|
Item |
When placing an item inside a group. |
Set Initial Value |
To control the contents of variables and the status of an item. |
Set Initial Value {4} |
|
Item |
On a user activity event on an item. |
Set Value |
Controlling user data entry and other warnings. |
Set Value {#D+1} If {##Date##<#D} |
|
List Lines |
When adding or re-presenting a list line of a list item.
|
Hide If |
To conditionally hide particular list lines or to set values with a Do statement. |
Hide If {iDocType=1|(iDocType=3)} |
Result Statements
Results are run (acted on) in the following order:
- Configuration results are run when the configuration is opened.
- Page results are run immediately before the page is opened.
- All other results* are run when the page they belong to is to be replaced by the next page, or when the Finish button is clicked in the case of the last page. These are run in Group and Item sequence as they appear on the wizard window. For each Item, any List Line(s) are processed first, then the Item. Once all Items for a Group are processed, the Group results are finally processed. Result statements are never executed for hidden Items or List Lines or those belonging to hidden Pages or Groups.
![]() TIP: The order in which results are processed is important because one result statement may have to depend on the processing consequences of a previous result statement. In general, you can think of the Group results as those that act on the collective choices that the user has made within it. When an Item is a list, you can think of the Item results as those that act on the collective choices that the user has made on the list.
TIP: The order in which results are processed is important because one result statement may have to depend on the processing consequences of a previous result statement. In general, you can think of the Group results as those that act on the collective choices that the user has made within it. When an Item is a list, you can think of the Item results as those that act on the collective choices that the user has made on the list.
* List Line result statements are run only when the list line is selected by the user. The current line is usually the only list line run, except in the case of a multi-select headed list in which case results are run for all selected lines. The Select Dialog statement causes special results timing and duplication (see below).
All result statements are conditional, which means that they all contain an optional If statement. If this is left blank (shown as “if {}”), no conditional test is applied and the result statement will always be run. If you enter a conditional calculation the result statement will only be run if the calculation evaluates to a non-zero number or a logical true (kTrue).
![]() NOTE: The Results for any Item that is disabled, whether by using a condition statement or another technique such as a Do statement, are ignored automatically. If a Group is disabled all Items within it are disabled.
NOTE: The Results for any Item that is disabled, whether by using a condition statement or another technique such as a Do statement, are ignored automatically. If a Group is disabled all Items within it are disabled.
The following statements are available:
|
Statement |
Action |
Example |
|---|---|---|
|
Include line {} if {} |
Adds a line item to the document. The line is not given a line number at this stage, it is given a Line Name (temporarily held as iJbiList.LineName). The line can subsequently be referenced by the Line Name in Exclude line and Set Line Value result statements. When the line is added to the iJbiList, that line becomes the current line in the list so immediate Set Line Value result statements can omit the LineName prefix.
Some processing or data change has not be completed in the “Sales Document Configurator” window. Click OK now to complete it or Cancel to abandon it. To avoid this being unnecessarily annoying, this only becomes effective once an Include Line or Exclude Line result statement has resulted in at least 1 line item for the document. |
Include line {01FirstLine} if {##IncludeCheckbox##}
|
|
Exclude line {} if {} |
Removes a line item from the list of line items for the document. You must provide the Line Name given to the line in it’s Include line statement. This happens in memory as soon as the result statement is run. So errors will result if there are subsequent Set Line Value statements for that line name. This statement will change the iJbiList current line if the line removed is itself the current line. |
Exclude line {01FirstLine} if {##Colour##=’BLUE’} |
|
Set Header Value {} to {} if {} |
Sets a value in the document header. You need to state the header field and a calculation which evaluates to the value you want to give it. An error will occur if the field entered is not a valid JOBFILE field, or SOHBOND (Dispatch complete flag). Use the Tool button on the Sales Document Configuration Results Tool window, when this result statement is selected, to see which fields can usefully be changed with this command. |
Set Header Value {JOBCREF} to {##CusRef##} if {len(##CusRef##)} |
|
Set Line Value {} to {} if {} |
Sets a value for a line item from the list of line items for the document. You should provide the Line Name given to the line in it’s Include line statement, unless you are confident that the line you want to change is the current line in the list. This statement will change the iJbiList current line if a line name is included. |
Set Line Value {01FirstLine,JBIQTY} to {5} if {}
|
|
Document Type is {} if {} |
Sets the document type that will be created by the configuration. The following are valid calculation results:
The instance variable iDocType is consequently set to 0, 1, 2 or 3, as above, by this statement and therefore can be referenced in subsequent condition or result statements. |
Document Type is {‘SO’} if {##DocType##} |
|
Create part like {} with new number {} if {} |
Creates a part list line for a new part to be added to the parts master before creating the document. You need to identify the part that is already in the database whose details are copied for the new part and give it a new part number. If the part is to be assigned a SO-999999-999 number in the same way as Order Item Configuration, you should use ???? as the first four characters of the number. Any other characters will be added to SO-999999 after the document is created. If you use just ???? then the full SO-999999-999 will be applied. After adding the part to iNewPtmList, any Bills of Materials, Process Route Operations, Quality Tests and Serial Number Structure records are copied from the Like Part to iNewBomList, iNewProList, iNewQapList and iNewSnsList. The current line of the iNewPtmList will be set to the new part and the PTMFILE CRB is setup. If the part has already been created in a previous Create part like statement the iNewPtmList current line will be reset. Note that the SO shown above will in fact be the Parent Number prefix in SO Configuration, or Parent Number prefix in Job Configuration depending on document type, set up in File — System Manager — Company Details. |
Create part like {‘AHD00080’} with new number {‘????’} |
|
Set Part Value field {} to {} if {} |
This sets a value for a new part in the iNewPtmList. If you are not confident that the current part list line is set to the part you intend, prefix the field with the new part number followed by a comma, then the field name. |
Set Part Value field {‘????’,PTMDESC} to {‘New part description’} |
|
Add/Change Component {} with quantity {} if {} |
This sets a value for a new BoM component in the iNewBomList. If you are not confident that the current list line is set to the component you intend, prefix the field with the parent part number followed by a comma, then the component part number, then the field name. The parent part is a calculation and the component can contain ## syntax variables but the fieldname must be a proper BOMFILE fieldname. If the Parent and Component combination does not exist, a new iNewBomList line will be added. To prevent a BoM line being created, set its BOMQTY value to zero. The iNewBomList will remain in the list but it will be ignored at the point of creating records in the database. |
Add/Change Component {‘????’,SWARF2,BOMQTY} with quantity {5} |
|
Add/Change Route Op. {} with quantity {} if {} |
This sets a value for a new Route operation in the iNewProList. If you are not confident that the current list line is set to the operation you intend, prefix the field with the parent part number followed by a comma, then the operation number, then the field name. The parent part is a calculation and the operation can contain ## syntax variables but the fieldname must be a proper PROFILE fieldname. If the Parent and Operation combination does not exist, a new iNewProList line will be added. To prevent an operation line being created, set its PROOPNO value to zero. The iNewProList will remain in the list but it will be ignored at the point of creating records in the database. |
Add/Change Route Op. {‘????’,020,PRORUNT} with quantity {0.250} |
|
Add/Change Quality Test {} with quantity {} if {} |
This sets a value for a new Quality test in the iNewQapList. If you are not confident that the current list line is set to the test you intend, prefix the field with the part number followed by a comma, then the test number, then the field name. The parent part is a calculation and the test number can contain ## syntax variables but the fieldname must be a proper QAPFILE fieldname. If the Parent and Test combination does not exist, a new iNewQapList line will be added. To prevent a test line being created, set its QAPNO value to zero. The iNewQapList will remain in the list but it will be ignored at the point of creating records in the database. |
Add/Change Quality Test {‘????’,10,QAPMIN} with quantity {4.65} |
|
Add/Change Serial Structure {} with quantity {} if {} |
This sets a value for a new Serial Number Structure in the iNewSnsList. If you are not confident that the current list line is set to the structure you intend, prefix the field with the parent part number followed by a comma, then the component part number, then the field name. The parent part is a calculation and the test number can contain ## syntax variables but the fieldname must be a proper SNSFILE fieldname. If the Parent and Test combination does not exist, a new iNewSnsList line will be added. To prevent a test line being created, set its SNSNO value to zero. The iNewSnsList will remain in the list but it will be ignored at the point of creating records in the database. |
Add/Change Serial Structure {‘????’,DSK01000,SNSQTY} with quantity {4} |
|
Find on {} where value {} if {} |
Operates in the same manner as the same Condition Statement – see above. |
Find on {PTMPTNO} where value {‘DSK01000’} if {iDocType=1} |
|
Set search as calculation {} if {} |
Operates in the same manner as the same Condition Statement – see above. |
Set search as calculation {SAHDDAT>=’1 JAN 2004′} if {iDocType=1} |
|
Find on search {} where value {} if {} |
Operates in the same manner as the same Condition Statement – see above. |
Find on search {SAHPTNO} where value {‘DSK’} if {iDocType=1} |
|
Do {} returns {} if {} |
Operates in the same manner as the same Condition Statement – see above.
|
Do {con(‘This job was created by ‘,m_UserId,’ at ‘,#T,’ on ‘,#D,’.’} returns {iJobRow.JOBCOMM} if {iDocType=1} |
|
Select Dialog of type {} into {} if {} |
Opens a selection dialogue window. The value must be one of the following non-calculated literal texts:
The calculation must be a field into which the part number the user selects is placed, typically iJobRow.JOBCUSC or iJbiList.JBIPTNO respectively. This is unique as a result statement as it re-executes the results, other than any Select Dialog and Post Process statements when the user confirms his selection in the dialog. The reason for this is that the user response to a dialogue takes place later than the occasion the result is first run. As a consequence any result statements that select a list line or setup the CRB will have potentially been disrupted. So re-executing them enables you to re-establish list line selections and the CRB state before the product of the dialogue is applied. |
Include line {02EngPart} if {##EngExtraPart##}
|
|
Post Process command {} with {} if {} |
Adds an activity to a list of activities that will be carried out after the document has been created. Full details of the range of available post-processing activities is listed below. |
Post Process command {PrintDoc} with {Screen,Doc} if {##Print##} |
|
Prevent Page Close with message {} if {} |
This statement does not act on data in any way. If the If Calculation evaluates to true, the wizard page will not close when the Next button is clicked by the user and optionally will notify the user with a message. It can be used to ensure important data is properly entered by the user.
|
Prevent Page Close with message {Before proceeding you must select a customer in the selection window.} if {iJobRow.JOBCUSC=”} If more than one statement is encountered on for a page, the messages are combined. |
|
Comment {} |
Operates in the same manner as the same Condition Statement – see above. |
Comment {The following was added to accommodate engineering design time – CR 12/2/2005} |
Post Processing
Post processing statements can be placed anywhere in the order configuration and are acted upon only after the document has been created and all other processing is complete. To activate post processing you need to set a result statement in the form of:
Post Process command {} with {} if {}
The statement parameters, if any, are not implemented as calculations. They must be entered as actual text values, for example Screen,Doc without any quotes.
The If Calculation takes on the normal form. The other two parts of the statement take on the following optional forms:
|
Action = Value |
Parameters = Calculation |
Remarks |
|---|---|---|
|
PrintDoc |
Destination,Type or just Type to print to the user’s current report destination. Valid report destinations are:
|
This result statement will print documents. You can have any combination of PrintDoc commands in your order configuration. Each will be acted on in turn. A typical example is: Valid Document Types are:
|
|
MaintDoc |
none |
This result statement will cause the appropriate document maintenance window to open with the document loaded. The user will get an error message if they don’t have access privileges. |
|
ViewDoc |
none |
This result statement will cause the appropriate document review window to open with the document loaded. The user will get an error message if they don’t have access privileges. |
|
Message |
none |
This result statement will simply provide an Ok message to the user telling them the type of document, its number and the customer it has been created for. |
|
CreateWOs |
Projected,Backflushed |
This result statement will only operate for Sales Orders or Jobs. It causes the system to create Work Orders for all parts that are manufactured parts (part type M or part type A where there is a BoM) for the quantity required on the SO or Job. If the Projected parameter is set to 1, the quantity on the WO will be less the projected quantity. If the backflushed parameter is set to 1, the WOs created will all be set for backflushing. WOs created will be given a reference of: |
|
CreatePOs |
Projected,RFQ |
This result statement will only operate for Sales Orders or Jobs. It causes the system to create Purchase Orders for all parts that are purchased (part type B or O or part type A where there is no BoM) for the quantity required on the SO or Job. If the Projected parameter is set to 1, the quantity on the PO will be less the projected quantity. If the RFQ parameter is set to 1, the RFQs will be created rather than confirmed Purchase Orders. PO lines created will be given a reference of: |
|
CreateOutPOs |
RFQ |
This result statement will only operate for Jobs only. It causes the system to create Purchase Orders for all outwork Work Centre operations for the quantity required on the Job item. If the RFQ parameter is set to 1, RFQs will be created rather than confirmed Purchase Orders. PO lines created will be given a reference of: |
Customisation Issues
![]() NOTE: Caliach Subscription Support does not extend to the design of Sales Document Configurations or any customisation issues.
NOTE: Caliach Subscription Support does not extend to the design of Sales Document Configurations or any customisation issues.
There are two customisation capabilities for the document configuration system.
oSOCustom Object Class
This is available in OpenVision and is instantiated inside the configuration environment as an instance variable iSOCustom.
Custom public methods (methods with names starting with a $ character) can then be called in calculations or Do condition and result statements. For example:
Do {iSOCustom.$MyMethod(##MyVariable##} returns {##MyVariable##}
Methods can be written for any function you need but note should be made if the CRB is effected and if so following statements should not depend on a consistent CRB state.
Subwindow Custom Window Classes
You can duplicate the wSOConfigSubWinDemo class in OpenVision and use that as the basis for a subwindow of your own.
For more details see the Sales Document Configuration Subwindow window help.
The window has 5 tab panes.
Configurations
Pages
Groups
Items
List Lines
Configurations
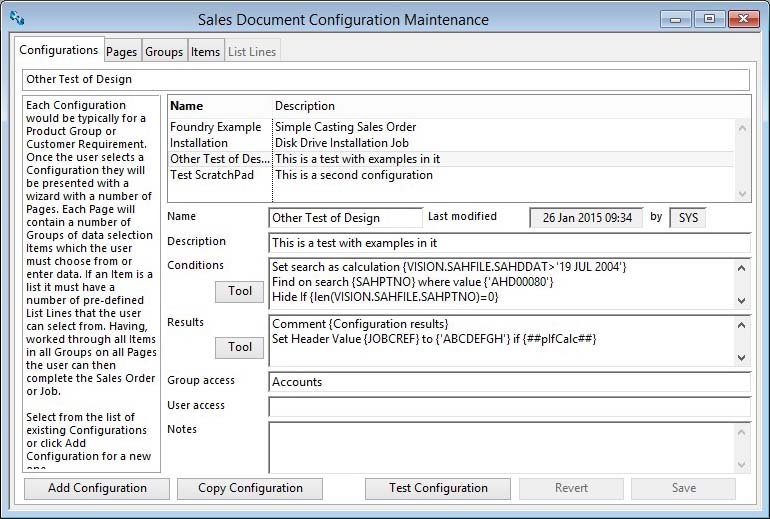
|
Field |
Description |
|---|---|
|
Configuration List |
List of order configurations. Click to select and edit details here and on other tab panes. Use the delete key to permanently remove. |
|
Name |
Sales Document Configurations. Configuration name. {SOCFILE.SOCNAME char 30 Idx} |
|
Last modified date and time |
Sales Document Configurations. Last modified date and time. {SOCFILE.SOCMODD date datetime} |
|
User that last modified the configuration |
Sales Document Configurations. Last modified user ID. {SOCFILE.SOCINIT char 3} |
|
Description |
Sales Document Configurations. Description. {SOCFILE.SOCDESC char 255} |
|
Conditions |
Sales Document Configurations. Conditions that are checked before the configuration can be used. {SOCFILE.SOCCOND char 10000000} |
|
Results |
Sales Document Configurations. Results applicable to the entire configuration. {SOCFILE.SOCRESU char 10000000} |
|
Group list |
Sales Document Configurations. Group access list for restricted access to others (comma delimited). {SOCFILE.SOCGROU char 1000} |
|
User list |
Sales Document Configurations. User access list for restricted access to others (comma delimited). {SOCFILE.SOCUSER char 1000} |
|
Notes |
Sales Document Configurations. Modification and design notes. {SOCFILE.SOCNOTE char 10000000} |
|
Button |
Action |
|---|---|
|
Tool |
Click to open the Conditions Design Tool. |
|
Tool |
Click to open the Results Design Tool. |
|
Add Configuration |
Click to add a new configuration. The name must be unique. |
|
Copy Configuration |
Click to copy the currently selected configuration to make a new one. The name must be unique. |
|
Test Configuration |
Click to test the currently selected configuration. |
|
Revert |
To revert any changes to the previously saved version. |
|
Save |
To save the changes you have made to the data file. |
Pages

|
Field |
Description |
|---|---|
|
Pages List |
List of Pages for the selected configuration. Click to select. Drag and drop to re-order. Use the delete key to remove. |
|
Name |
The internal name for the page. This can be seen as tooltip on the page title field on the wizard. |
|
Description |
The description that is shown for the page at the top of the wizard. This can contain ## syntax variables or calculations. For example, you can add the Customer code and name to the page description using the following description text: |
|
Conditions |
The conditions that apply to the page. |
|
Results |
The result consequences that apply to the page. |
|
Button |
Action |
|---|---|
|
Tool |
Click to open the Conditions Design Tool. |
|
Tool |
Click to open the Results Design Tool. |
|
Add Page |
Click to add a new Page. The name must be unique. |
|
Copy Page |
Click to copy the currently selected Page to make a new one. The name must be unique. |
|
Test Configuration |
Click to test the currently selected configuration. |
|
Revert |
To revert any changes to the previously saved version. |
|
Save |
To save the changes you have made to the data file. |
Groups
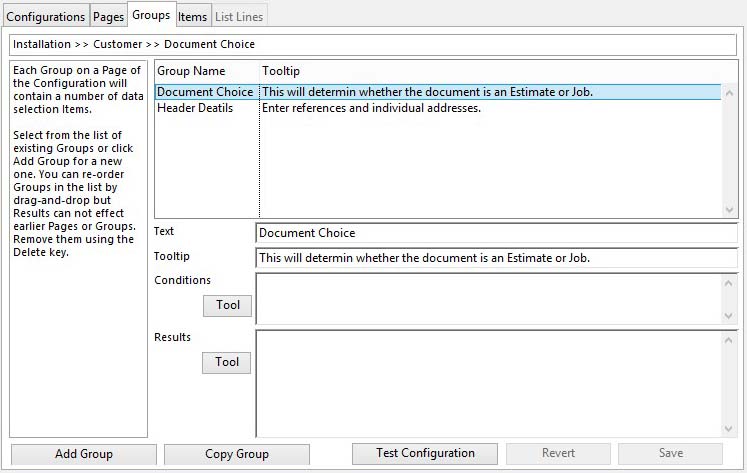
|
Field |
Description |
|---|---|
|
Groups List |
List of Groups on the selected Page for the selected Configuration. Click to select. Drag and drop to re-order. Use the delete key to remove. |
|
Text |
The name that will appear on Group. This must be alphanumeric, start with a non-digit but can contain underscores and spaces. |
|
Tooltip |
The tooltip for the group box. |
|
Condition |
The conditions that apply to the Group. The Find And Replace context (right-click) menu is available for this field. |
|
Result |
The result consequences that apply to the group. The Find And Replace context (right-click) menu is available for this field. |
|
Button |
Action |
|---|---|
|
Tool |
Click to open the Conditions Design Tool. |
|
Tool |
Click to open the Results Design Tool. |
|
Add Group |
Click to add a new Group. The name must be unique. |
|
Copy Group |
Click to copy the currently selected Group to make a new one. The name must be unique. |
|
Test Configuration |
Click to test the currently selected configuration. |
|
Revert |
To revert any changes to the previously saved version. |
|
Save |
To save the changes you have made to the data file. |
Items

|
Field |
Description |
|---|---|
|
Items List |
List of Items in the selected Group. Click to select. Drag and drop to re-order. Use the delete key to remove. |
|
Fieldtype drop-down list |
Select from the dropdown list of field types for the item. The datatype may be affected by your choice. |
|
Multi-select |
Check to permit multiple selections in the headed list. |
|
Force Uppercase |
Check to force characters uppercase. |
|
Dataname |
The internal dataname for the data. This needs to be unique and can be referred to in conditions and results. This must be alphanumeric, start with a non-digit but can contain underscores. |
|
Datatype drop-down list |
Select from the dropdown list of field types. The subtype list will be reset depending on your selection. |
|
Data subtype drop-down list |
Select from the dropdown list of data subtypes. The subtype list will be reset depending on your selection of data type. |
|
Maximum length |
The maximum length of character fields. |
|
Text |
Text for the item. For headed lists this is the heading and can be comma delimited to provide multiple columns. |
|
Tooltip |
The tooltip seen by the user when the mouse is over the item. |
|
Condition |
The condition logic that applies to the item. The Find And Replace context (right-click) menu is available for this field. |
|
Result |
The result consequences that apply to the item. The Find And Replace context (right-click) menu is available for this field. |
|
Button |
Action |
|---|---|
|
Tool |
Click to open the Conditions Design Tool. |
|
Tool |
Click to open the Results Design Tool. |
|
Add Item |
Click to add a new Item. The data name must be unique. |
|
Copy Item |
Click to copy the currently selected Item to make a new one. The data name must be unique. |
|
Test Configuration |
Click to test the currently selected configuration. |
|
Revert |
To revert any changes to the previously saved version. |
|
Save |
To save the changes you have made to the data file. |
List Lines
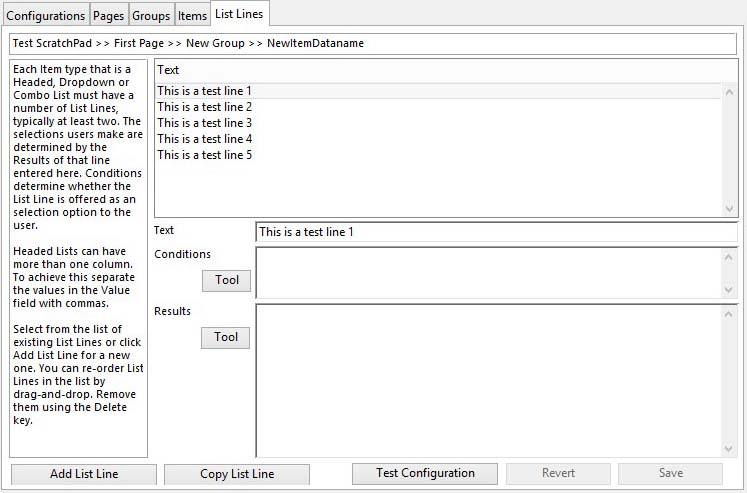
|
Field |
Description |
|---|---|
|
List Lines List |
List of lines for the List item. Click to select. Drag and drop to re-order. Use the delete key to remove. |
|
Text |
Text for the List Line. For headed lists this can be comma delimited to provide multiple columns. |
|
Condition |
The condition logic that applies to the List Line for it to be offered to the user. The Find And Replace context (right-click) menu is available for this field. |
|
Result |
The result consequences that apply to the list line if selected by the user. The Find And Replace context (right-click) menu is available for this field. |
|
Button |
Action |
|---|---|
|
Tool |
Click to open the Conditions Design Tool. |
|
Tool |
Click to open the Results Design Tool. |
|
Add List Line |
Click to add a new List Line. |
|
Copy List Line |
Click to copy the currently selected List Line to make a new one. |
|
Test Configuration |
Click to test the currently selected configuration. |
|
Revert |
To revert any changes to the previously saved version. |
|
Save |
To save the changes you have made to the data file. |
| See also: – |
Compiled in Program Version 5.10. Help data last modified 4 Jun 2012 04:49:00.00. Class wSOConfigMaint last modified 10 Oct 2017 11:48:47.
![]() Reference Contents > Manager Controls > Sales Document Configuration Maintenance
Reference Contents > Manager Controls > Sales Document Configuration Maintenance