– Introduction to Client-Server SQL
![]() Reference Contents > Client-Server SQL Database > – Introduction to Client-Server SQL
Reference Contents > Client-Server SQL Database > – Introduction to Client-Server SQL
SQL (Structured Query Language) is a programming mechanism between client computers and a server that delivers and manipulates structured data. It is ubiquitous in modern network data systems.
This is not a tutorial on SQL. If you want to learn more about it there are numerous tutorials on the Internet and most colleges and even schools now teach it. This introduction is provided to show how Caliach Vision generally implements it and therefore the power it offers you. SQL can be written to control the server, create and modify databases, update, insert and delete data, and locate and return data to the client computer. It is the latter that we will cover in this introduction as all other activities are written internally in Caliach Vision and users need not concern themselves with these aspects of the language.
Caliach SQL Design Principals
There are a number of principals that Caliach have adopted in the implementation of SQL for Caliach Vision.
Security: An SQL database is essentially open to anyone. This is always true with SQLite and with other server engines it is true if the user has a username and password which gain them sufficient privileges. There are numerous client programs that can read and manipulate data. So we cannot guarantee that data integrity is maintained outside Caliach Vision.
To maximise performance and cross-engine capability we:
|
Policy |
Reason |
|---|---|
|
The database engine does not enforce any foreign keys. |
This improves performance and cross-engine capability. |
|
All table columns are set to NOT NULL. |
This makes it harder for casual row inserts by vandals (except columns that in a major upgrade were needed during the upgrade but were obsolete thereafter). |
|
No stored procedures are used. |
For cross-engine capability. |
|
No row or column triggers are used. |
For cross-engine capability. |
|
Vision maintains the database structure. |
There is a managed mechanism for site data customisation. You can add columns to standard tables (if set permitting NULL) and additional tables on the database but they will be ignored by Caliach Vision. Changing column properties outside the Caliach Vision customisation framework will lead to Caliach Vision overwriting those changes. Use the customisation framework for adding custom indexes. |
|
Column names are case-insesitive-unique in the database. |
This rule enables the program to establish the table without table.column syntax being used. By convention within Caliach Vision all column and table names are upper-case but some servers fold the names to lower-case automatically, so viewing table or column names on the server will show them lower-case. |
Error Reporting
When SQL instructions are passed to the server, it first looks at the instructions to see that they make sense and that the server can do something useful with the instructions it has been given. SQL is an English-like syntax that is very particular. A miss-spelling, comma or single-quote in the wrong place will create an error. When the client sends a SQL instruction that the server cannot use, it returns an error message which Caliach Vision reports to the user in an OK message. Becuase they are longer than typical normal messages a special OK message window is employed.

In the example shown above, we have artificially created an error by entering XXXXX as an Ad Hoc Extra Where in the Masters — Parts — Print Reports window and attempted to Print. Note that the server is atempting to pinpoint where in the instruction it has found an error. This is best illustrated when in a monospaced font (see the ^ pointer in the last line). You can switch to a normal proportional font using the Change Font button.
Error messages can occur at any time. Such errors are also added to the Omnis Trace Log and The File — Preferences — Message Log, so if the user dismisses the message it can be re-read in either of the logs.
English is the international language of SQL and tyically all messages returned by the server are in English. Caliach Vision does not attempt to translate these into other languages supported by the program.
User Logon and Logoff
![]() NOTE: This section on User Logon and Logoff has been added to the help for V5.0400 when changes were made to make the process more flexible. One effect of the changes is to make it less likely that rouge users who have not cleanly logged off, or leave the program open overnight, will clog up the available licensed users limit.
NOTE: This section on User Logon and Logoff has been added to the help for V5.0400 when changes were made to make the process more flexible. One effect of the changes is to make it less likely that rouge users who have not cleanly logged off, or leave the program open overnight, will clog up the available licensed users limit.
Before Logon: When the program starts (or when any of the following File menu commands are operated: Logon as Different User, Restart Program or Change Database, all of which perform a Logoff first – see below), and before the User Logon window is presented, the program performs a number of tasks in preparation for user logon:
- Check for minimum operating resources.
- Reads the Terminal/Terminal.inf file so it can locate other files from their correct locations.
- Opens the Strings-??.stb file so that language-sensitive strings are available.
- Initiates the program help and multi-lingual system.
- Checks for any program updates (ProgSyst.db and ProgUser.db files) and applies them if they are new.
- Reads the Logon Settings and opens the User Logon window.
User Logon: With a User ID and Password the program can then attempt to attach to the Database server. In the special case of SQLite, where the database engine is embedded, this involves simply opening an operating system file. There is no additional security with SQLite. With MySQL and PostgreSQL, these engines exist as running services on the server or other computer. They connect to the user’s computer through a session. This session allows two-way communication between the program and the server engine over TCP/IP network protocols. To make a connection in the first instance, the following must be available from the Database Logon Settings (held in the Logon.db file):
- The correct IP address and Port and it must not be blocked by any firewalls.
- An appropriate server username and password which assigns privileges for the user in the database.
- The name of the database inside the database server engine.
With any of the above incorrect, a session can not be established and the Logon will fail, with an appropriate message.
Once the session is operational the program first verifies that the database structure on the server is synchronised with the structure the program expects. If an upgrade has altered a table by adding a column, for example, that table needs altering on the server. This can be a time consuming process, so normally it is avoided unless some change is recognised. Thereafter, a logon process is undertaken which involves:
- The License is verified (Caliach.inf file).
- The company details and system preferences are loaded and verified.
- The User ID and Password are verified and settings loaded.
- The User is awarded a session Token (see “About Tokens” below).
- A User Session Log entry is created.
- The About Caliach Vision window is opened, replacing the User Logon window.
- The menus are loaded and Caliach Vision user/group privileges applied to them.
- Other settings and options are loaded, such as pointers to customisation.
- A Tip Of The Day is presented.
- Any Workflow Alert Check, appropriately set, are run and displayed.
- Any KPIs, appropriately set, are run and displayed.
- If a upgrade changed the version number an Upgrade Notes window will display.
- 5 seconds after completion, or with a click on the About Caliach Vision window, it will close and the Navigator will open, if set to Open on Startup.
Up to 5 above, if any activity fails or produces and error the Logon is abandoned with an appropriate message. If not, when completed, you are fully operational.
You can view the current set of logged on users in File — System Manager — Monitor and from there you can view the current User Session Log and history.
User Logoff: This is typically fast and not noticed by the user. It is automatically triggered if you quit or exit the program using the Close Box or operating File — Logon as Different User, Restart Program, Change Database, or Exit. In addition, some functions such as Ledgers Month-End or MRP Run have options to exit on completion. The sequence of activities are as follows during logoff:
- Internal user settings are saved in the database.
- The user’s windows and lists last-used settings are saved.
- The user’s token is deleted.
- The user’s session log entry will be closed and updated with statistics.
- All windows, menus and other instantiated objects are closed and memory released.
- Unless you are exiting the program, the User Logon window will open and File menu will be replaced by the startup File menu.
There are consequences if this process is not cleanly performed by the program. An operating system Crash or computer power loss can by-pass the logoff process. This will leave the user token in the token table on the database
![]() NOTE: In network failure or server failure circumstances such that the user looses the connection to the DBMS, a failed logoff will occur. The program is then mostly inoperable so there is little chance of obtaining debugging information from the Message Log or Omnis Trace Log. As a result, when an error is identified in the Logoff process, a text file is automatically generated named LogoffDumpYYYYMMDDHHMMSS.txt (where the letters are a timestamp). It is placed in the user’s Caliach Vision installation folder, alongside the Vision.lbs file. This feature was added in V5.0406. Added to V5.100 was a further feature that warns users (when the About Caliach Vision window closes) that 5 or more of these LogonDump… files exist and will delete all but the latest unless the user clicks Cancel on the message box. If a user accumulates 5 or more LogoffDump… files, when the About Caliach Vision window closes the user will receive a warning and can delete all but the last log file.
NOTE: In network failure or server failure circumstances such that the user looses the connection to the DBMS, a failed logoff will occur. The program is then mostly inoperable so there is little chance of obtaining debugging information from the Message Log or Omnis Trace Log. As a result, when an error is identified in the Logoff process, a text file is automatically generated named LogoffDumpYYYYMMDDHHMMSS.txt (where the letters are a timestamp). It is placed in the user’s Caliach Vision installation folder, alongside the Vision.lbs file. This feature was added in V5.0406. Added to V5.100 was a further feature that warns users (when the About Caliach Vision window closes) that 5 or more of these LogonDump… files exist and will delete all but the latest unless the user clicks Cancel on the message box. If a user accumulates 5 or more LogoffDump… files, when the About Caliach Vision window closes the user will receive a warning and can delete all but the last log file.
User Tokens: In client-server environments communications are from client to server, which responds back to the client. There is no channel of communication directly from one client to another client. In other words, a user can ask and receive data from the server but can never talk directly to another user. This makes it hard for the system to know who has sessions running at any one time, who has gone to sleep or the dentist, leaving the program running.
A token system provides a way of accomodating this. Each user logon creates a token that can be uniquely identified as belonging to that user. The token contains an expiry date and time so that it does not live indefinitely. This so called lease-time is 15 minutes. While a user operates within the program their token’s expiry is regularly extended to the lease-time after the current server time (known as a token Refresh). However, if the user becomes inactive and the expiry passes, other users can see it as idle. Regular reading and refreshing of the tokens can also substitute for client to client messaging. For example, to signal to other users that a user is waiting to perform a single-user operation and that they must logoff.
![]() NOTE: The Lease-Time of 15 minutes is a compromise. If it is too short users can more readily “loose their place” in the licensed user limit of active users. If it is too long, in the event of major network disruption or power-out when many users fail to logoff cleanly, there will be a longer period of interruption before rogue entries are cleaned out.
NOTE: The Lease-Time of 15 minutes is a compromise. If it is too short users can more readily “loose their place” in the licensed user limit of active users. If it is too long, in the event of major network disruption or power-out when many users fail to logoff cleanly, there will be a longer period of interruption before rogue entries are cleaned out.
User tokens are either active or idle. They are active if they have not yet expired. After expiry they are assumed to be idle. There is also a single-user-request flag. This identifies that a user is waiting to perform an operation that requires exclusive use of the database, and that other users should logoff. There are therefore a number of rules that apply when using the token system that affect Logon and during user activity that triggers token refresh. They are:
- A user can not logon if there are already the licensed user limit of active tokens.
- A user can not logon if another user has a single-user-request on their token and is active.
- When a user logs on and finds all tokens are expired*, those tokens are deleted. (see Note below).
- When a user logs on and there are no other active tokens, old rows of the User Session Log will be deleted (controlled by optSessionLogMaxDays default 90).
- On refresh and the user’s token has been deleted, the user will be forced to logoff.
- On refresh and a user’s token is found idle it will not be able to become active if the license user limit will be exceeded.
- On refresh a user will be forced to logoff if another user has a single-user-request on their token. The user can choose a single delay of optSingleUserDelaySecs to finish their work before being logged off.
- On refresh and the user token is idle with a total session idle time exceeding the maximum limit (set by optSessionIdleMaxMins with default 240) the user will be forced to logoff.
![]() NOTE: * User tokens are typically refreshed each time a window is opened within Caliach Vision. This does mean that if a user is working away within windows without triggering the opening of a fresh window, then the user token is not refreshed and can expire even though the user is working within the program. When this happens a new user logon will trigger the removal of the working user’s token, thus forcing that user to perform a fresh logon on the next occasion a new window is opened – annoying! This situation has been addressed in V5.0401 for PostgreSQL running installations (MySQL cannot support this yet). It adds a test on the pg_stat_activity view (SELECT * FROM pg_stat_activity). This is a internal view of the PostgreSQL server’s connections to users and contains a number of measures of recent activity. The additional tests look at all connection to the database that have been made by the application_name caliachvision where the state_change date and time is older than the current time minus the lease time. The state_change is updated each time the user connection makes a request to the server. So this test covers the working-in-open-windows scenario. A new user logon may see all tokens expired but will not delete them unless the server connections have equally been idle for at least the standard lease time, if indeed the user’s connection is there at all.
NOTE: * User tokens are typically refreshed each time a window is opened within Caliach Vision. This does mean that if a user is working away within windows without triggering the opening of a fresh window, then the user token is not refreshed and can expire even though the user is working within the program. When this happens a new user logon will trigger the removal of the working user’s token, thus forcing that user to perform a fresh logon on the next occasion a new window is opened – annoying! This situation has been addressed in V5.0401 for PostgreSQL running installations (MySQL cannot support this yet). It adds a test on the pg_stat_activity view (SELECT * FROM pg_stat_activity). This is a internal view of the PostgreSQL server’s connections to users and contains a number of measures of recent activity. The additional tests look at all connection to the database that have been made by the application_name caliachvision where the state_change date and time is older than the current time minus the lease time. The state_change is updated each time the user connection makes a request to the server. So this test covers the working-in-open-windows scenario. A new user logon may see all tokens expired but will not delete them unless the server connections have equally been idle for at least the standard lease time, if indeed the user’s connection is there at all.
![]() NOTE: * In version 5.1000 the process of deleting expired tokens was amended. The process now first deletes only tokens belonging to the same user as is currently logging on. The remaining expired tokens are then only deleted if the number exceeds more than 50% of the site licensed user count. This restriction is designed to reduce the number of forced logoffs at times of low activity on small sites. Additionally, with this change the File — System Manager — Monitor automatically deletes tokens that are expired for more than 6 hours.
NOTE: * In version 5.1000 the process of deleting expired tokens was amended. The process now first deletes only tokens belonging to the same user as is currently logging on. The remaining expired tokens are then only deleted if the number exceeds more than 50% of the site licensed user count. This restriction is designed to reduce the number of forced logoffs at times of low activity on small sites. Additionally, with this change the File — System Manager — Monitor automatically deletes tokens that are expired for more than 6 hours.
There are a number of options that effect this system:
|
Name |
Privileges |
Description |
|---|---|---|
|
optSessionIdleMaxMins |
Sy |
Maximum session idle time in minutes before forcing a logoff. minimum of 5, maximum 720, default 240. |
|
optSessionLogMaxDays |
Sy |
The maximum age in days of USLFILE table rows are automatically deleted. Minimum 10, maximum 365, default 90. |
|
optSingleUserDelaySecs |
S, Sy, U |
Single-user other user delay logout in seconds. Minimum 60, maximum 600, default 180. |
You can view the current set of logged on users in File — System Manager — Monitor which shows the current status of tokens. In addition, from there you can view the current User Session Log and history on which is stored a number of statistics relating the session activity including refresh and idle time.
Transactions
Client-Server databases engines almost always, at least attempt, to provide for ACID Transactions (see Wikipedia for details). Caliach Vision has been written to accommodate this. The best way to describe a Transaction is by example. Say you are simply adding an extra part to a Purchase Order. First the PO line item has to be added to the PO Items table, then the Part on-order quantity needs to be updated, then an Inventory history row needs to be added to the inventory history table. That is a minimum of 3 internal data manipulations. Internally, of course, there are many more – updating of indexes, etc.. At any point an error could occur; the network could fail, the server or client computer could crash, the disk could fail to write reliably. With these data manipulations being processed sequentially and discretely, one-by-one, as is the case with pre-V5 Omnis local datafiles, the overall system would be compromised. A PO line item with no Inventory audit history, for example. Half the job done with unpredictable results in the data. Scale that up to say, the dispatch of a 250 item Sales Order, or a General Ledger month-end, where possibly thousands of data changes are performed and you can see how vulnerable tranditional systems are.
The solution to this is to wrap the entire activity in a virtual single transaction. Off you go, do all this, but if anything goes wrong make it as though nothing has happened at all. Effectively this is the process:
Begin Transaction
....now do loads of things
if there is an error: Rollback
if all is well: Commit everything to disk at one time
If the commit is not issued by the client, perhaps because of disconnection, the server assumes the worst and automatically rolls back any changes.
At least in the case of PostgreSQL and MySQL, while this is going on, other users see no changes until the commit is fully executed to disk. There is never a half-way-house.
Most data-changing activities in Caliach Vision are wrapped as a single transaction. There is an indication to the user in the form of an icon at the beginning of the task bar. If no transaction is underway it is green:

While a transaction is underway the colour will change to amber. If an error is detected and a rollback forced it will turn red, otherwise it will return to green. Note that at the end of the tooltip the time in seconds the last transaction took is displayed.
![]() NOTE: Transactions in PostgreSQL behave subtly differently from other database engines. When a row is inserted a Sequence object within the database is used to provide the next Record Sequence Number, a bit like an auto-advancing counter. For example, the Transaction Serial Id (TRASEQ) in Ledger Transactions. PostgreSQL does not include this Sequence activity within it’s Searialisable Transaction model. As a result, in the event of an error during a transaction that has inserted rows into the database, and therefore advanced the Sequence, on rollback the Sequence will not be returned to it’s original, pre-transaction, value. The effect of this is that record sequence numbers do not always advance by 1. There can be gaps when serialisable transactions fail and are automatically rerun when contention between user activities is spotted. In the normal course of events this is unimportant. However, in Ledger Audit Trail analysis when looking for manually deleted transaction, this behaviour should be recognised as normal. Missing TRASEQ numbers is NOT proof of manually deleted data rows.
NOTE: Transactions in PostgreSQL behave subtly differently from other database engines. When a row is inserted a Sequence object within the database is used to provide the next Record Sequence Number, a bit like an auto-advancing counter. For example, the Transaction Serial Id (TRASEQ) in Ledger Transactions. PostgreSQL does not include this Sequence activity within it’s Searialisable Transaction model. As a result, in the event of an error during a transaction that has inserted rows into the database, and therefore advanced the Sequence, on rollback the Sequence will not be returned to it’s original, pre-transaction, value. The effect of this is that record sequence numbers do not always advance by 1. There can be gaps when serialisable transactions fail and are automatically rerun when contention between user activities is spotted. In the normal course of events this is unimportant. However, in Ledger Audit Trail analysis when looking for manually deleted transaction, this behaviour should be recognised as normal. Missing TRASEQ numbers is NOT proof of manually deleted data rows.
Date, Time and Datetime
Clock
With SQL the server is common to all users connected to it and the date and time on the server computer is therefore synchronised across all users connected. In all data respects Caliach Vision implements server date and time. In pre-V5 Caliach Vision the only clock was on each client’s computer which could of course be set differently from another client computer. In V5, regardless of the clients clock settings, the date always reflects the server clock.
This has implications for users that travel and connect to their server back home. Say your server is in Melbourne, Australia and you are on business in London, UK. It is 10am in London, it will be 9pm in Melbourne. When you post a transaction the timestamp will be 9pm, not your local time, regardless of your computer clock settings.
Timestamps such as 18 Sep 2017 12:26 are typically displayed in the program to a resolution of 1 minute, and you can set the formatting in the Localisation tab pane of File — System Manager — Company Details. In fact they are stored in the data with a resolution of a thousandth of a second in the case of Sqlite and to millionth of a second with other databases. You can increase the visible resolution (from V5.10) using the option optTimeShowSecs. A value of 1 adds seconds (e.g. 18 Sep 2017 12:26:14) and 2 will also add centi-seconds (e.g. 18 Sep 2017 12:26:14.91). The sever will be storing the data in the form of 2017-09-18 12:26:143.905893.
Typically timestamps are based on the time the server transaction starts (localtimestamp in PostgreSQL). This means that in a long-running transaction there is consistency with all timestamps recorded during that transaction. For example, a large dispatch resulting in many stock updates will leave all part quantity last change timestamps the same. This is by design. However, there are examples where this is not desirable, for example, when clearing bank transactions. To be able to mimic a bank statement the system must be able to order a statement report by the timestamp of when the clearance took place. So if you select multiple payments and receipts and Invert Clear the clearing will take place in one sever transaction. To retain the order, a different timestamp mechanism is used (current_timestamp() in PostgreSQL). This grabs the time to the microsecond for each update separately, so preserving the order. See Bank Account Review and Reconciliation help for more details.
Minimum Date
Caliach Vision often treats dates (and date-times) as optional. For example, a Work Order Kitted Date is blank until the WO is kitted. This is still the case in V5 for SQLite and MySQL engines. However PostgreSQL is unforgiving and sees a blank date as illegal data for a date type column. For PostgreSQL therefore a real date has to be used. Caliach has therefore set 1st Jan 1800 as a minimum date and used 1st Jan 1900 as a logical minimum (anything before 1st Jan 1900 is equivilent to a blank date). This is fine but it can be visually imposing in lists and reports, where a blank date is seen as 1 Jan 1800. From V5.0304 a change to the Omnis Studio DAM allows for the default PostgreSQL date to be seen inside the program as blank, so this visual confusion has been resolved.
Reporting with SELECT
Delivering data for a report or listing, means the client computer asking the server to collect and deliver a set of data. This is performed by a single SELECT statement. A statement in SQL is an English language line of text containing case-insensitive keywords (we will show them upper-case here) mostly defined by the SQL standard, or by a particular engine’s dialect of it. For example, the following is about the simplest select statement you could write that would deliver a list with one column of all customer codes from the CUSFILE table:
SELECT CUSCODE FROM CUSFILE
In general, a select statement contains 4 sections separated by keywords as in the following (although it can be much more complicated):
SELECT ....... FROM ...... WHERE ...... ORDER BY .......
SELECT: Following the keyword (or words in some cases) is the definition of what data columns to return. This is typically a comma-seperated list of columns, but can be calculations or cumulative subtotals of calculated data. Here are some examples:
|
Contents |
What it might return |
Comments |
|---|---|---|
|
* |
ALW001,Always Manufacturing Company,.,.,.,. |
A list with one row for each of all columns of the table(s) |
|
CUSCODE,CUSCNAM |
ALW001,Always Manufacturing Company |
A list of just the two specified columns of the table(s) |
|
count(*) |
5246 |
A single row containing one column of the number of rows found |
|
sum(CUSCBAL) |
287863.42 |
A single row containing one column of the sum of all customer balances |
FROM clause: Tells the server from which tables to extract the data and if more than one how the server is to relate the data between tables. In it’s simplest form it is just a single table name. But frequently you want to collect data across several tables, which requires the use of one or more joins. Here are some examples:
|
Contents |
What it might return |
Comments |
|---|---|---|
|
CUSFILE |
Only data from the CUSFILE table |
A single table select statement |
|
CUSFILE JOIN ADRFILE ON CUSDADR=ADRID |
Both CUSFILE and ADRFILE tables together |
A 2-table set of data relates the customer default address row to the customer row |
|
CUSFILE LEFT JOIN SOHFILE ON CUSCODE=SOHCUSC |
Both CUSFILE and SOHFILE tables together |
All Customers and SOs or Quotes if they have them (customers will be duplicated if they have more than one) |
WHERE clause: Tells the server what rows to restrict the results too. If there is no WHERE clause, all available rows will be returned. This is in effect the selection and can consist of many parts, but in the end when all are applied to the data the server finds it must produce a logical Yes or No, and only if Yes does the data get included. Here are some examples:
|
Contents |
What it might return |
Comments |
|---|---|---|
|
CUSBAR |
a single test on the boolean column CUSBAR |
Results only for customers CUSBAR is true |
|
NOT CUSBAR |
a single test on the boolean column CUSBAR |
Results only for customers CUSBAR is not true |
|
CUSCODE>=’D’ |
a single comparison test on the column CUSCODE |
Results only for customers with code greater than or equal to the character D (note that the D needs single quotes around it) |
|
CUSOINV>500.00 |
a single numeric test on the column CUSOINV |
Results only for customers with current balance greater than 500.00 (numeric values are not quoted) |
|
NOT CUSBAR AND CUSOINV>5000.00 |
two comparisons that both have to apply |
Results for customers with CUSBAR not true and have a current balance greater than 5000.00 |
|
CUSCNAM LIKE ‘D%’ |
a pattern matching test on a column |
Only customers with a name that starts with the character D |
|
CUSIDX1 IN (‘TEST’,’WWW’) |
a column that is one of a list of possible values |
Only customers with index codes TEST or WWW (the list between parenthesis can have any number of values separated by commas) |
|
PTMPTNO IN (SELECT DISTINCT PROPTNO FROM PROFILE WHERE PROWKC=’PACK’) |
a column that is one of a list of possible values derived by another SELECT statement executed on possibly one or more other tables. |
Only parts which in the Process Route file have an operation going through the PACK work centre. |
The above is but a small sample of what can be applied in a where clause. Syntax may change between server engines. For specifics, go to the server engine’s web site.
ORDER BY clause: The SELECT, FROM and WHERE define the results. This optional clause sorts those results. Having done that you can add a LIMIT clause that in effect says “only send the the first N in this order”. For example, to give the 5 customers with the largest account balance (the DESC is a short version of DESCENDING):
ORDER BY CUSCBAL DESC,CUSCODE LIMIT 5
How a select statement operates
All statements go through a prepare phase during which the server checks the syntax of the statement to ensure that it can be understood by the server, all the tables, columns and functions are logical and can be executed. Then the server works out a plan for the data retrieval using it’s optimiser and it’s knowledge of the indexes and data-distribution across columns and tables.
If there are no errors in the prepare stage the statement can then go on to the execution stage. It is during this stage that the server collects up the data from the database (or otherwise performs it’s task on the data). This is all still happening exclusively within the server engine with the client waiting.
When that ececution has completed, the client needs to fetch the data from the server across the network. This can be row-by-row or by a chunk of a number of rows until all are fetched. And at that point the server’s work is complete.
Errors can occur at any stage and the server will report some details of what has occurred and you will receive a message like Failed to prepare: Unknown column CUSXYZ in table CUSFILE. These messages are typically pretty cryptic and always in English.
Caliach Vision SQL Implementation
For the most part users need not know how Caliach Vision implements activities involving SQL in the program. However, they will see the results including on occasion references to SQL or parts of SQL statements, for instance at the end of most reports. There are also places where a little knowledge of SQL is useful, for instance in extending standard report selections.
Report Summary Information
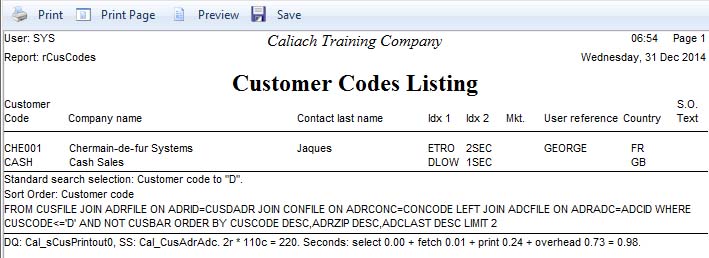
The illustration shows a simple customer listing report printed to Screen from the Masters — Customers — Print Reports window. Typically such reports are created by Caliach Vision’s Dynamic Query system. If so there are two relevant sections at the end of the report. The first is parts of the SQL Select statement the server will have received from the FROM keyword onwards. This will contain the most useful information; the FROM, WHERE and ORDER BY, and will change with every different user selection. The second section is of summary statistics about the execution including timings. It shows the name of the Dynamic Query used, the name of the Sort Set used, the number of rows retrieved * the number of columns = column row count (or number of elements of data delivered by the server), then the timings of the various stages and total execution time in seconds.
Typical Report Selection Window Extras
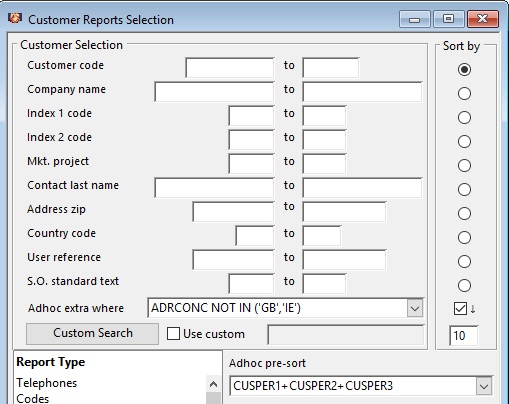
The illustration above will be immediately recognised by pre-version 5 users as typical of the selection and sort part of a reporting window, in this case a customer report. The user has chosen all customer’s, sorted by customer code, which the user could do pre-V5 as well. What is new to V5 is the addition of the following:
Adhoc extra where: This allows you to add to the automatically generated where clause which will be appended with AND logic, or, if the Adhoc extra where text starts with OR , with OR logic. This can be any expression operating on any columns in tables included in the FROM clause that evaluates to TRUE for a row to be included. It can be multi-expressions combined by AND or OR logical operators. The following are examples (that may depend on the SQL engine you are using):
|
Example of Where expressions |
Result |
|---|---|
|
CUSBAR |
Will return only customers that have been set to Do Not Use. With boolean type columns the simple column name will evaluate to TRUE or FALSE. If you want the reverse use the NOT operator, so NOT CUSBAR. |
|
OR CUSBAR |
The use of a leading OR will change the combining logic with other restrictive criteria entered in the general selection. If there are no other entries in the selection, the report will list all customers marked Do Not Use. If say, a range of codes from A to D is entered in the selection, then all A to D customers will be combined with all marked Do Not Use. If you are going to combine multiple expressions after an OR, then you should encase these in brackets, like this OR (CUSBAR AND CUSCODE>=’C’) |
|
CUSMODM > ‘2016-01-01 00:00’ |
Returns only customers that have had master data modified since 1st January 2016 time 00:00. You can use =, >, <, <> (not equals), >=, <= comparisons. Note the formatting of the date as YYYY-MM-DD and for datetime columns YYYY-MM-DD HH:MM. Dates, datetimes and character columns are string values bounded by single quote characters. If a string contains a ‘ character within it add an extra ‘ character so O’Leary is ‘O”Leary’. |
|
CUSPER1 >= 1000 |
Returns only customers with 1000.00 turnover or more in period 1. Note that numbers do NOT have single quotes around them and generally decimals do not have to be explicitly entered. |
|
CUSCODE = @[MEMORY.m_CusList.CUSCODE]) |
Returns the single customer currently selected in the Customer ScratchPad. This illustrates the use of a bind variable using the syntax @[MEMORY.m_CusList.CUSCODE]. A bind variable is a form of syntax that tells the program to substitute a memory value as it sends the command to the SQL server engine. The substitution applies the correct formatting for the data type. This technique however will only work if the variable inside the square brackets is in the scope of the method running the query. So in most cases the variable must be global, such as this example. Other selected ScratchPad lines would be @[MEMORY.m_PtmList.PTMPTNO] for Part, @[MEMORY.m_SupList.SUPCODE] for Supplier, @[MEMORY.m_GlaList.GLACODE] for G/L account. |
|
ADRCONC NOT IN (‘GB’,’IE’) |
In the above graphic the user is requesting all customers whose default address is not in the countries GB or IE. In this case we are using the NOT logic and the IN operator which enables you to list values. This is the same as ADRCONC<>’GB’ AND ADRCONC<>’IE’. |
|
(ADRCONC=’GB’ OR ADRCONC=’IE’) |
This is the opposite to the above giving customers only with GB or IE addresses. Because we are using OR logic we need to enclose it in brackets. When the final statement is implemented the result will be WHERE –normal select logic– AND (ADRCONC=’GB’ OR ADRCONC=’IE’). This is the same as ADRCONC IN (‘GB’,’IE’) in which the items in the list are effectively ORed. |
|
CUSCNAM LIKE ‘%snow%’ |
Chooses only customers where the letters “snow” is contained in their name. |
|
CUSCODE IN (SELECT DISTINCT INVCUSC FROM INVFILE WHERE INVDATE > ‘2016-01-01’ AND INVVALU > 0.00) |
Customers are selected on the basis of a subquery. using the IN operator. The subquery returns the customer codes for all invoices since 1st January 2016 that are not credit notes (with negative values). |
|
MRPPTNO IN (SELECT DISTINCT BOMPPNO FROM BOMFILE WHERE BOMCPNO = @[MEMORY.m_PtmList.PTMPTNO]) |
This can be used in a MRP Results report. It restricts the results to only those parts in the BoM table that are parent parts of the component part currently selected in the Parts ScratchPad. This illustrates the use of a bind variable using the syntax @[MEMORY.m_PtmList.PTMPTNO]. |
|
PTMPTNO IN (SELECT t1.PUHPTNO FROM (SELECT PUHPTNO, SUM(PUHCOST*PUHRECQ) FROM PUHFILE WHERE PUHDATE>’2016-01-01′ GROUP BY PUHPTNO HAVING SUM(PUHCOST * PUHRECQ) >= 10000) AS t1) |
This could be used in a Parts report to restrict the report to only those parts from the purchase history received from 1st January 2016 in which the sum received value is greater than or equal to 10000. It uses two subqueries, one inside the other. The inner most subquery builds a list of parts and sum value using the GROUP BY clause, then filters that using the HAVING clause to those >= 10000. The outer subquery extracts just the part number list for the IN clause to use. |
Adhoc pre-sort: This allows you to impose a different primary sort order on the results. (Warning! For reports which have sub-totalling this can disrupt the sub-totalling as rows will be returned in an unexpected order with respect to the report subtotal mechanism.) In the illustrated example the user wants to sort by the numeric addition of the three period turnovers. As with Adhoc extra where you can use any columns from any of the tables in the FROM clause.
|
Example of Pre-Sort clause |
Result |
|---|---|
|
CUSCRLT |
Customer credit limit order with the lowest first |
|
CUSCRLT DESC |
Customer credit limit order with the lowest last |
|
length(CUSCNAM) |
Ordered by the length in characters of the customer name, using a function that may be special to the SQL engine you employ. |
|
CUSCPER1+CUSPER2+CUSPER3 |
In the order of the sum of all period turnovers. |
|
(CUSPER1+CUSPER2+CUSPER3)/9 |
In the order of the average monthly turnover (assuming your periods are set for quarterly). |
Reverse sort checkbox: The checkbox with the down arrow icon has been checked in the illustration. This reverses the sort order of the results (in SQL terms it adds a DESC (for Descending) to each ORDER BY part, or ASC (for Ascending) if it was normally DESC.
Limit quantity: The final field below the Reverse checkbox appends a LIMIT N phrase to the end of the ORDER BY clause. This tells the server to only sent the first N rows of the results after the results have been ordered.
Using a combination of Limit, sort and Reverse you can do such things as list the top 10 or bottom 10 results only. For example, the top ten Invoices by value this month, or the 5 largest (or smallest) jobs we have.
![]() NOTE: Since V5.0400 the Adhoc extra where and Adhoc pre-sorts entered are saved in a table using first-in-first-out based on last used date and time when used by any user on the system. The fields are a combined entry field and drop-list in last-used reverse order. The SQL texts (and Reverse Sort and Limit values in the case of Adhoc pre-sort) are stored in the ADHFILE table using context. The context is determined by the tables available for WHERE and SORT columns (i.e. listed in the context menu Insert Column window). The DBMS is also taken into account, so when copying the database to another DBMS engine the clauses will not be available under the new DBMS engine. If the entered SQL clause is in error, it is not saved. The first-in-first-out list for each type and context is limited, by default, to 10. This can be changed by setting the system option optAdHocExtraLimit.
NOTE: Since V5.0400 the Adhoc extra where and Adhoc pre-sorts entered are saved in a table using first-in-first-out based on last used date and time when used by any user on the system. The fields are a combined entry field and drop-list in last-used reverse order. The SQL texts (and Reverse Sort and Limit values in the case of Adhoc pre-sort) are stored in the ADHFILE table using context. The context is determined by the tables available for WHERE and SORT columns (i.e. listed in the context menu Insert Column window). The DBMS is also taken into account, so when copying the database to another DBMS engine the clauses will not be available under the new DBMS engine. If the entered SQL clause is in error, it is not saved. The first-in-first-out list for each type and context is limited, by default, to 10. This can be changed by setting the system option optAdHocExtraLimit.
Both the Adhoc extra where and Adhoc pre-sort fields in the window have context (right-click) menus which provide users with assistance in creating entries. In both cases you can open a column listing pallet window. The title includes the tables that are joined in the standard Dynamic Query used for the reports offered in the report group you have chosen (this is the context mentioned in the Note above).
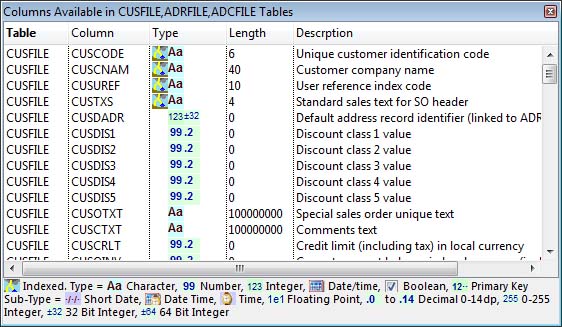
The window will list all columns of these tables any one of which may be involved in an Adhoc extra where or Adhoc pre-sort. You can double click to insert or replace a column or drag-and-drop to a particular place.
With the Adhoc extra where the context menu has additional lines that generate functions on a column for date and date-time ranges. It actually uses Where Shortcuts from the SQL Statements database. To apply one of them, first enter a column on which you want the date/time range to apply, then with the cursor at the end of the column, operate the menu function. For example, in Sales History you may want to see only yesterday’s dispatches, enter the column:
SAHDDAT
Now operate the menu item Yesterday Only and the Adhoc extra where will expand to:
SAHDDAT>=date('now','localtime','start of day','-1 days') AND SAHDDAT<date('now','localtime','start of day')
The above is SQLite. If you were on PostgreSQL it would be:
SAHDDAT>=current_date - INTERVAL '1 days' AND SAHDDAT<current_date
And this would be the MySQL (MariaDB):
SAHDDAT>=DATE_ADD(CURDATE(), INTERVAL -1 DAYS) AND SAHDDAT<CURDATE()
This is one of many provided but illustrates the variations between SQL engines when functions are used.
Formatting Data for SQL
Dates: All of the three SQL engines store and use dates in a specific text format: for dates YYYY-MM-DD, for times HH:mm:ss.cc, and for datetimes (timestamps) YYYY-MM-DD HH:mm:ss.cc
If you are entering a date directly in SQL then you must hold to that format, so, for example, reporting all work history for 12th January 2015 you would use in an Adhoc extra where, and it requires the single quotes because it is a character string, as opposed to a number:
WOHDATE='2015-01-12'
Numbers: can be entered without single quotes and generally without the need for decimals, so WOHQTY=2000 will bring up all rows where the quantity is 2000.000. SQLite can be difficult because all data is stored in a text or binary format internally so a 3 decimal column containing 10.000 will actually store 10.
Text: must in all cases be enclosed in single quote characters. If the text you are entering includes a single quote character, double-up. So to search for O’Grady you would use the text:
ADCLAST='O''Grady'
Statements.db Database
Caliach Vision has an external database of SQL constructs with variations for the supported SQL Server Engines (cross-engine). The Statments.db is maintained from File — Advanced — SQL Statements Manager. Normal users cannot modifiy named objects starting Cal_, which are reserved for program use.
Dynamic Queries, that build into SQL statements to drive, typically reports, but also other processes such as Data Views, Ad Hoc Graphs and general data collecting processes elsewhere.
Sort Sets are primarily for reports, to both set the order by clause in the SQL statement and the report subtotalling characteristics.
Where Shortcuts are pre-defined parts of Where clauses, most usefully when they involve functions.
Join Shortcuts are predefined FROM clauses. They are useful for standard joins, especially when joins involve functions in the join equality.
Statement Shortcuts are predefined complete SQL statements. They can be used in Data Views and Ad Hoc Graphs with the benefit of being cross-engine.
ScatchPad Transfer or Drag-and-Drop
Most report selections allow ScratchPad Transfers or Drag-and-Drop. In pre-V5 this used alternative program code to generate the report disregarding other selections the user may have made in the window. From V5 this has changed so that ScratchPad Transfer is just one additional search component for the resulting server select. Other selections will still apply.
ScratchPad Transfer is implemented as an IN (‘value’,’value’,..,..) where clause addition.
In pre-V5 dropping 3 customers on a report selection gave you 3 results. With V5 if the user puts in a limiting range and only one of those dropped also matches the selection range entered, only 1 will be on the report. So ScratchPad Transfer should be seen as additional to other selections.
Optimised Select
All server engines use an optimiser that turns the user data request into a plan of data retrieval from the database. The more complex the search the more important this is to performance. For example, if we want all customers with a balance greater than 1000.00 with customer codes greater than X, because customer codes are indexed and the codes are unique, the best route to the result would be to look at all customers over X, test the balance value and exclude those that fail the balance test. But what happens if most customers are coded X…, best route may be to scan the table for balances that match and then test the code.
The optimiser makes this decision. All elements in the select can affect its decisions and thus performance. Say a user wanted to select all customers of index code 1 equal to some value and then uses the ScatchPad to drive the report. In effect the user is saying they want a report of this selection of customers with this index code only. The optimiser will decide whether it will find all customers with the index code and eliminate those not in the ScratchPad selection or the other way round. It could make a huge difference; find 100,000 customers and eliminate 99,980 is much slower than find 150 and eliminate 130.
The optimiser also takes into account the order by and limit to determine it’s retrieval strategy. If there is an order by clause and limit it will assume the best strategy is to collect data by the order by index and stop when the limit is reached. But the user can confuse by adding irrelevant search criteria. For example, say you wanted the first 5 customers by name, the statement would be:
SELECT CUSCODE,CUSCNAM FROM CUSFILE ORDER BY CUSCNAM LIMIT 5
The optimise here will choose the customer name index and walk that until it finds 5 rows.
The optimiser uses statistics of value distribution in indexes to determine it’s strategy. These statistics are collected using the ANALYZE command. You can perform this in File — Advanced — Re-Indexing.
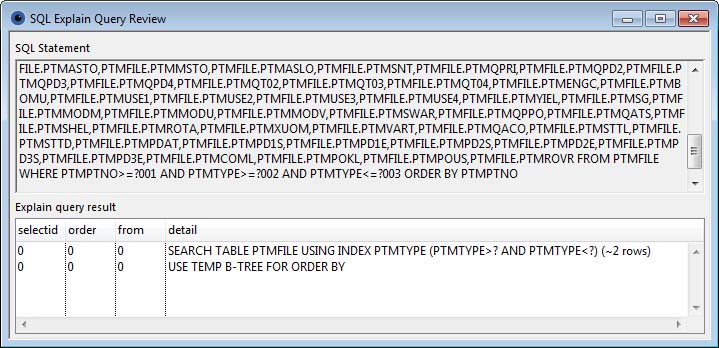
Explain
The EXPLAIN SQL prefix instructs the server to tell the client how it would navigate the database to perform the statement that follows the keyword. It allows you to see the optimiser’s plan of execution. This can be useful to professionals trying to speed up complex statements. Caliach Vision implements this with Dynamic Queries using the Shift key. If pressed when triggering a report, instead of the report being produced, a window will open to show the optimiser plan.
![]() NOTE: For PostgreSQL there is an option (User only) that can be used to add EXPLAIN clause options – they must be syntactically correct for the PostgreSQL version running. optSqlPgExplainOptions: PostgreSQL EXPLAIN options. See PostgreSQL documentation. Google “postgresql explain” for details. The parentheses are added automatically. E.G. ANALYZE TRUE,FROMAT JSON
NOTE: For PostgreSQL there is an option (User only) that can be used to add EXPLAIN clause options – they must be syntactically correct for the PostgreSQL version running. optSqlPgExplainOptions: PostgreSQL EXPLAIN options. See PostgreSQL documentation. Google “postgresql explain” for details. The parentheses are added automatically. E.G. ANALYZE TRUE,FROMAT JSON
Each server engine presents different information. See the respective web sites for an interpretation.
NULL Values
The concept of NULL values is important in data theory. A NULL is a non-value, unset or indeterminate value. All data elements in a database can be NULL so a small integer with a range from 0 to 255 can also have a value of NULL. NULLs are most often used to show the values that have not yet been set specifically. However, Caliach is not a fan of NULLs, not least because any function or aggregate that encounters a NULL will itself be a NULL. If 1 out of 100,000 stock items has a single NULL value cost element, the entire stock value is NULL.
Caliach Vision prevents NULL values by prohibiting them in to column definitions in all tables. This means that the server will refuse to insert or update data unless all columns are explicitly set with a real value. Some database engines (most notably PostgreSQL) are fussy about receiving the correct data form for column definition. For instance a value for an integer field of 1.2 will fail because 1.2 is not an integer. A value of 12 for a character field is illegal because it is not in the form of a string. ’12’ is Ok. Caliach Vision handles all this for you but if you are entering raw SQL, such as in a Custom Search, you need to comply with the rules of the server engine.
![]() CUSTOM CAPABILITY: Any customisation that manipulates data in any way should observe the NOT NULL constraint and it is recommended that custom tables also comply with this. However, custom columns added to standard Caliach Vision tables should not be NOT NULL columns. This is because the normal program code has no direct concern for custom added columns and so may leave them in a NULL state when inserting/updating rows. If the NOT NULL constraint is applied in these circumstances, it will cause the server to error and prevent normal activity proceeding.
CUSTOM CAPABILITY: Any customisation that manipulates data in any way should observe the NOT NULL constraint and it is recommended that custom tables also comply with this. However, custom columns added to standard Caliach Vision tables should not be NOT NULL columns. This is because the normal program code has no direct concern for custom added columns and so may leave them in a NULL state when inserting/updating rows. If the NOT NULL constraint is applied in these circumstances, it will cause the server to error and prevent normal activity proceeding.
| See also: – |
Compiled in Program Version 5.10. Help data last modified 19 Apr 2018 02:32:24.27. No class.
![]() Reference Contents > Client-Server SQL Database > – Introduction to Client-Server SQL
Reference Contents > Client-Server SQL Database > – Introduction to Client-Server SQL