Import Export Control
![]() Reference Contents > Data Transfer > Import Export Control
Reference Contents > Data Transfer > Import Export Control
Introduction
The Data Transfer Utility provides tools for importing data into, and exporting data out of, a Caliach Vision data file. It is useful for setting up new installations and should not be used to supplement normal transaction processing.
Basic rules for importing should always apply:
- Always import into a copy of the Caliach Vision data file. If you have not prepared the data you are importing correctly, your data file can be filled with garbled records.
- Use the Export Headings button to create a column title header for your spreadsheet pre-import data. You will be asked to create a temporary file which will contain two rows which can be pasted into your data file.
- Use Data Transfer — System Fields to check for the valid range of data within fields.
- Care should be exercised in the formatting given to cells in the spreadsheet when preparing data. The importing process is relatively intelligent, however numeric fields are expected to be numbers only, not mixed with characters such as $, £, #, ¢. Similarly, all codes are converted into character strings, so if you have numeric codes that you want sorted numerically in Caliach Vision you must format them in the spreadsheet as characters and pack the numbers with preceding zeros, if required. Also remember that certain import format text strings are limited in length and can not contain Tabs, CRs, or line feed control characters. Return characters can only be passed into Caliach Vision if placed in the import file as a <CR> character string.
- Spend time and care in checking the data before importing, it will save much time later.
- Wherever possible, test the integrity of your pre-formatted data by test importing all records, then importing only a few records (use copy and paste into a temporary data file). Finally, check the quality of the results before proceeding with the bulk of the data.
- After importing, check the results. Remember that part numbers and customer and suppliers codes can not be edited within Caliach Vision, and records can not be deleted if related processing has occurred.
![]() WARNING: BoM records should not be imported more than once as component quantities in the existing records will be consolidated with those imported.
WARNING: BoM records should not be imported more than once as component quantities in the existing records will be consolidated with those imported.
![]() TIP: Look particularly for the upper case O and the number zero as they often get miss-typed and, if in error will cause confusing sort orders.
TIP: Look particularly for the upper case O and the number zero as they often get miss-typed and, if in error will cause confusing sort orders.
![]() TIP: With Unicode, V4.0000 onwards, all character data imported is canonically normalised under under the nfc() function to ensure predictable results. This includes indexed fields, so some data relationships may not appear to to be as expected if the resulting character string is changed by this process.
TIP: With Unicode, V4.0000 onwards, all character data imported is canonically normalised under under the nfc() function to ensure predictable results. This includes indexed fields, so some data relationships may not appear to to be as expected if the resulting character string is changed by this process.
Getting started
Start with preparing your new Caliach Vision data file in which importing is to take place.
- In particular make sure the Company Details have been completed, including all defaults.
- Set up any Index codes, Country codes and Currencies that will form part of the import source data.
- Replace all carriage return characters in long text fields with a <CR> string. This will be converted to a carriage return after importing.
Now operate the File — Advanced — Data Transfer Utility menu function and select an appropriate menu from the Data Transfer hierarchical menu now on the menu bar.
ALWAYS import in the following sequence, when creating a new Caliach Vision database:
|
Order |
Data |
Dependencies |
|---|---|---|
|
1 |
Standard Texts |
None |
|
2 |
Index and Country Codes |
None |
|
3 |
Customers |
Must use Country and Customer Index codes and may use Standard sales texts. Address lines can be either in the form of a single multi-line field or as up to 4 individual lines. |
|
4 |
Suppliers |
Must use Country and Supplier Index codes and may use Standard purchase texts. Address lines can be either in the form of a single multi-line field or as up to 4 individual lines. |
|
5 |
Parts |
Must use Part Index codes and may use Standard sales, purchase and works texts and may also reference Suppliers. |
|
6 |
Bills of Material |
Must use Parts and may use Standard engineering texts. Any duplicated parent/component records will be consolidated if the System Preferences are set to disallow duplicate components. Lowest-level numbers will be re-calculated after import if the System Preference is set. |
|
7 |
Engineering Data |
May use Parts and may use Standard engineering texts. |
|
8 |
Work Centres |
None |
|
9 |
Process Routes |
Must use Parts and Work Centres and may also use Standard works texts. |
|
10 |
Purchase Parts |
Must use Parts and Suppliers. |
|
11 |
Production Plan |
Must use Parts. |
|
12 |
Product Serial Numbers |
Must use Parts and may use Customers. |
|
13 |
G/L Accounts |
Must have G/L report layout which can be imported from within Caliach Vision. |
|
14 |
Marketing |
Must have Index Codes |
|
15 |
Addresses and Contacts (if not imported with master records) (See note below) |
Must have Customers, Marketing and Suppliers. |
|
16 |
Inventory Quantity |
Must have Parts. Inventory history will be created for each non-zero part quantity. |
|
17 |
Un-received POs |
Must have Suppliers and Parts. PO header and line items will be produced. In addition, Parts and Supplier values are updated and Inventory history records created. |
|
18 |
Un-dispatched SOs |
Must have Customers and Parts. SO header and line items will be produced. In addition, Parts and Customer values are updated and Inventory history records created. |
|
19 |
Sales History |
Must have Customers and Parts. |
![]() NOTE: Addresses and Contacts have two additional initial columns to the data to ease the linking to master records. The first column should contain CUS, DEA, DEL or SUP to indicate whether the address is linked to a Customer, Marketing, Delivery Details or Supplier master record. The second column is the key field value for the master record, and is respectively: Customer Code, Marketing Business Name (case sensitive), Delivery Point Code and Supplier Code. This data is combined on import to create the address record link value.
NOTE: Addresses and Contacts have two additional initial columns to the data to ease the linking to master records. The first column should contain CUS, DEA, DEL or SUP to indicate whether the address is linked to a Customer, Marketing, Delivery Details or Supplier master record. The second column is the key field value for the master record, and is respectively: Customer Code, Marketing Business Name (case sensitive), Delivery Point Code and Supplier Code. This data is combined on import to create the address record link value.
File Formats
The radio buttons permit selection of the data file format used for import and export. Tab delimited is convenient. You can prepare your data in any good spreadsheet (such as Microsoft Excel) and save the file in Tab delimited format. The spreadsheet columns represent fields and the rows are records.
The window has 2 tab panes.
Import Export
Advanced Options
Import Export
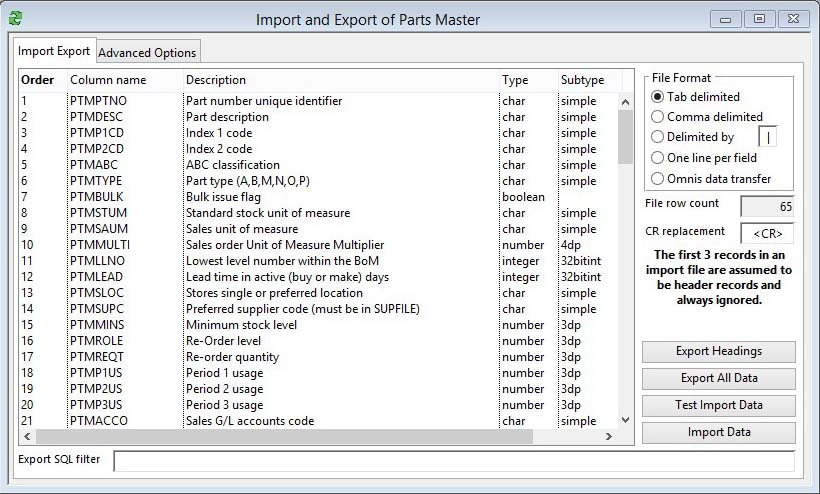
Use this pane to import or export data.
|
Field |
Description |
|---|---|
|
Column List |
Lists the import field columns. The column number is very significant. |
|
Tab delimited |
Standard text file with each record on a line and fields delimited by tabs. |
|
Comma delimited |
Standard text file with each record on a line and fields delimited by a comma. |
|
Delimited by |
Standard text file with each record on a line and fields delimited by a comma. |
|
User Character |
A single character that will be used to delimit fields in a one line per record text file. |
|
One line per field |
A single line per field in a text file. |
|
Omnis data transfer |
Special non-text file format that enables import and export of non text data types. |
|
Current Record Count |
Number of records in the file. |
|
Carriage Return Replacement |
The character or set of characters that will replace a Carriage Return in character fields with a max length of at least 100. Not applicable to Omnis data transfer format. |
|
Export with search |
Check this to limit the records exported. A search design dialogue will open. |
|
Do not consolidate component quantities when already existing |
When importing BoM components, normally duplicates are consolidated. Checking this will reject duplicate records when the system preference is not multiple common components. |
|
Button |
Action |
|---|---|
|
Modify Search |
Click to design or modify the search that can be used for exporting data. |
|
Export Headings |
Creates a two-record Header in the selected file format for the data to be transferred. Useful for preparing data for importing. |
|
Export All Data |
Export of data in the selected file format for the data to be transferred. You may be provided with a selection dialogue to restrict the records exported. A two record header is always provided. |
|
Test Import Data |
Test imports data. All validation of the data is carried out and errors will be reported. The import data can then be corrected before full import. When finished an Alert Message window will show the results. This can be printed using the button provided. You will be notified of any data incompatibility and no data will be changed in the data file. |
|
Import Data |
Full data import. Data validation will be carried out and all adjustments made to ensure the data is appropriate for the program. |
Advanced Options
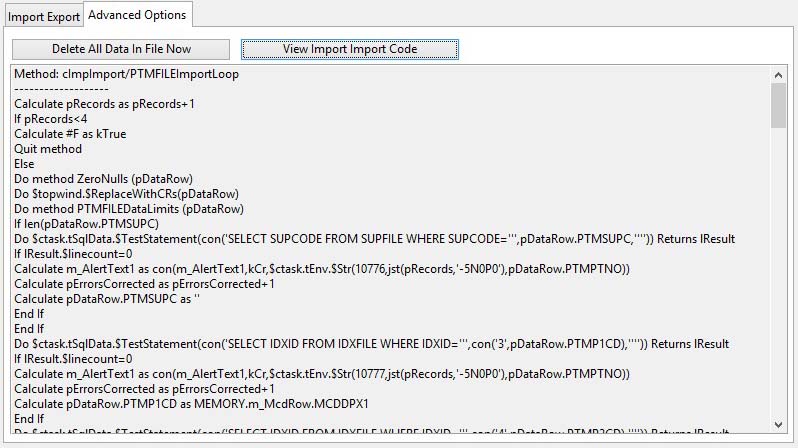
Select this pane for advanced options.
|
Field |
Description |
|---|---|
|
Import Code |
Program code in associated routines. |
|
Button |
Action |
|
Delete All Data In File Now |
This will drop the file and all data. It may take some time.
|
|
View Import Import Code |
This will allow you to view the processing code used to check each imported record.
|
| See also: – |
Compiled in Program Version 5.10. Help data last modified 31 Dec 2014 01:08:00.00. Class wImpControl last modified 23 Sep 2017 10:50:54.
![]() Reference Contents > Data Transfer > Import Export Control
Reference Contents > Data Transfer > Import Export Control