Select Purchase Order
![]() Reference Contents > Purchase Orders > Select Purchase Order
Reference Contents > Purchase Orders > Select Purchase Order
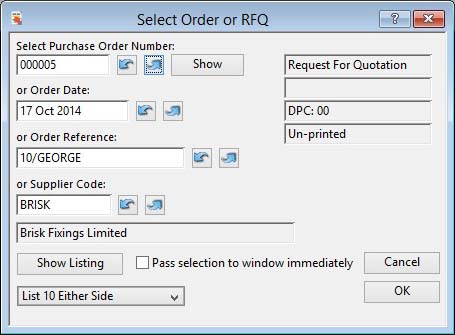
This window enables you to select an existing Purchase Order or Request for Quotation.
You can enter a PO number, Order Date, Order Reference or Supplier Code to find the desired document. When passing out of each of the fields the system will find the closest matching PO record to the data entered. You can click on the Show Listing button to build a list of all POs in the system controlled by the selection you make in the dropdown list below the button. You can also use the Show button to view the Purchase Order or RFQ Details window.
|
Field |
Description |
|---|---|
|
Purchase Order Number |
Purchase Order Headers. Purchase order number. {POHFILE.POHPONO char 6} |
|
Order Date |
Purchase Order Headers. Date of issue of purchase order. {POHFILE.POHDATE date date1980} |
|
Order Reference |
Purchase Order Headers. User reference. {POHFILE.POHUSER char 15} |
|
Supplier Code |
Purchase Order Headers. Supplier code. {POHFILE.POHSUPC char 6} |
|
Supplier Name |
Suppliers. Supplier company name. {SUPFILE.SUPNAME char 40} |
|
Document Type |
Purchase Order Headers. Request for Quotation (if set to Yes). {POHFILE.POHRELF boolean} |
|
Limit |
Indicates if the order limit has been exceeded for the supplier. |
|
Delivery Point Code |
Purchase Order Headers. Delivery details code. {POHFILE.POHDPC char 2} |
|
Printed? |
Purchase Order Headers. PO printed flag (YES = Printed). {POHFILE.POHPRNT boolean}
|
|
Pass selection to window immediately |
Check to cause the selection to be immediately reflected on the target window. |
![]() TIP: Normally, when the same part is applied to consecutive line items any part extra texts (individual or standard) are suppressed so the first line only contains them. This is to reduce unnecessary duplication. However, this normal behaviour can be prevented with the user Option optPOPartTextDupl set to 1. Extra texts are then repetitively printed.
TIP: Normally, when the same part is applied to consecutive line items any part extra texts (individual or standard) are suppressed so the first line only contains them. This is to reduce unnecessary duplication. However, this normal behaviour can be prevented with the user Option optPOPartTextDupl set to 1. Extra texts are then repetitively printed.
|
Button |
Action |
|---|---|
|
Show |
Click to open the Purchase Order or RFQ Details window. |
|
Show Listing |
Click to show a list of requests for quotation and orders based on the selection below. |
|
Selection Options Dropdown List |
Choose a selection for the listing. |
|
Cancel |
Aborts the process currently in session. The keyboard equivalent is the Esc key for Windows computers and Command-.(full stop or period) for the Mac. |
|
OK |
The OK button updates the data you have entered, or confirms the selection and/or processes the function you have called. |
|
|
Will cause a report to be printed of the subject matter. Right-click to change the report destination. |
Printing Request for Quotations (RFQ)
Normally with a Purchase Order marked as a RFQ, when printed, a single document is printed. However, there is an optional document design that you can set up in the Custom Reports table of settings window which will give you multiple supplier RFQ documents.
With the multiple-supplier RFQ report design, a single RFQ is selected but multiple RFQs are printed, one for each supplier that has purchase part records for any of the part items in the created RFQ. This is useful if you want to get quotations from all suppliers of a part or group of parts. All RFQs printed will contain any non-part or outwork line items and the RFQ for the supplier you chose for the original document will contain all items regardless of whether there are purchase part records.
![]() WARNING: The multiple supplier RFQ prints as a single document of multiple pages so it should not be used with the Email report destination as it will only be sent to the single supplier. It is designed for printing.
WARNING: The multiple supplier RFQ prints as a single document of multiple pages so it should not be used with the Email report destination as it will only be sent to the single supplier. It is designed for printing.
To set this up, go to either the System, Group or User settings, either the File — System Manager — Privileges and Settings window or the File — Preferences — User Settings window. You then add two entries in the Custom Report list, both should be given a type of RFQ. The standard single supplier design class name is rPurchRFQ and the multiple supplier design class name is rPurchRFQmulti. With these two entries made, on printing a RFQ the user will be presented with a choice of the standard or multiple-supplier document.
| See also: – |
Compiled in Program Version 5.10. Help data last modified 11 Nov 2012 03:59:00.00. Class wPurchOrderno last modified 17 Oct 2017 04:29:56.
![]() Reference Contents > Purchase Orders > Select Purchase Order
Reference Contents > Purchase Orders > Select Purchase Order