Help Contents Maintenance
![]() Reference Contents > Advanced Special Functions > Help Contents Maintenance
Reference Contents > Advanced Special Functions > Help Contents Maintenance
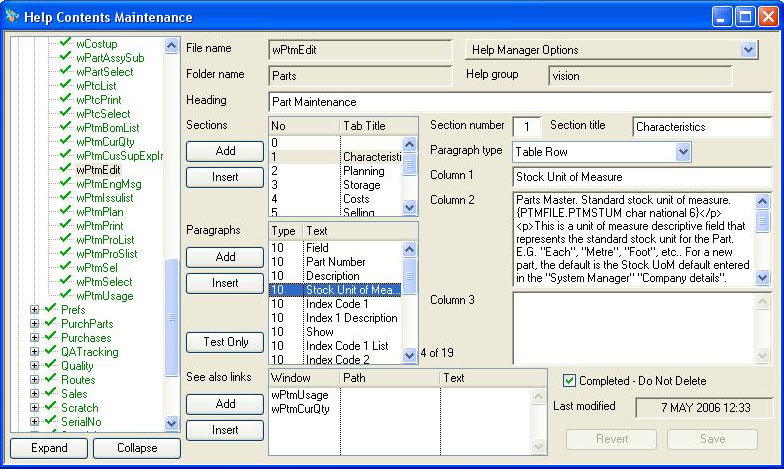
The Help Maintenance window enables you to manage an automated Help database system. It manages data held in the HelpData.df1 datafile which must be located in the Custom directory. If the datafile is not present, an empty data file will be created.
This Help Management system enables you to write pages of help in a structured form with graphics that will be generated as HTML files and stored in the Vision folder in the Help directory of the currently running Omnis Studio directory structure.
The Maintenance window operates in conjunction with the Help Manager Options Menu.
The window extensively uses drag and drop to sort and copy list lines.
|
Field |
Description |
|---|---|
|
Folder and File Structure List |
List of all folders and files within, recorded in the database. The tree list root is the help group. |
|
File Name |
Help HTML contents. Help file name (normally class name). {HLPFILE.HLPNAME char 40} |
|
Folder Name |
Help HTML contents. Folder name (normally window $tasks.[class.$designetaskname].$desc). {HLPFILE.HLPFOLD char 40} |
|
Help group |
Help HTML contents. Help group (vision, visiondesign, etc). {HLPFILE.HLPFOLD char 40} |
|
Heading |
Help HTML contents. Help page heading (normally class.$title). {HLPFILE.HLPHEAD char 1000} |
|
Section List |
Help HTML contents. List of section contents (number (0=general),Title,ParagraphList) (ParagraphList = Type,Text1,Text2,Text3) (Type: 0=Paragraph,1-5=(Headings 1 through 5),10=Table row, 20=Graphic(when ../ general), 21=Graphic selected, 30=Paragraph selected). {HLPFILE.HLPTABS list} |
|
Paragraph List |
The list of paragraphs contained in the section selected above. |
|
See Also Links List |
Help HTML contents. See also list of links (WinName,LinkPath,LinkText) (WinName=HLPNAME or LinkPath and LinkText). {HLPFILE.HLPSEEA list}
|
|
Section Number |
The section number. 0 is the general window. Others generally refer to tab pane number. |
|
Section Title |
Section title text. |
|
Paragraph Type |
The HTML paragraph type. Select from the dropdown list. |
|
Paragraph Text |
The paragraph text (or first column text if a table row). |
|
Column 1 |
First column text of the table row. |
|
Column 2 |
Second column text of the table row. |
|
Column 3 |
Third column text of the table row. |
|
Completed – Do Not Delete |
Help HTML contents. This help text is complete flag. {HLPFILE.HLPDONE boolean} |
|
Last Modified Date and Time |
Help HTML contents. Help data record last modified date and time. {HLPFILE.HLPMOD date datetime} |
|
Button |
Action |
|---|---|
|
Add |
Adds a line to the list alongside. |
|
Insert |
Inserts a line at the selected line to the list alongside. |
|
Revert |
To revert any changes to the previously saved version. |
|
Save |
To save the changes you have made to the data file. |
Generating Graphics for the Reference Book
Every Window, Menu and Toolbar should have an up-to-date JPG graphic file and in the case of windows, each Tab Pane needs one. There are several commercial packages that can assist in generating these but the following is a brief instruction on a simple way to archive this (using a Windows XP machine):
- Launch the Paint accessory program (usually in the Accessories section of Start – All Programs. Switch back to Caliach Vision.
- Open the window using normal Caliach Vision functions and ensure it has meaningful data in it. Make sure the screen is showing exactly what you want in the graphic (normally without tooltips and menus open). Don’t size windows too large and try and make the illustration as efficient as possible without too much blank space. Where a window has context menus that do not have their own help page or have additional menu lines, the image should show the open context menu with a line selected (e.g. Address and Contact subwindows).
- Press the Prt Sc Print Screen key on the keyboard; this will put an image of the screen in the clipboard.
- Switch to the Paint program and Paste (Ctrl+V).
- You will now have a full screen image. Select the selection tool and carefully select the image needed (this can be tricky to do, on the one hand avoiding background stirps and on the other obtaining the full object image).
- In the case of windows with tab panes, there is generally one graphic for each tab pane. The first image should be of the whole window, others should be of just the tab pane part of the window.
- Once happy with your selection copy it to the clipboard (Ctrl+C).
- Operate File — New and do not save the current image.
- Paste (Ctrl+V) and you should have the final image ready to save.
- Operate File — Save As and select JPEG from the file type dropdown. Navigate to the correct C:Program FilesRainingDataOS415helpvision? and save the file, overwriting if need be. The filename should be all lower case.
- You can test the result within vision using File — Advanced — Special Functions, then Special Functions — Help Manager, select the help page record and operate Help Manager Options — Create HTML File for Selected. The Help Manager Options — Generate for Reference Book Option should be checked.
An alternative method for simple window images where there is no context menu or tooltip needed to be shown is as follows:
- Choose the HTML file report destination.
- Have the target window on top and select Window — Print Top.
- Navigate to the correct Graphic directory, use the default “untitled.htm” file name and Save.
- Now switch to Windows Explorer, copy the filename of the original and then delete it. Rename “untitled1.JPG” with the correct file name (paste) and then delete the “untitled HTM” file.
- You now have a clean image of the top window.
- If it is for the second or later tab panes of a tab pane window, you will need to edit the graphic and trim down to show just the tab pane.
| See also: – |
Compiled in Program Version 5.10. Help data last modified 4 Jun 2012 04:49:00.00. Class wHelpMaint last modified 1 May 2018 05:37:20.
![]() Reference Contents > Advanced Special Functions > Help Contents Maintenance
Reference Contents > Advanced Special Functions > Help Contents Maintenance