OVERVIEW
Backflushed orders have no components issued on the system in advance of manufacture. Only when a batch, or sub-batch, of the completed assembly is received into stock do you account for the parts you have used in the manufacture. At the time you create a Work Order you must identify it as a Backflushed Work Order.
This function is the single function in which you record the completion of production and the consumption of component parts.
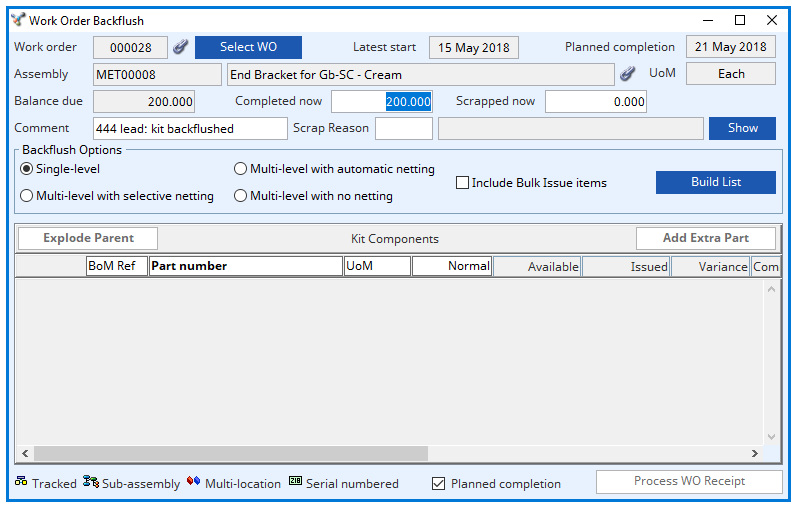
You are first required to select the Work Order you are completing. You will then be presented with this Work Order Backflushing window in which you identify the quantity completed and scrapped and the parts used in the production of that quantity.
The system assumes you are completing the Work Order with this receipt. If you are not, or if there is a quantity of assembly scrapped, you must adjust the received and scrapped quantity.
You must now construct a list of parts that have been consumed in the production of the batch of the assembly. The system can help by building a Bill of Materials list for you, which may then be modified.
Having built a list of components, you are free to change the listed part quantities in the grid lines.
If you have made any changes to the kit issue list prepared by the system, you will have the choice to Print Variance Report. If checked, a list of all changes, both reductions and additions, will be printed.
Parts that are flagged as Multi-location or Tracked are indicated as such in the list. You will be presented automatically with the Location/Batch assignment dialog.
If component parts have been given the Allow auto-selection of location attribute, the system will attempt to pre-select the locations. It will also abide by the Draw from several locations attribute and follow the Assembly auto-selection preferred location prefix, if any, on the Work Order assembly part record. Any auto-selections will be shown, and you must confirm them before processing can be carried out.
When Backflushed Work Orders are processed, the kit component issues are treated in the same way as the kit of a normal Work Order and the receipt of the assembly likewise. Work Order history is also created as in a normal Work Order.
If any part has been given the Draw from several locations attribute, you will be able to split the batch you are issuing between more than one source location. To do this, double click on the part line in the lower list. If the part’s attribute has been set, you will be presented with a window in which you can enter a quantity for the new split batch.
File Path
Process > Work Orders > Backflush WO…
This file path takes you to the Work Order Backflush window.
Work Order
Work order number. {WKOFILE.WKOWONO char 6}
Link Icon
Click to view any linked external files. Hold the shift key down and click to create a new file link for this record.
Select WO button
To select a specific Work Order. It opens the Select Work Order window.
Latest Start
Latest kitting and start date. {WKOFILE.WKOLATE date date1980}
Planned completion
Date of planned completion. {WKOFILE.WKOCDAT date date1980}
Assembly
Part number (parent assembly). {WKOFILE.WKOPTNO char 18}
Assembly description
Part description. {PTMFILE.PTMDESC char 30}
UoM
Standard stock unit of measure. {PTMFILE.PTMSTUM char 6}
Balance due
Balance due still for completion. {WKOFILE.WKOBAL number 3dp}
Completed now
The quantity of the assembly completed and put into inventory on this backflush occasion.
In the File — System Manager — Company Details you may have set a WO + Receiving variance limit. In which case the permissible total quantity (received + scrapped) may be more than the Quantity Ordered. When you want to receive a greater quantity than ordered you should hold the SHIFT key down when leaving the quantity entry field.
Scrapped now
The quantity of the assembly scrapped during production on this backflush occasion.
Comment
The inventory comment that will be used when recording the assembly movement.
Scrap reason code
Scrap reason code (relation: IDXID = con(‘7’,WOHSCRE). {WOHFILE.WOHSCRE char 4}
Scrap reason description
Index code, scrap reason or QA test description (must have at least 1 character). {IDXFILE.IDXDESC char 255}
Show button
To show a list of available codes from which to select.
Backflush Options field
Single-level
Will yield a single-level kit similar to a normal WO.
Multi-level with automatic netting
Will yield a multi-level kit with each sub assembly automatically netted against available inventory. Only shortages will be blown through.
This is a constructed list starting with the single-level Bill of Materials. Any sub-assembly parent parts are examined for a negative net physical. Where such a condition exists the unavailable quantity of the sub-assembly is assumed to be obtained by manufacturing that shortage quantity of the sub-assembly. This can continue right down to the lowest level. In other words, sub-assemblies are only listed to the extent that they are available in inventory.
Multi-level with selective netting
Will initially yield a single level kit. You can then blow through sub-assemblies by double-clicking on them.
This is initially the same as the single-level list. After the system has prepared the single-level list, you should identify sub-assemblies that you have manufactured along with the main Work Order assembly. If netting is appropriate, there will be a negative Net physical quantity on the list. To blow through the sub-assembly, click on the Explode Parent button. You can always arrange for an alternative mixed quantity by changing the quantity and adding the sub-assembly as an extra item (see later) after the blow-through.
Multi-level with no netting
Will yield a full to-lowest-level kit with no consideration of current physical quantities.
This is a list of all lowest-level items in the fully exploded Bill of Materials. It assumes that no intermediate sub-assembly has been drawn from inventory and that all of them have been manufactured under this Work Order.
Include Bulk Issue items
Check this option to have Bulk Issue parts included in the kit list.
This can be used on any of the list building options. If checked, the normal practice of shopfloor control of bulk issue parts is ignored, and they are included as direct issues from inventory to the Work Order.
Component Issue Grid
A list of component parts to issue or return. Sorting the list will reset all editable values to the default.
Bom Reference
Component reference within structure. {BOMFILE.BOMCREF char 4}
Part Number
Component part number. {BOMFILE.BOMCPNO char 18}
UoM
Standard stock unit of measure. {PTMFILE.PTMSTUM char 6}
Normal
The kit quantity required for issue or available for return.
Available
The available stock. Calculated from the current part physical less any other issues. With multiple entries of the same part, this will change depending on the sort order.
Issued
The quantity being issued or returned.
Variance
Any quantity that will be posted as a shortage or remain with the supplier.
Comment
The inventory comment that will be used when recording the part movement.
Description
Part description. {PTMFILE.PTMDESC char 30}
Build List
Having set up the quantities and options, click to build the kit list below.
Explode parent button
Having built the list with the selective netting option, use this button to explode the subassembly you have selected on the list.
Add Extra Part button
To use a part selection dialogue to add an extra item to the component list of issued work order. Alternatively, you can drag and drop from the Parts ScratchPad or BoM Listing.
Process WO Receipt button
Click to process the WO receipt and simultaneous kit issue.
Compiled in Program Version 6.00. Help date last modified on 23 June 2020
Class wWoBackflush last modified 25 May 2022