OVERVIEW
There are many circumstances where managers or other users wish to know that a particular circumstance has arisen, or an event taken place on the system. This may be as simple as a part going below re-order level or a customer exceeding his credit limit. These circumstances can be investigated using reviews or reports. However, this is not likely to be timely and is generally time consuming.
Workflow Alert Triggers is a feature in which events can be reported automatically direct to the person who needs to know either via the Message Box or by Email. Triggers are system-wide and will normally be triggered regardless of which user causes the event to occur.
As an alternative to sending messages to users with the Message Box system, a Trigger can create a Marketing Event that will be appended to a Marketing record’s event list. Such triggers can also be sent by email. Such Marketing Event Triggers can only be sent direct for a trigger associated with a Marketing record, or indirectly for a Customer event or Supplier event where the Customer or Supplier is linked to a Marketing record. If these conditions do not apply, no event will be created. See Target Users below for details of the syntax employed. For information on Marketing events see the Marketing Data Maintenance window help.
As an alternative to sending messages to explicit Email addresses such as john@somewhere.com, where appropriate you can send to a customer or supplier address or contact email address. This is known as Indirect Email Addressing. See Target Emails below for details of the syntax employed.
Generic triggers are predefined in the system and when the maintenance window opens will be listed in the upper left list. You can add, using drag-and-drop, as many triggers as you like each of which can be tailored to your exact needs by adding a Condition. These conditions must be entered as logical Omnis Studio calculations that resolve to a non-zero or logically true value at runtime for the trigger to be instigated. No Condition will result in that generic event always being triggered. The message the trigger sends can be customised for each trigger and both the message and description can hold square-bracket Omnis Studio calculations that are evaluated at runtime. A default message is provided when you add trigger.
Once you have set up your triggers, they will be operational pretty much immediately. In normal data processing the trigger system operates internally as follows:
- When a generic trigger circumstance is encountered, a check is made that one or more of these triggers have been set up by the System Manager.
- If so, and for each one, any condition is evaluated. If its value is zero or false that trigger is ignored.
- If not, the description (that will used as the message subject or heading) and message text will be evaluated.
- The resulting trigger message data will then be appended to a log in global memory and an internal timer set running.
- Normal processing, which may encounter additional trigger events, then continues until the user’s operations are complete.
- The internal timer does not count down while other processing is going on. Therefore, after a few seconds of the completion of program processing (or a normal program quit or restart), the timer will time out and automatically open a window which will send the trigger messages.
- If the destination of trigger messages are email addresses, this may take some time and may necessitate dial-up to the Internet. In this case the user should be patient. Very often though, it is so fast that the window is only open for a flash.
Conditions and Square Bracket Notation
In all trigger circumstances, when the trigger is encountered, condition, description and message text evaluated occur together at a particular point in data processing with the global file data memory in a particular state. It is therefore important that only fields from files that can be assured to be in memory in their current state are used. For example, there is no point is using Supplier (SUPFILE) fields in a trigger for Customer credit because that file slot will be populated with data from any supplier, depending on previous user activity. If in the condition calculation, it would cause the trigger to be highly unpredictable.
As much as possible, the trigger point is placed such that expected history data to the event is available. So, for example, in part status triggers, the parts (PTMFILE) and inventory history (STHFILE) files are available. However, this is not the case if you have switched off the recording of inventory history, for some reason. Common sense needs to be used and in general only use fields from files that are illustrated already in the default message text data you will see when adding a new trigger.
In all cases global memory fields are available (the MEMORY file) and the company details file (MCDFILE), plus # variables. The following may be useful:
| File | Field | Description |
| MEMORY | m_TriggerQty21 | A special 2 decimal place number variable used in many triggers to hold the quantity processed (see default message texts as examples). |
| MEMORY | m_TriggerQty21 m_TriggerQty21 m_TriggerQty21 | Special 3 decimal place number variables used in many triggers to hold the quantity processed (see default message texts as examples. Note, if not shown in the examples they will not contain useful values.). |
| MEMORY | m_TriggerList | A special text field that contains a list of line-item data processed (see default message texts as examples, e.g. SO Dispatch or Customer Invoice). |
| MEMORY | m_Company | Your company name as seen on reports |
| MEMORY | m_UserId | The processing user’s id. This is useful if you want to restrict triggers to particular users. For example, the condition statement m_UserId<>’SYS’ would cause the trigger to operate unless the operation was instigated by the ‘SYS’ user. |
| MCDFILE | MCDSTCU | The systems currency unit |
| MCDFILE | MCDSTCU | The system currency text |
| Globals | #D | Current date |
| Globals | #T | Current time |
WARNING: We do NOT recommend that you use oCustom1 custom functions in triggers unless they are extremely simple and never change the state of the Current Record Buffer.
File Path
File > System Manager > Workflow Alert Triggers…
This file path takes you to the Workflow Trigger Alert Maintenance window.
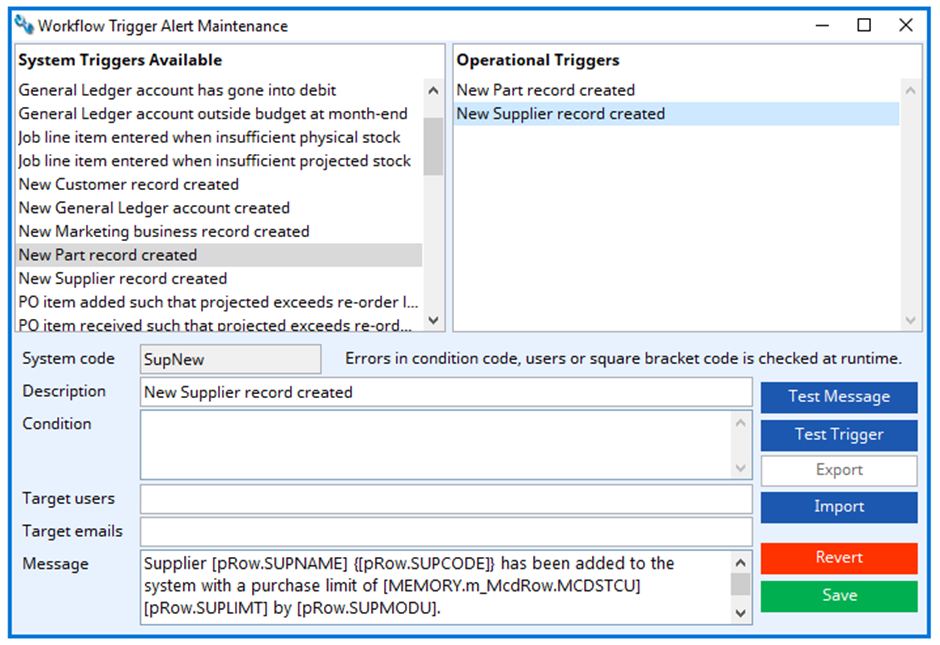
System Triggers Available field
Lists the available triggers. Drag those you want to add to the Operational Triggers list.
Optional Triggers field
Lists the operational triggers. Drag from the Trigger list to add. Click to select and modify details. Use Delete key to remove.
System code
The system code for the trigger type.
Description
The description of the trigger. The description will be used as the resulting message heading. Can contain square bracket notation.
Condition
Enter a limiting logical condition (non-zero result) as a Studio calculation that will limit the triggers operation. Carriage returns characters and not permitted.
NOTE: Some triggers need to be controlled in their operation otherwise they will happen too often and their business significance will be lost. For example, customer credit limit being exceeded without a condition will send a message every time a transaction takes place when the account exceeds the credit limit. By adding the condition CUSOINV-CUSCRLT<=m_TriggerQty21 the message will only be sent when the account goes over the credit limit.
Target Users
A comma separated list of users that will receive the triggered message. These must be system users’s login IDs.
NOTE: As an alternative to a list of system users, you can specify the automatic creation of a Marketing Event. This is only useful where the trigger is associated with a Marketing record or a Customer or Supplier that is linked to a Marketing record. If such conditions apply, a Marketing Event will be generated. To effect this you need to enter the following syntax:
MKTEVT=CUS,TYP,REF,Boss
where CUS can be SUP or DEA to indicate whether it associated with a Customer, Supplier or Marketing event, TYP = the Event Type, REF = the Event Reference, and “Boss” can be any text that is used to identify the contact on the description contact field. The search is case-sensitive and finds the last contact entered containing the text somewhere in the description. If the final entry is left blank, the default contact on the default address will be used.
Target emails
A comma separated list of email addresses that will receive the triggered message.
NOTE: As an alternative to a list of explicit Email Addresses (such as john@somewhere.com), you can specify a list of address or contact ID fields from which to derive an email address from the address or contact database. This is only useful where the trigger is associated with an address or contact record. You can list in priority order a number of fields, the first of which that relates to a valid email address will be used. To effect this you need to enter the following syntax:
EMAIL=INVDADC|INVCAD|someone@caliach.com,additional@somewhere.com
The above example would be useful for a trigger on dispatch such as SODispatch. EMAIL= must start the entry followed by a list of entries. The fields, separated by a vertical bar character, can be any one of the following appropriate to the trigger circumstances: INVDADC, INVIADC, SOHDADC, SOHIADC, JOBDADC, JOBIADC, POHADC, PUHADC for contacts, and INVCAD, INVINVA, SOHCADS, SOHINVA, JOBCADS, JOBINVA, POHCADS, PUHCADS, CUSDADR, SUPDADR and DEADADR for addresses (In the case of CUSDADR, SUPDADR or DEADADR the default contact email is used, if valid, otherwise the default address for the customer, supplier or marketing record is used, if valid.). See also the note below. The final field on the list can be an absolute address, which will be used if none of the foregoing have valid email addresses. Finally, the EMAIL= syntax can form the first entry in a list of email addresses, so in the above dispatch trigger example, an email is sent to the Dispatch contact email, if valid, or the Dispatch address email, if valid, or someone@caliach.com, if valid. In addition, one email is always sent to additional@somewhere.com
NOTE: For indirect address fields (not contacts) you can also append a contact description search string so that the contact with the text contained it its description will be used. The search text is appended with a colon. For example, CUSDADR:Boss will locate the last contact on any address for the customer that has been entered with “Boss” somewhere in the description. If none is found the default contact is used.
Message
The message body text that the trigger will send. Can contain square bracket notation.
Test Message button
Click to test whether the message interprets correctly.
Test Trigger button
Click to test the trigger without conditions. You can then check the results.
Export button
Click to export the Operational Triggers for transfer to another datafile or for backup purposes. You will be prompted for a file name and destination.
Import button
Click to import the Operational Triggers exported previously. If you already have some Triggers you will be given the option of appending the imported triggers to the existing ones. You will be prompted for a file.
WARNING: Check that Users and Email Addresses are correct for any imported triggers.
Revert button
To revert any changes to the previously saved version.
Save button
To save the changes you have made to the data file.
| See also: | Workflow Trigger Sending Dialog |
Compiled in Program Version 6.00. Help date last modified on 12 February 2024.
Class wTriggerMaint (Workflow Trigger Alert Maintenance) last modified 25 May 2022 FP: File > System Manager > Workflow Alert Triggers…