Caliach ERP Tutorial
This tutorial is designed for those who are completely new to Caliach Vision ERP and want to know how to use the free Demonstration Software.
Master Data
Previously in this tutorial, you have been shown how to get going with the Caliach Vision Demonstration software, explored how to get help, how to move around the programme and shown the characteristic user-interface. It is now time to examine the data and operational structure of the program.
Caliach Vision is a relational database program. A database can be thought of as a collection of data tables, each containing a number of defined columns and a row for each set of column data. A table is just like a simple spreadsheet layout of data, however in a database, row data can be rapidly accessed by way of indexes. An index is just like the index at the back of a reference book, where words are sorted in an easy-to-locate way and alongside each word is a page number or numbers which identify where the word is to be found. Imagine the time it would take you to locate a word in a book without an index, where you would have to scan every page until you find it. Database tables can have many columns indexed which is simple enough but the complexity comes from the way in which data in one table can relate to data in other tables. It is the importance of these relationships which leads to the term “Relational Database”.
As an example, if a customer’s data is held in a table with columns for Code, Company Name, etc., both code and company name columns are indexed so locating a customer row by its code or name is very fast indeed. A customer however is likely to have one or more Invoices, details of which will be stored in an Invoice table. One of the columns of the Invoice table will be the customer code which identifies who the invoice belongs to. The relationship between a customer and their invoices is defined by the same code being in columns in both tables and typically both being indexed so that the relationship can be joined very fast.
Caliach Vision has well over 100 tables, all of which are related to others, many in multiple ways. It is convenient to view these tables as belonging to three broad groups; Master, Process and History tables.
Master tables can be thought of as those that define your fixed business information. Data in them tends to be set up and remain permanently. They change little but are added to as the business progresses and changes. These include parts, customers, suppliers, production rules, taxes, countries, currencies, ledger accounts, etc..
Process tables can be thought of as tables defining your on-going business activity such as customer orders, manufacturing commitments, purchase orders, current accounts, etc..
History tables contain records, audit trails and logs of activity completed.
In Caliach Vision, master data is maintained under the Masters menu and process and history data are typically accessible under the Process and Ledgers menus. It is the Masters menu that we will explore in this section of the tutorial.
Re-start the Caliach Vision Demo programme if it is not already running and login using SYS with no password.
Viewing a Customer
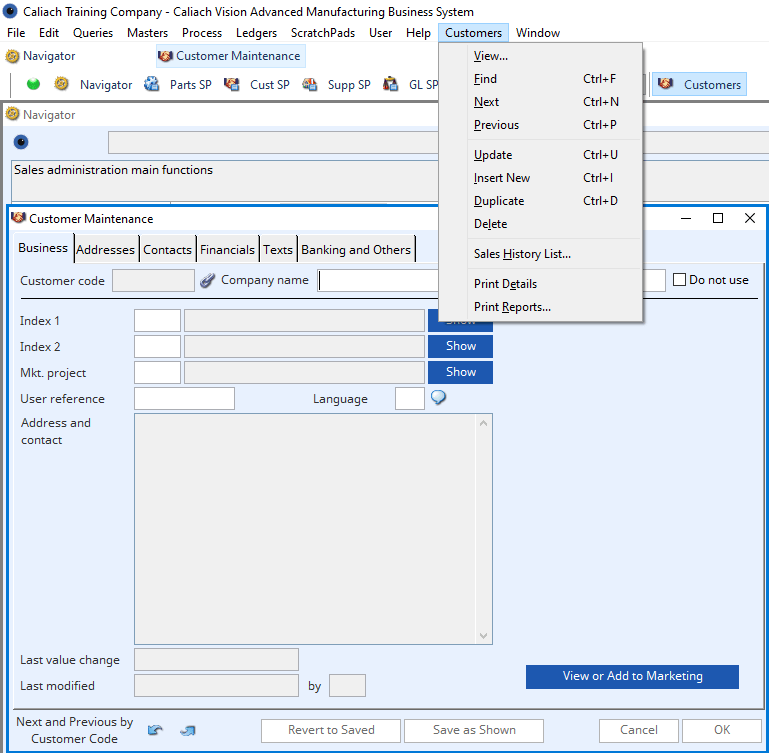
In the Navigator, click on the Sales icon on the left and then double click on the Customers icon to the right. In this navigator set up the Customers icon has been set to the same as the following menu path: Masters→Customers→View.
The Customer Maintenance window will open empty of data.
Now that you have started and entered the Customers task, the Customers menu is at the right on the main menu bar and that keyboard equivalents are now active for it.
There are numerous ways of loading a specific customer into the maintenance window and the method will depend on the circumstances and what is convenient at the time. We can Find a customer and locate the Next or Previous customer in the table, use the Keyword Search system to locate a customer by some word used in the data or we can select a customer from a list in the ScratchPad, possibly one which we may have located before elsewhere in the program.
To Find a customer, right-click somewhere on the window other than editable data boxes and the Customer menu will pop-up as a context-menu. Select Find from the menu and the window will then change to Find-mode, where only certain data boxes can be edited and the Cancel and OK buttons become active at the bottom right.
We have used the context-menu approach to activate the Find function, which is typical of master maintenance windows, however, we could have done the same thing using the Masters→Customers→Find menu path. We could also have gone to the Customers task menu at the right of the menu bar or we could have used the keyboard equivalent of Ctrl+F. Additionally, we could have drilled-down on the customer code data box with a double-click. Finally, we could have set up an icon on our Navigator that would have instigated the Find function rather than the View that we used earlier.
In Find-mode, you can only enter data in data boxes (fields) that are indexed in the database. When you have entered some characters, click OK or press the Enter key before leaving the field for another. The programme then finds the closest match to the data you have entered in that field’s index and loads the customer record into the window. Type the character A into the customer code field and press the Enter key and the customer with code ALW001 will be loaded into the window – the Always Manufacturing Company.
The Enter key is always the same as clicking on the OK button and the Esc key is the same as clicking on the Cancel button. Also note that typing both a lower-case “a” and an upper-case “A” both produce an upper-case A in the code field. This is because the field is forced to upper-case which is typically the rule for codes.
Now hold the Ctrl key down and press momentarily the N key. This is the keyboard equivalent of the Next function. The window will redraw to show customer BEJ001. The Next option takes you along the code index from customer to customer and Previous takes you in the opposite direction. Both of these functions are duplicated in the small arrow icon buttons at the bottom left of the window.
To do a more complex find, double-click on the customer code box to switch into find-mode again. Press the tab key a few times to move from the code field to the User reference field and type A, then press Enter. The customer that comes up will be BEJ001 as it has the first A entry in the user reference index. Note that the text in the bottom left corner of the window now reads “Next and Previous by User reference” where before it had read “Next and Previous by Customer code “. This is because you pressed Enter while in the User reference field and are using that index. Now click Next, Next, etc. The TER001, TER002, YEL001, ZEB001, customers will be loaded. This is because they all have ARTHUR as the user reference. Note that while this group comes up in alphabetic sequence in this case, it will not always do so. In fact, the order will be the same as the customer records that were created in the database.
Let us now find a customer where we can’t remember their code or any other index field data but we do remember their address has “North” somewhere in it.
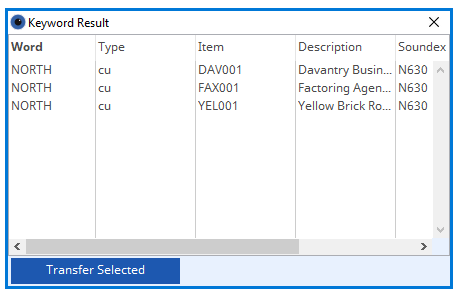
To use Keyword Search for this exercise, double-click on the customer code box to switch into find-mode again. Now type ?NORT into the customer code box and this time press the tab key.
A window will popup listing all customers that have keywords starting with the letters NORT. In our limited data set there are three and NORTH is the only keyword. Double-click on the Daventry Business Systems line to select that customer.
The Keyword Search system is extremely powerful and applies to all main master tables (Parts, Customers, Suppliers, Marketing, etc.) It is automatically invoked throughout the programme when doing a Find, Select or Search when you type a leading ? or * character in a code field followed by your word or leading characters. The ? means ‘words starting with’ and an * means ‘whole word’. Keywords are words extracted from particular fields that you can define for your installation. You can even do a ‘sounds-like’ if you are not sure of the spelling, using ?? as a prefix. You can also use combinational logic but that is getting beyond us here. The system is somewhat like using a search engine on the Internet, (an idea which originated with Alta Vista).
Keyword Search is a very useful feature of Caliach Vision. When you explore the Parts, try finding all parts where the word SWITCH is mentioned in the description or elsewhere. When you are an engineer working with 20,000 parts, that is handy!
Back to our customer DAV001 – Daventry Business Systems. Let us briefly run through the master data on the maintenance window for this customer.

The Business tab pane covers general record classification codes. Parts, Customers, Suppliers and Marketing records all have enforced Index 1 and 2 classification codes (See fig. 3.3 above). You define for your site what classifications to use but every customer must have a code set. The Show buttons are there to bring up a list of codes from which you can select the one you want. You will see many Show buttons like this around the system. All these classification codes can be used for finding and searches. When you implement your system, deciding on what you use these codes for is important.

The Addresses tab pane contains the address information for the customer. A customer, as with a supplier and marketing record, can have any number of associated addresses. They may have branch offices, delivery addresses, etc.. Address data is actually held in its own table and only related to the customer which is why you can have many for the same customer. The data held in an address record is not just the plain address but also data fields that are used in the system that may change from address to address. For example, the tax arrangements may be different because the addresses may be in different countries or states where tax treatment must be different.
If there is more than one address, the options will appear as tabs which you can select to display, unless there are more than 5 when a drop-down list is used for selection.
The addressing system is powerful in Caliach Vision in that you can setup different addresses (and contacts) for use in different circumstances. For example, one address maybe for use on Invoices but another is used on Account Statements.
Note that in the description for Fig. 3.4, we refer to it as the Addresses sub-window. This is because it is actually a window design that is used inside another window and therefore will appear in other places in the program, such as Suppliers Maintenance, and behave in exactly the same way. This is an example of the use of object-oriented design that makes operation of Caliach Vision both reliable and consistent.
The Contacts tab pane shows the people-contact information. You can have any number of contacts which are linked to an address so here again you can select the address from which you can then list contacts. You must have at least one address for a customer but you do not need to have contacts for all addresses. Each customer has a default address and for each address, if there are contacts, one is the default.
The Financials tab pane contains information as settings relating to your financial relationship with the customer. Switch Window Tooltips on to get more information on each field or press Shift+F1 and click on the window to bring up the help and scroll down to view the Financial section.

To explain about the discount system supported by Caliach Vision, Products (parts) can be given a discount class (0-10 where 0 is no-discount). Customers have 10 discount rates for classes 1 to 10, seen on the left of the window. You set the class descriptions for the site depending on your policy.
Each customer then has a discount rate for each of the classes of discount so that when a product is sold (placed on a Sales Order) its class determines the discount rate the customer will receive. In addition, you can set up further discount refinements in Customer-Parts for quantity prices or additional discounts or even date-bound special offers.
The Texts tab pane contains a number of text-type data fields for the customer. The Caliach Vision database supports variable-length text fields which means that very large capacity text fields can be provided where the storage needs of the data are no more than is needed for the length of data you actually enter. In the case of the Comments field as an example, you can enter up to 100 million characters if you wanted but if you only enter 10, only 10 characters worth of storage space is consumed.
The Payment terms is used to tell the customer what your payment terms are to them. If this is left blank, your standard for the site will apply so you only use this field if this customer has special non-standard terms.
The Sales Order header text is an example of where Caliach Vision uses both individual and standard texts. Both of these texts are shown on the header of a Quotation or Sales Order. Individual texts are simply texts that have been entered to, in this case, the customer record. Standard texts are created in the Masters→Standard Texts set of text libraries. There are libraries for Sales, Purchase, Works and Engineering purposes. Each text is defined once and given a code. In the master record only the code is entered. This way, where a text is likely to be repetitively used, it is most efficiently held centrally in a standard text library. It is also very easy to maintain as changing it centrally will change it wherever it is used.
The Banking and Others tab pane includes bank details that can be used for electronic payments (more normally for Suppliers) and user-defined fields. The user defined fields can be optionally made to migrate into documents such as sales orders and sales history.
Adding a New Customer
Typically there are two ways of adding a new master record; you can insert a new one, with essential default data being provided automatically, or you can duplicate an existing one, in which most of the currently selected record is copied. Both are functions of the master task menu. We will now insert a new customer by operating the Masters→Customers→Insert New menu function.
The cursor will be in the Customer code field. Let us enter AAA000. Codes must be unique and we recommend that they have some degree of meaning, for instance the first 3 or 4 character of the company’s name followed by a 2 or 3 digit serial number. That way you can have many companies called Brown (BRO001, BRO002), while at the same time, it is intuitive to at least get close by typing BRO.
Now enter the company name. You will see that certain fields do have values. These are known as default values and are generally setup at a site level, for example, index codes, country, currency, etc.
You can now press the tab key to move from field to field and press the Shift+tab to go backwards. You can view the available codes and other options using the Show buttons. In the resulting list, double-click to apply that line’s value.
When you have reached the last entry field on the tab pane, click on the next tab pane. A new address will have been created and you can populate as many fields as appropriate. Use the window tooltips if you are unsure of what the data element is for.

Now click on the Contacts tab pane. Because contacts are only optional, when a new address is created, no contact is created for it, so if you want a contact, click on the red plus icon button. + means Add, – means Delete, Default button means Make Current the Default and the final chain icon initiates the external file link system for the record. The link icon will be discussed later. These button controls are the same on the Address tab pane and do the same things. Now add your details into this new contact record. Note that some fields appear repetitious to the address, for instance telephone number and email. This is because there need not be a contact associated with an address and if there isn’t, then the address data will be used.
Now carry on with the Financials tab pane. You will see that essential default values have been added for you so there is no absolute need for you to enter any data here. Similarly, you need not add any data in the Texts or Banking and Others tab panes.
At this point all you need to do is click on OK or press the Enter key to confirm the addition of the new customer. All the appropriate records will be added to the database and Keywords will be added to the keyword database.
You now have a new customer in the system that will be active immediately.
ScratchPads
This is where the concept of ScratchPads in Caliach Vision is introduced. There are four ScratchPads, one each for Parts, Customers, Suppliers and General Ledger Accounts. A ScratchPad is a list of master records available in its own window however, unlike many other lists, this is designed to be highly interactive with the rest of the system.
The contents of the list can be populated in four ways:
- Directly from a selection dialogue (using the menu on the ScratchPad window).
- From a previously saved set for a user (using the same menu).
- Records automatically added each time you choose a master record throughout the system.
- From many data print report functions where there are pseudo-reports to load a ScratchPad with encountered master records (e.g. All parts where there was inventory movements this week).
With master records listed in a ScratchPad, there are a number of things you can do with the list other than just sort or manipulate the list:
- Click on a master record line to select that record for one or more other windows.
- Drag-and-drop a master record to use it in a specific location on another window.
- Transfer a number of selected records for a multi-record function such as a report or global changes.
- Drag-and-drop multiple records so that your selection drives a report or other activity.
ScratchPad list columns can be individually chosen for each single user or group of users and columns can be calculated using data from the master record. You can even use custom programme code to derive column values from associated data.

You can open a ScratchPad simply by clicking on one of the four tools on the left of the task toolbar. Alternatively, you can open them from the ScratchPad main menu, or you can simple press one of F5 through F8 keyboard function keys.
Let us open the Customer ScratchPad. Press the keyboard F6 function key and the Customer ScratchPad will open ?.
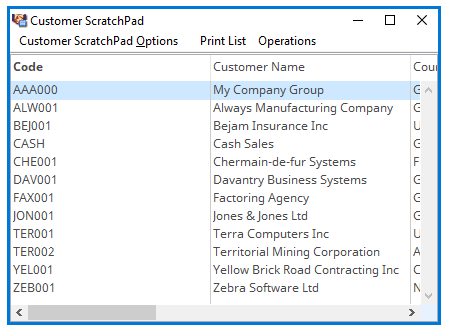
You will see that it already has a number of customers listed and these customers will be those you have already seen in the maintenance window. This is because each time a new customer record is selected by whatever mechanism, it is automatically added to the ScratchPad list. The latest was the new customer we gave AAA000 as a code. It will be selected in the list.
Now click on another customer in the list. That customer will be loaded into the maintenance window.
Now go to the Customers menu and operate the Sales History list. A new window will open and list all sales items dispatched to the customer you selected earlier. Move the windows around so you can see at least some of their contents and bring the ScratchPad back on top of the others. Now click on a line and use the up and down arrow keyboard keys to run up and down the list. Each time you change customer, the new customer will be loaded into the maintenance window and their sales history will be listed. Multiple window interaction is a typical use of a ScratchPad.
Again go to the Customers menu and operate the Print Reports function. Move it so both it and the ScratchPad are visible. Click on a customer in the ScratchPad list. Hold down the Ctrl key on the keyboard (Command key on a Mac), then click on another list line, and then another. All three will be selected. Now click on one of your selected lines, hold down the mouse button and drag the mouse over to the Print Report window, then let go of the mouse button. A report will be printed to the screen for the selected customers only. Drag-and-drop is another powerful use of a ScratchPad.
Finally, explore the list, its sorting capability by clicking on column headings, re-sizing columns and making columns invisible by right-clicking on headings. You can also explore the functions on the Customers ScratchPad menu and the Print List menu in the window.
Global Changes

Global Changes is a term used to describe the en-masse change of master record data values. It is most useful when applied to Parts, Customers and Suppliers and is available from the Masters→Global Changes menu.
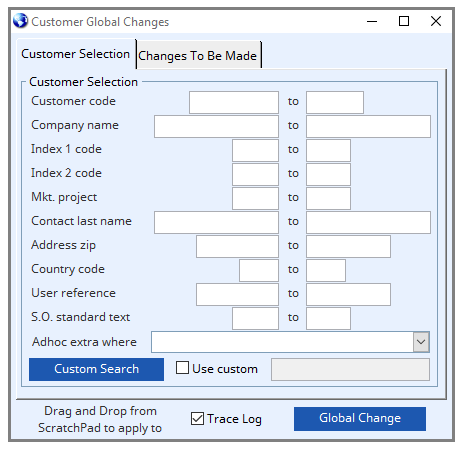
This is a very powerful feature (and potentially dangerous in untrained hands) that enables you to very quickly change many master record values.. Look at Customer Global Changes by selecting Masters→Global Changes→Customers.
The first tab pane provides one mechanism of selecting a range of customers to which you want to apply changes. Another mechanism is to drag-and-drop selected customers from the Customer ScratchPad list.
The second tab pane contains a list of data values that you can change for the customers selected. Uniquely, global change windows contain a scrollable area that contains all the fields that can be globally changed. During the subsequent change, only those that have been marked for change using the checkbox to the left of the field will be affected.
One of the useful values of this feature manifests itself during the initial implementation of the system in your business. Typically, master records can be imported from an old, legacy system, however many of Caliach Vision’s fields are not available within the imported data (and therefore features of the programme will be unavailable). This can be rapidly remedied using Global Changes to populate selected master records with appropriate values. A trace log can record the changes.
Other Master Data
We have specifically used Customer master data to illustrate master data maintenance. A glance at the Masters main menu will show you the extent of master data and some, if not all, will be relevant to you. We will briefly run through them here.

Parts are at the bedrock of any operational system. All physical, and some non-physical, entities you work with in your business are typically defined as parts. These include raw materials, intermediate assemblies and end products. Parts get bought, made, sold, costed, priced, stored, stocked, measured, etc.. Each is uniquely defined with a Part Number which in the case of Caliach Vision can be up to 18 characters long.
Bill of Material is the definition of the physical relationships between parts that define what is used to make what. It can be thought of as a set of recipes or build-lists with one for each manufactured part. It allows the system to know what parts need to be available in what appropriate quantities in order to produce a quantity of a manufactured part. In Caliach Vision jargon, the manufactured part is known as a Parent Part, which is made up of a collection of Component Parts. Bills of Material (BoM) can be multi-level to any degree, in other words any parent can itself be a component of another parent part and so on.
Process Routes define the operational processes applied to the BoM to convert its ingredients, or kit, into the manufactured part. While the BoM is all about parts and quantities, process routes are all about work activity on the production shop-floor. The BoM is the what, while process routes are the how. A process route for a parent part is made up of a list of operations, each carried out in a work centre that you can define. You also define the times that it takes to carry out each operation and the costs associated with each work centre. From this, work costing and capacity utilisation can be calculated by the system.
Quality Assurance enables you to set up testing regimes for parts that can be automatically enforced when materials or production items are received.
Engineering Data is a general purpose part-related database that can be used for document and graphics cross-reference. This data can be automatically applied to work documents so that extensive engineering information is available in production.
Marketing is a general-purpose contacts database. This is often used for pre-sales activity. Each marketing record can have any number of addresses, each of which can have any number of contacts. In addition there is an event log in which activity can be recorded. Marketing records can be easily converted to customers and/or suppliers and links can be set up which allow the marketing database to be used for CRM (Customer Relationship Management) activity.
Customers define who you sell too. All customers have accounts in the Receivables (Sales) Ledger. Quotations, Sales Orders, Estimates and Jobs all apply to specific customers.
Suppliers define who you buy from. All suppliers have accounts in the Payables (Purchase) Ledger. Request For Quotations (RFQ), Purchase Orders all apply to specific suppliers.
Customer-Parts define specific selling relationships between parts and customers. This permits particular contractual arrangements for products with customers and includes quantity discount arrangements and even time-limited special offers,
Purchase-Parts define specific buying relationships between parts and suppliers. This in effect provides default purchase order item details with supplier part numbers, units of measure and price structures. This database can be automatically populated during the normal purchasing process.
Standard Texts are four libraries of texts that can apply within the system in places where multi-line texts are used. Where a text applies, in many instances it is more efficient and manageable to hold these as standard texts and refer to them by their code.
Global Changes allows mass-change of master record data elements and should be used with extreme caution.
All of the above can be explored at your leisure. The next tutorial section moves on to the processing activity, starting with a customer order.