Environment Designer
![]() Reference Contents > Advanced Functions > Environment Designer
Reference Contents > Advanced Functions > Environment Designer
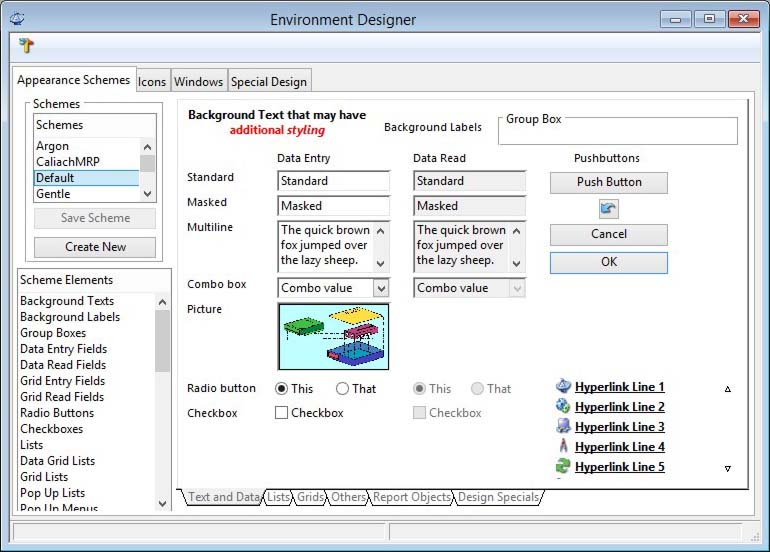
The Environment Designer window contains a set of tools to personalise the graphical appearance of the program. Any changes made are only applied to the local copy of the program. The window is opened by selecting File — Advanced — Environment.
Appearances can be saved as Schemes which can be applied again after the program has been re-installed, and which can also be distributed to other users. Icon graphics can be changed and other window characteristics customised.
The window has three tab panes – the formatting toolbar at the top of the window is used for the Appearance Schemes tab pane only and rebuilds itself on selection of a Scheme Element to reflect the available properties that can be changed.
The window has 3 tab panes.
Appearance Schemes
Icons
Windows
Appearance Schemes
Button Functions
|
Button |
Action |
|---|---|
|
Save Scheme |
Saves the current appearance to the selected Scheme. Schemes are stored in the Custom/Schemes directory and contain characteristics for all platforms supported.
|
|
Create New |
Creates a new Scheme with the current appearance. |
|
Apply to All Platforms |
This button is available on the Design Specials sub-tab pane. Applies the current appearance for the selected Scheme Element from the current platform to the other three platforms. This does not apply to the Font and Font Size. |
Operation
To change the appearance of a Scheme Element you must first select it by clicking on the list of Scheme Elements. The formatting toolbar will then reflect the current settings for the Scheme Element and the toolbar will be rebuilt to reflect the attributes that can be altered. For example, selecting Window Background in the list will provide tools for background and foreground colour and background pattern, etc. Any changes you make using the tools will be reflected on the window and any others that may be open. These changes are applied immediately to the program #STYLE class from which all objects on windows and reports inherit their appearance characteristics.
To abandon any changes made and revert to the previously saved Scheme, double-click on the Scheme line in the Schemes list.
To save the changed appearance as a Scheme, click Create New in the Schemes area at the left of the window – you will be prompted to enter a suitable Scheme name or abandon the creation process. Once a Scheme is created, selecting it in the list will cause it to be applied to the Environment Designer window and any other open windows.
To save changes to a Scheme, click Save Scheme.
Notes
Schemes are saved as .inf files in the Schemes sub-directory of the Custom directory. The Default should not be changed, as this sets the program back to its original appearance.
The program default scheme closely follows Windows standards, and uses special window colours that enable them to mimic the Window Settings you have adopted in the Appearance pane of the Display Control Panel. This means that if you change the appearance in Windows, the program will similarly change to reflect this. If you however alter colours of program objects specifically, such as the window background, at least for these objects the appearance will remain the same regardless of changes made in the Display Control Panel under Windows.
Also some combinations of settings will be inappropriate and may cause text to be unreadable (text colour and foreground colour, or some choices of 3D effect, too large a font size, etc). All objects mostly have fixed rectangular dimensions, even if sometimes invisible. If text renders outside these dimensions, it will be clipped. This may make texts misleading or unreadable.
Icons
Button Functions
|
Button |
Action |
|---|---|
|
Revert to Saved |
Abandons changes and reverts to the previously saved icon list. |
|
Save as Listed |
Saves the current contents of the icon list. |
Operation
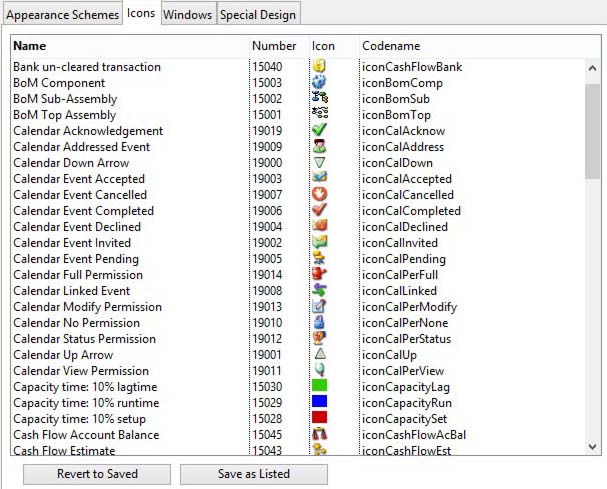
This tab pane lists all program icons, and shows the currently assigned icon graphics and associated ID.
To change an icon id in the list, click on the ID in the list and edit the number. Click Revert to Saved to abandon your changes, or Save as Listed to save changes.
![]() TIP: To edit cells in the list, select the line and click in the cell and hover the mouse over the cell. I.E. click once and pause with no mouse movement. The cell will then expand into an editable box in which you can enter different data. On leaving the box with any action like a tab or click elsewhere, the data is verified and the list returns to normal with the new data shown in the cell.
TIP: To edit cells in the list, select the line and click in the cell and hover the mouse over the cell. I.E. click once and pause with no mouse movement. The cell will then expand into an editable box in which you can enter different data. On leaving the box with any action like a tab or click elsewhere, the data is verified and the list returns to normal with the new data shown in the cell.
Notes
All icons are stored in a special system class named #ICONS, and they can be added to or modified using the Icon Editor available in the Design version of Omnis Studio.
Windows

Button Functions
|
Button |
Action |
|---|---|
|
Reset Window Behaviour |
Applies the Multiple Window Behaviour option selection to the whole program. |
|
Reset Window Positions |
Sets all window positions so that they will next open centrally, to the entered dimensions (minimum 480×797). |
|
Archive Current Layout |
Saves all current window settings into an archive file. |
|
Restore layout from Archive |
Reloads previously archived window settings. |
Operation
The Windows tab contains groups of functions used to further customise the Graphical User Interface (GUI).
MULTIPLE WINDOW BEHAVIOUR AREA
Select the Keep Clicks when Brought Forward option to ensure that when an inactive window is clicked on to bring it to the top and make it active, the click will additionally activate an object on the window if the object was under the mouse pointer during the click.
Normally, without this option, the first click on a window to bring it to the front of others and make it active will only do just that, another mouse click is required to activate an object on the window. For less experienced operators it is recommended that this option is left off – the safest setting. However for more experienced users the number of clicks required to operate the program is reduced when the option is selected, making the GUI more responsive and increasing efficiency.
To apply a change to this option throughout the program click Reset Window Behaviour.
WINDOW POSITIONS AREA
The program remembers the size and position of windows as you close them so that they re-open on the next occasion in a predictable manner. The absolute size and position will be retained even when you change the display resolution (effective size) or copy the program to another computer with a different size display.
This function allows you to reset all window sizes to fit a smaller size display, and open next time centrally. There is a minimum size of 797×450 (appropriate for an 800×600 working area).
To reset window positions first tab (or click) into the height and width data entry boxes and enter dimensions appropriate to the working area to be used, then click Reset Window Positions to apply the change throughout the program.
To archive the current window settings remembered by the program, click Archive Current Layout. The settings saved include list column widths, grid row heights and headed list sort orders. This process creates, or overwrites, a file called Windows.inf in the Terminal directory. When the program is first opened after installation, it looks for this file and if found offers the user the opportunity to Restore Layout from Archive. This will reload previously saved window settings.
To reload the contents of the archive file at any time, click Restore Layout from Archive.
Compiled in Program Version 5.10. Help data last modified 24 Apr 2012 10:28:00.00. Class wEnvironmentDesigner last modified 8 Feb 2018 02:31:29.
![]() Reference Contents > Advanced Functions > Environment Designer
Reference Contents > Advanced Functions > Environment Designer