Serial Number Assignment
![]() Reference Contents > Serial Numbers > Serial Number Assignment
Reference Contents > Serial Numbers > Serial Number Assignment
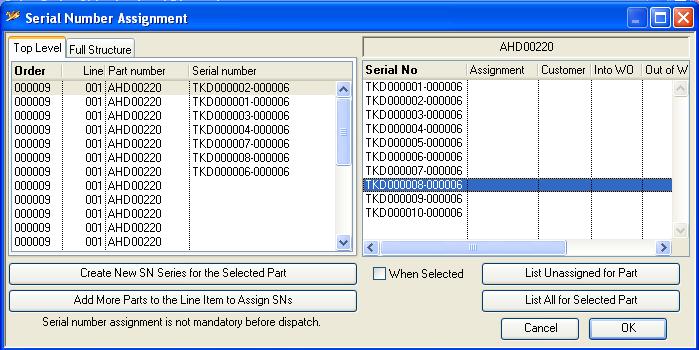
This window will open automatically when you process a SO Dispatch or Job Issue for parts that have been set to Required on Dispatch and Job issue, or a WO Kit Issue for kit parts that have been set to Required on WO kit issue, or a WO Receipt for an assembly or kit item that has been set to Required on WO receipt in the Product Serial Numbering Options.
The list on the left will show one line for each unit of part moved. For example, if a part has been given a dispatch quantity of 4, there will be 4 lines for that part. You should complete this list by making an assignment for each line. If serial number records have already been assigned to the Sales or Work Order, these will be provided pre-assigned.
![]() WARNING: If the appropriate System Preferences control has been set, you will have to complete assignments for all parts listed before you can proceed with the dispatch. If the System Preference is not set, you will merely be warned.
WARNING: If the appropriate System Preferences control has been set, you will have to complete assignments for all parts listed before you can proceed with the dispatch. If the System Preference is not set, you will merely be warned.
The window provides a number of methods of assigning serial numbers to parts.
Firstly, you can select a part line and enter a serial number in the list column itself. Do not use the OK or enter key, as this will complete the total assignment process.
Secondly, you can create a list of serial numbers on the right. To do this, select a part line on the left hand list, then click on either of the List Unassigned for Part or List All for Selected Part buttons. In the former case, you will be able to see any existing assignments for the serial number records. To assign serial numbers from the resulting list, drag and drop multiple lines from this list to the assignment list. You can do this one-by-one or in a group. You cannot assign a serial number already assigned in this dispatch.
You can create a sequence of new serial number records for the quantity of dispatch. To do this first select the part on the left hand list. Then click on the Create New Serial Number Series for the Selected Part button. This opens the Serial Number Sequence Setup window.
![]() NOTE: The quantity of records produced will be equal to the number of un-assigned part lines. As a result, if you only need to create some of the serial number records required, assign those you can first before attempting to create new ones.
NOTE: The quantity of records produced will be equal to the number of un-assigned part lines. As a result, if you only need to create some of the serial number records required, assign those you can first before attempting to create new ones.
![]() WARNING: If you confirm the creation of serial numbers, the resulting records will be created immediately, regardless of whether the dispatch is finally processed.
WARNING: If you confirm the creation of serial numbers, the resulting records will be created immediately, regardless of whether the dispatch is finally processed.
To remove an assigned serial number, select the line and pause the mouse over the serial number column. It will then go into an edit box and you can delete the entry.
You can extend the linking of Serial Number records to parts that are not directly involved in the dispatch. This is particularly useful where you want to tie the serial numbers of sub-assemblies to particular dispatches but do not want to setup a serial number structure. To do this first select the part on the left hand list. Then click on the Add More Parts to the Line Item to Assign Serial Numbers button. It opens the Part Selection window. After selection of a part you can assign a serial number as before.
When a part has a serial number structure, all unassigned parts in the tree can be assigned by drag and drop in the same way as earlier.
|
Field |
Description |
|---|---|
|
Part Listed |
Sales Order Line Items. Part number. {SOLFILE.SOLPTNO char 18} |
|
Serial Number List |
List of serial number records for the part. Use multiple-selection to assign. |
|
When Selected |
Check this to build a list of unassigned serial numbers whenever that part is selected on other lists. |
|
Button |
Action |
|---|---|
|
Create New Serial Number Series for the Selected Part |
To create a new sequence of SNos for the dispatched quantity. This opens the Serial Number Sequence Setup window. |
|
Add More Parts to the Line Item to Assign Serial Numbers |
To add additional parts to the selected line item to which you can assign SNos. It opens the Part Selection window. |
|
List Unassigned for Part |
To list all currently unassigned SNos for the selected part. |
|
List All for Selected Part |
To list all currently available SNos for the selected part. |
|
OK |
The OK button updates the data you have entered, or confirms the selection and/or processes the function you have called. |
|
Cancel |
Aborts the process currently in session. The keyboard equivalent is the Esc key for Windows computers and Command-.(full stop or period) for the Mac. |
The window has 2 tab panes.
Top Level
A list of all items that need Serial Number assignment. Drag and drop to assign or directly type serial number in the list. Use the Delete key to de-assign serial numbers in the structure.
![]() TIP: To edit cells in the list, select the line and click in the cell and hover the mouse over the cell. I.E. click once and pause with no mouse movement. The cell will then expand into an editable box in which you can enter different data. On leaving the box with any action like a tab or click elsewhere, the data is verified and the list returns to normal with the new data shown in the cell.
TIP: To edit cells in the list, select the line and click in the cell and hover the mouse over the cell. I.E. click once and pause with no mouse movement. The cell will then expand into an editable box in which you can enter different data. On leaving the box with any action like a tab or click elsewhere, the data is verified and the list returns to normal with the new data shown in the cell.
Full Structure
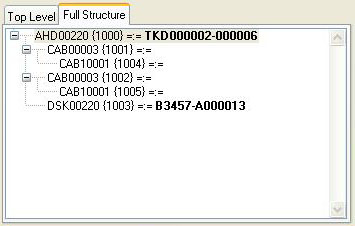
The serial number part structure tree of the part selected in the Top Level pane, along with any serial numbers assigned.
| See also: – |
Compiled in Program Version 5.10. Help data last modified 24 Apr 2012 06:50:00.00. Class wSnoSoSetup last modified 23 Sep 2017 10:51:07.
![]() Reference Contents > Serial Numbers > Serial Number Assignment
Reference Contents > Serial Numbers > Serial Number Assignment