OVERVIEW
This window is the primary data entry window for the Work Tracking system. You can manually enter data, however it is primarily designed to be used with wedge barcode readers.
Two sets of data are needed for real time work tracking.
The first set is activity data, which is:
Work Order number, e.g. 000001 or a Special Tracking Order such as CLEAN
Operation number, e.g. 010 or, in the case of Special Tracking Orders, 000
Whether the work is Setup or Runtime indicated by a 0 or 1.
These are linked together with dashes to make a single data entry string, for example 000001-010-0, indicating setup on operation 10 of work order 000001.
This data can be printed as a barcode on Work Orders, two for each operation of the route. One for Setup and one for Runtime. The user can then just swipe one or other to record this activity data.
When you need to log to Special Tracking Orders it is best to use a sheet of barcodes or labels. These can be printed from the Special Tracking Orders function. There are no setup or runtime alternatives, as any activity on a Special Tracking Order has zero operation number and is considered setup.
The second set of data is employee data, which is:
Employee code, e.g. 5200
Action of either starting or finishing (logging on or off a work activity) indicated by a 0 or 1
These are concatenated together with a dash to make a single data entry string, for example 5200-0, indicating employee 5200 is starting a work activity.
This data can be typically part of an employee badge and can be printed as barcode label (standard Avery L7163) from File — System Manager — Employees.
Data Entry
When you operate the Work Tracking Input function, the window opens with no data. The list area will show only entries made since you open the window. Note that, unlike other program windows, the Cancel button clears the data entry fields ready for a new input data set and does not close the window or cancel the edit process.
The status bar at the bottom of the window will show any error, warning, or status messages.
The system has the capability of automatically recording the completion of Work Order operations as though you were doing so in the Shopfloor Data function. To record completion, check the Record Quantities checkbox and two additional entry fields become exposed. This additional data needs to be entered through the keyboard. If you enter a scrapped quantity, you may also provide a scrap reason code (optionally selected from the Show list).
To make a data entry, first swipe the Work Order operation barcode, or Special Tracking Work Order barcode, then the employee label start barcode. Those two swipes, if correct, will cause the data to be recorded and added to the list. The window status returns automatically to be ready for another data set entry.
When you record the end of an operation, the start record previously made will be located and the finish time recorded on it. That tracking record will then have been completed. A default time of 12 hours is allowed between starting and finishing before a separate finishing-only tracking record is created. This is necessary to resolve the problem of an employee not recording the finish of an operation before he leaves in the afternoon.
The listing shows results for the session. The list shows the key information of employee code, work order, operation number and setup (S) or runtime (R), plus the Log status of whether the record is currently open (On) or has been finished (Off), then the start and finish date and times, and finally a comment.
To enter a comment, simply double-click on the line. The Work Tracking Comment window will open where you can enter your comment text.
Work Tracking records can be amended and analysed in the Work Tracking Analysis window.
File Path
Process > Shopfloor > Work Tracking Input…
This file path takes you to the Work Operation Tracking window.
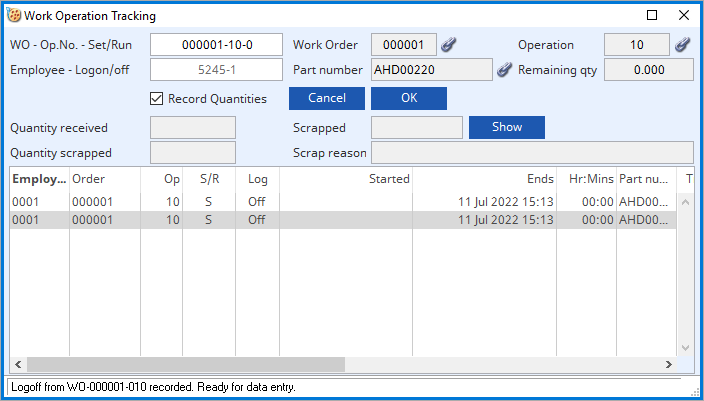
WO – Op.No. – Set/Run
Tracking event operation input in the form Work Order – Op No – Set or Run entry, normally by barcode scan.
Work Order
Work order number
Link icon
Click to view any linked external files. Hold the shift key down and click to create a new file link for the record.
Operation
Operation number
Employee – Login/off
Employee input in the form Employee code – Start or End entry, normally by barcode scan.
Part number
Unique part number.
Remaining qty
Remaining quantity that has not been recorded in the Work Order history.
Record Quantities
Check this option if you wish to record assembly operation completion.
Cancel button
Aborts the process currently in session. The keyboard equivalent is the Esc key for Windows computers and Command-.(full stop or period) for the Mac.
OK button
The OK button updates the data you have entered or confirms the selection and/or processes the function you have called.
Quantity received
Quantity of the assembly completed.
Quantity Scrapped
Quantity of the assembly scrapped.
Scrapped reason code
Scrap reason code entry is only possible when a scrap quantity has been entered.
Scrapped reason
Reason for scrap.
Show button
Click to show a list of available scrap reason codes.
Scrap reason pop up list
List of available scrap codes. Double-click to assign.
Information field
List of events recorded so far this session. Enter or change a comment in the list or by double-clicking.
Compiled in Program Version 6.00. Help data last modified 12 July 2022
Class wWtkInput last modified 25 May 2022