Caliach ERP Tutorial
This tutorial is designed for those who are completely new to Caliach Vision ERP and want to know how to use the free Demonstration Software.
Capacity Planning
Capacity Planning is part of Caliach Vision’s Manufacturing license and would not be available to you if you chose only the Inventory license option.
If you have arrived at this point in the tutorial from the previous Material Requirements Planning section you will know that that process effectively forecasts physical parts and produces a database of expected stock movements and recommended actions that meet demand on the business with appropriately timed supply, day-by-day. Capacity Planning, on the other hand looks at production activities – shop floor processes and the minute-by-minute loading that your objectives place on equipment, facilities and labour.
There are two alternative classes of Capacity Planning typically available; infinite and finite. This refers to the scale of available production resources that the system assumes. Caliach Vision implements the infinite variety where operations pass through work centres on-time, regardless of their capacity to do the work given other operations competing for the capacity. The planner can then see in the results any bottlenecks that may arise and re-adjust objectives accordingly. With the finite variety of capacity planning a cap is placed on work centre capacity and work is re-scheduled automatically by the analysis to smooth bottlenecks. Finite Capacity Planning typically requires significantly more information to be entered for it to operate effectively, especially in smaller manufacturing environments. The Scheduled Transfers menu function provides a bi-directional link to Finite Capacity Planning third party software.
Unlike MRP, Caliach Vision’s capacity planning is an analysis in memory only. It does not generate stored results because it resolves activities down to the hundredth of an hour and such a snapshot-analysis would be effectively out-of-date as soon as it was created, so there is no point in wasting time storing the results.
Capacity Planning typically gathers information from Work Orders (although this can be supplemented by recommended WOs from MRP results), their operational routes (derived from Process Routes), Jobs and Work Centres. These sources of information are enough for the system to analyse production activity sufficiently to produce an Operations Listing and from that three primary views into the future. These views are the Kit-To Listing that tell a storeman what to kit in what order and where to deliver the kit, Make-To Listings which tell machine operators what to make in what order, and Work Centre Loadings which allows planners to predict bottlenecks in production and to move jobs around so that capacity can be most efficiently used.
The analysis accommodates shop floor activity that is being recorded in near-real time. This means that were you to be recording the completion, or partial completion, of work order operations, the analysis presented would take account of this activity and only show the loading of the still to be completed part of work orders.
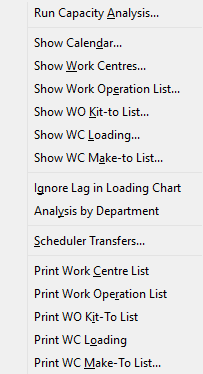
When any Capacity Planning menu function is operated, before any analysis results can be presented, capacity planning processing is undertaken with the user being first presented with its driving options. Once run, the results remain in memory until the Capacity task is closed, indicated by the ![]() icon no longer being present in the task toolbar under the main menu bar at the top of the screen. If you want to force a re-run of the analysis you can operate the Capacity→Run Capacity Analysis menu function.
icon no longer being present in the task toolbar under the main menu bar at the top of the screen. If you want to force a re-run of the analysis you can operate the Capacity→Run Capacity Analysis menu function.
Operations Listing

The results of the Capacity Planning analysis is an Operations List. Every work order or job included is broken into its operations and scheduled backwards from the completion date using the timings calculated for each operation work centre.
Lets now have a look in the demonstration program by operating the Process→Capacity Planning→Show Work Operations List menu function. If you have not already run a Capacity Planning menu function, you will be offered the options to drive the analysis.
Notice that you can choose to restrict the extent of the analysis by entering a date in the future which saves time if you are only concerned about the next week or so. For the most part all types of document that may include operations should be included but MRP recommendations would be optional depending on how far ahead you wanted visibility.
In this case, as we have so little data, you should check the final checkbox and then click on the Run button. Confirm the subsequent warning message.
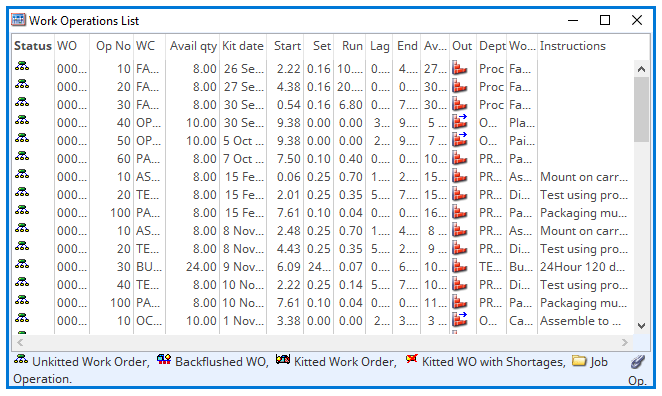
In due course the Operations List will open and show you a detailed breakdown of all operations encountered by your selection. The icons will indicate the order status.
This is the raw data on which other analysis listings are based. If you sort by the WO column, you can see how the scheduling is calculated. Bear in mind however that scheduling can be complex, with parallel running (when negative lag) and shared and individual WC loading.
Kit-To List
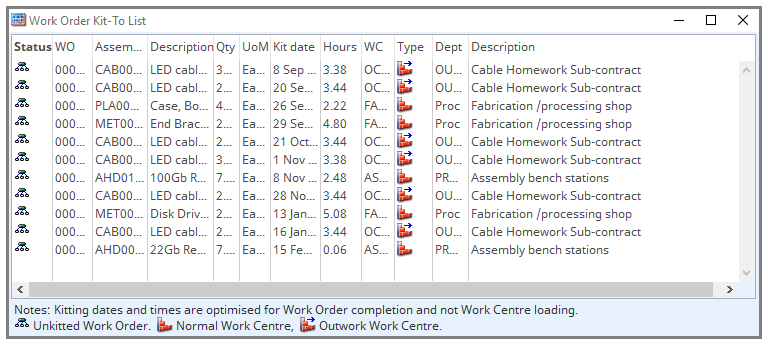
The first useful sub-analysis that can be obtained from the operations list is the Kit-To List. When working with conventional Work Orders that are initially kitted before being processed (as opposed to backflushed WOs) the Kit-To List acts as a job-sheet for a storeman preparing materials and components for the shop floor. The list includes the work centre of the first operation and the date and time that work should start on that operation so that the storeman can deliver the kit to the right place on time.
Operate the Show WO Kit-to List on the Capacity menu to view an example.
A word here about Work Centres. They are the centres of activity for particular operations. These can include assembly areas, machine tools or processing equipment, notional areas such as quality inspection and outwork or subcontract activities. They are defined once and then each process operation is ‘located’ at a work centre. Work centres have cost rates applied to them so that the cost of a particular operation is calculated from the time taken and the work centre rates. Work Centres can be grouped into departments.
The Kit-To Listing can be sorted by any of the columns including the work centre departments listed on the right.
Make-To List
The next useful sub-analysis that can be obtained from the capacity planning operations list is the Make-To List. With this list you must choose a work centre before it will list anything. So when you operate the Capacity→Show WC Make-To List menu function, after the make-to list window opens, a window opens that lists all work centres. Move this work centre list to the right so you can see the make-to list beside it and click on the ASSY work centre in the list. Immediately the make-to list will be re-drawn with a list of all operations for that particular work centre.
Without leaving the work centre list, you can use the keyboard up and down arrow keys to move down the work centre list, displaying for each work centre the kit-to list analysis.
This is an appropriate time to operate the Capacity→Analysis by Department menu function. This will cause the kit-to list to show all work centre activity for a particular department rather than just a singe work centre. Useful for a foreman allocating work in the morning.
Work Centre Loading
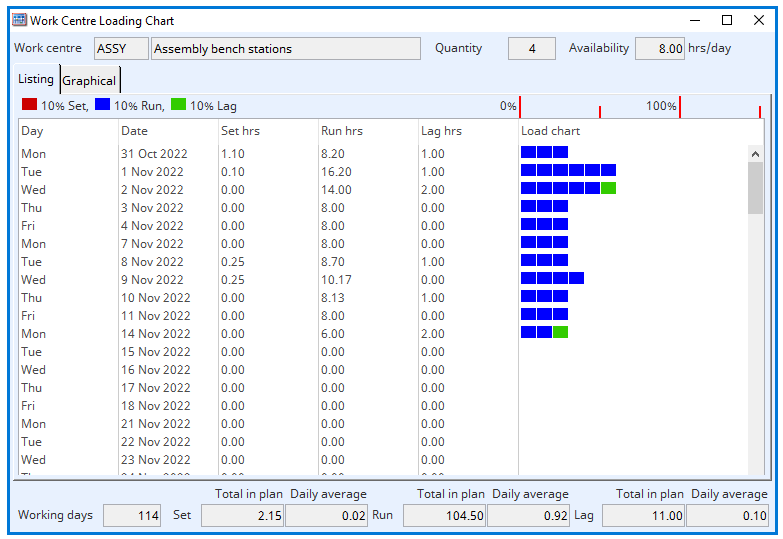
With ASSY selected in the work centre list and the Analysis by Department menu function off, operate the Capacity→Show WC Loading menu function. This will open the Work Centre Loading window. This shows the day-by-day load on the work centre in graphical form.
The chart shows the percent load on the work centre broken down into setup, run and lag time. You can immediately see when bottlenecks are likely to occur. They will show up as horizontal bars exceeding the 100% indicator at the top.
Note that above the loading chart are details of the work centre selected including Quantity and Availability. These values are defined for each work centre and together determine the number of work centre hours in one day that make up 100%. In the case of ASSY there are 4 with 8 hours a day each making 32 hours per day available capacity.
Lag time is non-active time that is added to an operation but is not included for costing. It can be used for a number of different circumstances, for example, paint drying time, staging or waiting time between operations, soaking time, safety time, etc.. As such it may not be a real consumer of capacity. So another menu switch is provided to Ignore Lag in Loading Chart.
Re-Schedule Work
Now the true power of Caliach Vision’s capacity planning can be revealed!
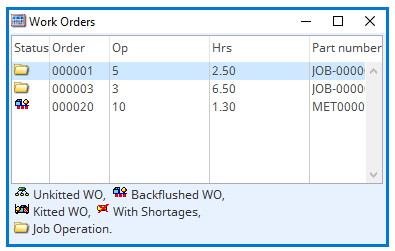
With the Work Centre Loading and Work Centre Listing windows open, double-click on the first line on the loading chart. A small Work Orders window will open which you should move to the right and below the Work Centre Listing window. This lists all the work orders, jobs and MRP recommended orders that make up the loading on the day in question.
Choose a Work Order in the list and double-click. You can now view the Work Order details in the window that opens. If you choose an MRP recommended order (those beginning with an M), nothing will happen.
In this window you can re-schedule the Work Order by changing the completion date. Simply select a new date from the list of working days and confirm with the Ok button.
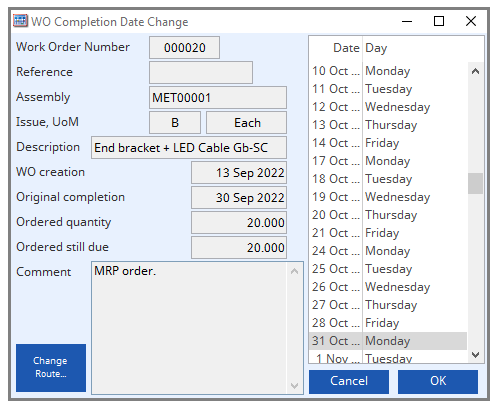
The Work Order will now be rescheduled and all capacity planning windows open at the time will be redrawn to reflect the change including the loading window. Of course, it is up to you whether this will effect customer deliveries (if moved forward) or the availability of materials and components (if moved back in time).
With Work Orders, as opposed to Jobs, you can also use the Change Route button to modify operation times or work centres. In fact you are completely free to re-structure the entire route, even while the work order is in production. Likewise, any changes will be reflected in the capacity analysis once confirmed.
Typically then, when using capacity planning it is the Work Centre Loading analysis that is first used to identify and rectify gross overloading before then producing make-to and kit-to lists to organise the production for a shift.
We have now sufficiently covered the forecasting and scheduling aspects of Caliach Vision. In the next section we move on to history that is automatically maintained by the program.