Caliach ERP Tutorial
This tutorial is designed for those who are completely new to Caliach Vision ERP and want to know how to use the free Demonstration Software.
Introduction
Caliach Vision is an easy to use and implement business software tool for managing a manufacturing or other process business. However, on the face of it ERP software such as Caliach Vision can appear very intimidating to the uninitiated. We aim to break down that barrier through this Tutorial and provide you with sufficient confidence in its use to assess the program’s benefits in your application. A full working version of Caliach Vision can be downloaded and should be installed before using this Tutorial. The demonstration software is a running edition of the program which is limited in the extent of data stored but otherwise fully functional.
About this Tutorial
Step by step, this tutorial will guide you through a process of familiarisation with the Caliach Vision program. It is designed to be read in parallel with your using the demonstration software so your first step is to download that software. For more information about the demo, please see our FAQ section.
Caliach Vision is a generic ERP application, which means that is not industry-specific and many industry types are successfully using the software. The demonstration, which will illustrate this tutorial, comes with a set of Training Data associated with electronics manufacture, however all the processes described have parallels in virtually all other manufacturing- and process orientated businesses. You should also not be too concerned that the language used is unfamiliar. Different industries and regions use different words to describe essentially the same thing. A Work Order can be a Production Job, a Batch Order, a Factory Loading, etc.
Finally, before we get going, it should be clear that this tutorial is not a substitute for proper training by a professional. This is a familiarisation tutorial, designed to help you in your decision over acquiring a suitable ERP solution for your business. Once that decision is made, you will have passed the familiarisation stage and will without doubt benefit from professional training, well beyond the scope of this tutorial.
Demonstration Installation
Caliach Vision is available for Microsoft Windows and Apple MacOS operating systems. The appearance may be slightly different but for the purposes of this tutorial all illustrations will be MS Windows.
Download the demonstration software and run the installation software as you would with any other programme for your platform. You will then be guided through the process with on-screen instructions. This does not apply to Linux for which an Install.txt file is provided which gives instructions.
In Windows, when you have installed the software, you will have a shortcut icon on your desktop from which you can launch the program. Without your intervention during installation, all programme files are placed in a C:\CaliachVisionDemo-6.0007 folder (for MacOS it will be HardDrive:Applications:CaliachVisionDemo-6.0007). The version number may change.
With installation complete, you are now able to run the program. With Windows simply double-click on the Caliach Vision Demo desktop icon. With MacOS, launch by double-clicking on the Caliach VisionDemo ERP Demonstration x64 desktop icon.
Logging into Training Data
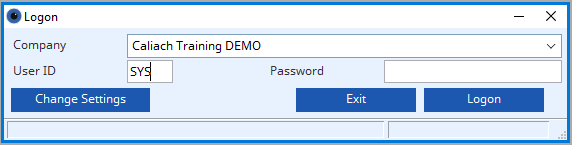
You will now enter the Login procedure. Under normal working circumstances, you would enter a personal User Identifier (typically your initials) followed by your own password. You would then obtain your user settings including access privileges to the program’s functionality. With the demonstration datafile however, you should type in the user identifier of “SYS” and leave the password blank (see Fig. 1.1). We use SYS, or System Manager, as this user has privileges to all functional areas of the program.
The demo comes with a standard TrainingDemo database but it is possible for you to create your own database and populate it with your own data. When creating a new database however, before you can usefully use it, it is necessary to initialise base records for a number of control files such as countries, index codes, calendars, etc.. Once you have been through this tutorial you may be in a position to try this.
After entering SYS press the Enter key or click on the Logon button. Because it is a demonstration program, you will now be presented with a window which will list the record limitations of the programme and the current status of the database.
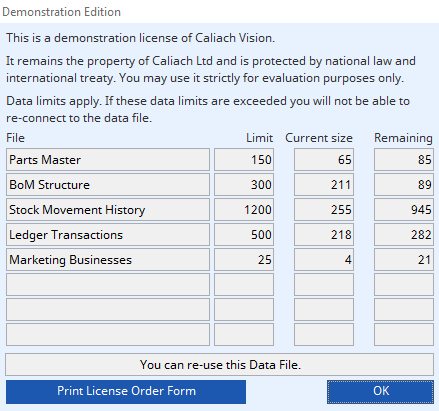
Note that as you go on using the datafile and building up records, there will be a point at which you will not be able to re-enter it. If you exceed the limits of the demo, your only option is to recover the original datafile by re-installing the demo, if you haven’t made a copy.
After the Demonstration Edition window opens, continue with the login by pressing the Enter key or clicking on the OK button.
The system will proceed to load your settings and privileges and initialise the program. During this process you may receive a number of messages and one in particular is important to this tutorial. Because dates are important to a scheduling programme such as Caliach Vision, for the demonstration only, a mechanism has been provided to bring dates up to date so that the scheduling can be realistic. You will receive a message similar to that in Fig. 1.3.
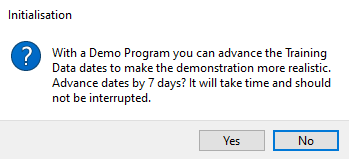
For now, click on the Yes button to bring the dates in the database as close to current as possible. Note that the No button has an enhanced border which indicates that pressing the Enter key will activate it. This is standard practice in the programme where a user response is called for – the default, or safe response, can be made with a press of the Enter key.
The system works by looking first at the last date on a number of common audit files and where it finds that the last entry is at least 7 days old, it offers to advance the dates in increments of 7 days so if you process data regularly, you will not see this message again. If you don’t use the demo for more than a week however, you will again be offered this advance message when you return to using the demo program.
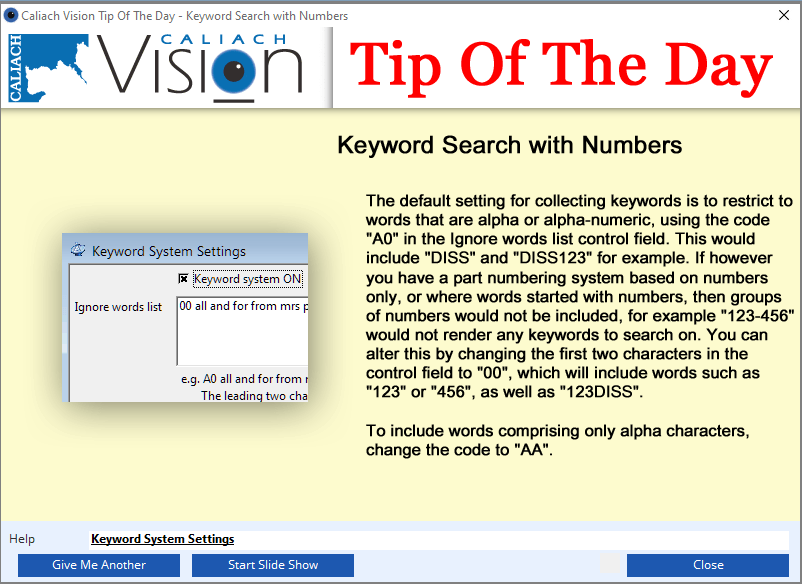
After advancing dates, the login will proceed and when complete, you will be presented with a Tip Of The Day which is designed to help improve knowledge of more obscure features of the program. Each day when you logon, you will get a new Tip. When you have digested the information, simply click on the Close button.
You will then be presented with the About Caliach window which provides information on the licenses and status of your system. If you then click on it, or wait for a few seconds, the Navigator window will replace it and the login process will be complete. At this point you have fully arrived in the Caliach Vision programme and have access to all its functions.
The Navigator is one mechanism that can be used to access Caliach Vision functionality. It is an interface that can be customised for each individual user to provide them with a simple way of navigating through their own daily activity. The primary way of activating Caliach Vision functions however is by using the main menu bar at the top of the screen. Its initial contents will be File, Edit, Reports, Masters, Process, Ledgers, ScratchPads, User, Help and Windows.

You will see that immediately below the menu (shown at the top in Fig. 1.5), there is a taskbar with a button for each open window. The taskbar is used to conveniently switch between open windows and can optionally be placed at the bottom of the screen or switched off as a user setting. Below that is a toolbar which we refer to as the Task Toolbar and will discuss later.
It is now time to move on to the next tutorial page. Click on the Next link below.