Caliach ERP Tutorial
This tutorial is designed for those who are completely new to Caliach Vision ERP and want to know how to use the free Demonstration Software.
Finding Your Way Around
- Language
- Getting help
- Menus, Tasks and Windows
- Data Entry and Updating
- Drilling Down to Details
- Security and User Access
- Reports and Destinations
Having installed the demonstration software, connected to the Training Data database and logged in, you are now in a position to explore Caliach Vision which is a substantial programme with a huge amount of functionality. In this tutorial we can only help you get going and sample some of the functional areas, leaving you to explore the rest on your own but when you are ready to streamline and grow your business with the full version, full Training for you and your staff will be provided as part of the Installation process.
The first thing you need become familiar with is how to move around Caliach Vision and how to exploit its power as a user. Whilst you may be familiar with standard Windows-like user interactions, some of the capabilities of Caliach Vision and the standards it adopts may not be immediately obvious so this page will describe the basics of navigation and the user-interface.
At the end of the last page, we had logged in and had the Navigator window open. If at that point you left the demonstration programme please re-launch the Caliach Vision Demo with the User Id of SYS and no password, then press the Enter key. You may receive a few messages then clicking on the About Caliach Vision window will take you back to viewing the Navigator, as shown in Fig. 2.1.

Language
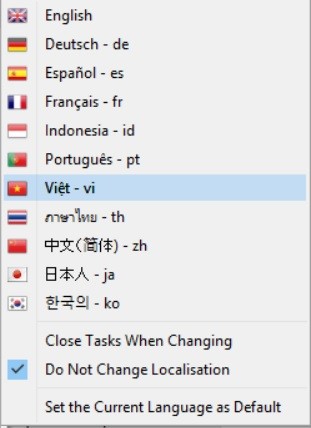
Caliach Vision fully supports all Unicode characters and has been designed to operate independently of the language seen by the user. Any language can be supported in both the programme and the data you can enter. Caliach have produced dynamic programme language change from English tp Chinese (Simplified), French, German, Indonesian, Japanese, Korean, Portuguese, Spanish, Thai and Vietnamese. It can be translated into any other language as well and if there is a particular one you need, just contact us and we can take it from there.

There are two parts to Caliach Vision’s multi-lingual capabilities. The first of these is that the Program’s Language can be dynamically changed from the File→Program Language hierarchical menu (Fig. 1.2) simply by choosing an alternative language. All open windows and menus will re-write text into the chosen language and thereafter windows will open in that language. Tooltips, messages, list headings, tab panes, report texts, etc. are all translated. If you have downloaded the extra language help during installation, that too will switch to your chosen language. If you choose to experiment, simply use the flag icons to get back to a language you can understand.
The second part is a system developed by Caliach called Language Swap. The Language Swap System allows you to translate your textual data into as many languages as you wish when you output to reports, Work Orders etc. which truly satisfies a multi-lingual community.

As an example, if a price list was wanted in Korean, choose Korean before printing a normal parts Selling Prices report. Of course, you would have had to translate the part descriptions into Korean in the appropriate maintenance window. There is no limit to how many, and which, languages are possible, even dead (Latin) and fanciful (Emoji).
Getting Help
There are three forms of help with Caliach Vision.
- Window Tooltips, for all objects on windows, tools on toolbars and menu lines.
- Topic Help, which is a browser-type topic help window that can be invoked where each topic covers a menu, window, sub-window and toolbar.
- Online Help at www.caliach.com with our knowledge base (select Support then Knowledge Base from the dropdown menu).
Both Topic Help and Online Help contain numerous links that enable you to navigate freely through your researches.
Window Tooltips
Window tooltips are little ‘aide memoir’ messages that pop-up when you point the mouse over an object, such as a button or data entry or display box. Typically, you may have already encountered them on the login window where they are turned on prior to loading the user settings. You can turn them on and off using the Help→Window Tooltips menu sequence or press the Ctrl+H key sequence.

Fig. 2.5 illustrates a typical tooltip that you will see if you move the mouse over the data display box at the top of the Navigator window that reads “Caliach Training Company”. When window tooltips are on, an extra text bar runs along the bottom of the screen which is for menu line tooltips, illustrated in Fig. 2.1. Whenever you want a reminder of what something is, or what it will do if you activate it, switch Window Tooltips on but they can become somewhat distracting if you leave them on permanently after you have become familiar with that function.
All data entry and display fields have tooltips that describe the data in the form of the file description (e.g. Parts Master) followed by the field description (e.g. Part Number unique identifier) followed by, in brackets, the internal file.field names and data type and size (e.g. PTMFILE.PTMPTNO char 18 Idx). The later codes are useful for any user search, customisation or report-writing activity because this defines the data internally and can be used in calculations as will be explained later.
Topic Help
In-depth help on a particular subject is available from Topic Help and that can be contextually located using the following technique:
- With the Navigator window open, operate the Help menu and then the What’s This? menu line (or, as an alternative, hold the Shift key down and press the F1 key).
- You will notice that the mouse icon changes.
- Now point the mouse anywhere within the Navigator window and click. A browser window will open loaded with the topic help for the Navigator.
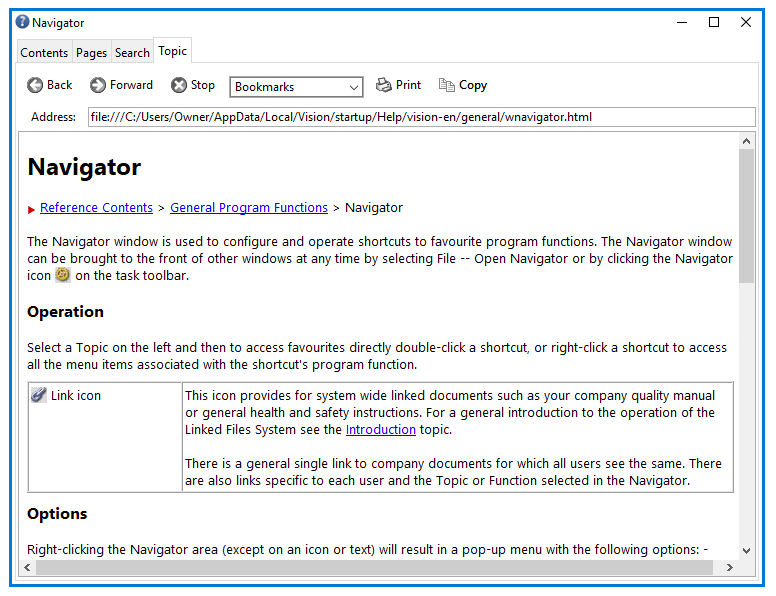
The window has 4 tab panes and under these circumstances, it opens with the Topic tab selected. The browser acts in the same way as an internet browser with hot links to other documents. The help system is, in fact, written in HTML pages which can be added to by users to include your own help. We will leave you to explore its functions and scope but notice that in the Contents and Search tab panes, you will find a tree list of the entire help system and a word search capability respectively. In the latter case, try the following:
- Click on the Search tab.
- Type NAV into the word box at the top.
- The list below will jump to Navigate. Below that will be navigation and then Navigator.
- Click on the Navigator line.
- Below the word list you will see a list of help topic pages that contain the word Navigator.
- Double click on the topic line Navigator and you will be taken to the Topic tab pane containing that help and all instances of the word Navigator will be selected.
- You can even search for multiple words (e.g. Navigator setup). In this case, only help topics containing both words will be listed and when displayed both words will be selected (but not necessarily as a phrase).
Working with Menus, Tasks and Windows
Menus and Tasks
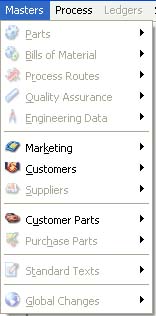
Caliach Vision has 4 primary navigation menus that always remain on the top menu bar. These are File, Masters, Process and Ledgers. It is through these that you can navigate around the programme and drive its main functions. Other menus on the menu bar typically apply standard functions which can be used in all functional areas, such as Edit, ScratchPads, Help and Window. The Queries menu provides access to Ad Hoc Reports and the User menu is where you gain access to custom features. All these menus remain the same throughout a working session and regardless of a users permissions – users denied permission to use a function will see the function menu line greyed-out as shown in Fig. 2.10.
We have occasionally been asked if a site or user can customise the menus, typically to remove areas of functionality that are not used by them? Many ERP programmes offer this option but Caliach Vision chose not to do so for what we consider to be a very good reason. An ERP programme as powerful and flexible as Vision has many functional areas and numerous menu functions – in our case, (more than 700 menu lines). Were we to offer every site and/or user to have different menu layouts and contents, it would be impossible for us to offer the depth and efficiency of Support which we take pride in because what you see would not be the same as what those supporting you see. This applies as much to the users operating in a site as to us trying to help or train you. This policy extends also to windows and toolbars which similarly will always contain the same objects and tools regardless of where you are operating the program.
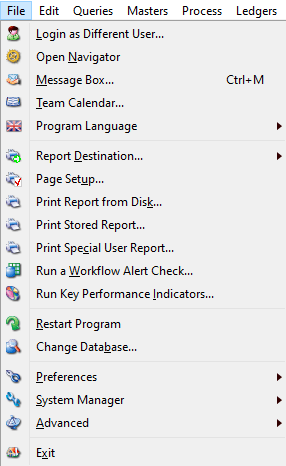
We will now explore the main navigation menus, starting with the File menu. This menu is slightly unusual compared with other main navigation menus in as much as it contains direct functions rather than other hierarchical menus. You will see that these are all general functions that are associated with the programme as a whole rather than a particular functional area. Turn on your Window Tooltips if they are off and run your mouse down the menu. You will see a description of each menu function’s action appear on the tooltip bar at the bottom of the screen.
Notice that the Report Destination menu line has an arrow head on the right. This indicates that in itself, it is not a menu function but that it contains a further menu below it, known as a hierarchical menu. If you click on Report Destination its hierarchical menu appears on the right and you can move the mouse to activate a function found on that menu. For ease of use, Caliach Vision has only a single level of hierarchy. The Report Destination hierarchical menu is exceptional, as it is there only to switch between report output destinations and does not invoke any functional activity.
All the other hierarchical menus however operate a function in, or entry into, a functional area of the program. An example of these is the three menu lines immediately above the final Exit line on the File menu. Preferences, System Manager, and Advanced all contain a suite of functional activities. We call these groups of menu functions Tasks. When you operate one of the hierarchical menu functions you will be entering the Task to perform some activity, so, for example, move the mouse over the File→Preferences line and then on to the User Settings function, then release the mouse (in future, as a shorthand, we will say “operate the File→Preferences→User Settings function”). This will open the User Settings Maintenance window but ignore this window for the moment. Now, go back to the File menu, run down to the System Manager hierarchical menu, then the Countries function line within it, and release the mouse. Again, ignore the contents of the window that opens. Look at the menu bar, window taskbar and task toolbar at the top of the screen.
First you will see that there has been an additional Manager menu added to the menu bar on the right before the Window menu. This indicates that the immediate window that is on top of all others belongs to the Manager (or System Manager) task. If you click on the Manager menu you will see that its contents are exactly the same as the File→System Manager hierarchical menu.
Below the menu bar will be the Window Taskbar with now three buttons in it. There is a button for each open window with its title as the button name and the upper-most window highlighted with a stronger border. Incidentally, the same list of open windows is shown on the Window main menu.
Below the window taskbar is a toolbar we call the Tasks Toolbar. This contains 6 standard tools for the Navigator, 4 ScratchPads and a drop-down list for report destinations. Thereafter on the right is a tool for each of the Tasks that you have invoked which in this case, are the Preferences and System Manager tasks.

With Caliach Vision (almost) any functional activity can be open and operational on the screen at the same time as any other so in this example we can maintain our countries while also maintaining our user settings. This can get pretty complex in practice with many windows, menus and tasks active at the same time so there are a number of ways to move around and switch between windows and tasks. First, if you can see part of the window you want to move too, click on it. If you cannot see it, click on the button on the Window Taskbar. You can also select it from the Window main menu, or finally, if you know the task that it belongs to, click on the task tool. Try the various techniques with the User Settings Maintenance and Country Maintenance windows.
Note that the Manager and Preferences menus on the menu bar will alternate so that whichever window is on top has its task menu readily available. Although not relevant in this case, most task menus in the programme have quick-key equivalents, e.g. Ctrl+F for Find, etc.. These can be very useful for the power-user but with so many functional areas and similar functions, there wouldn’t be enough letters to make them all unique. This is solved by only having quick-key equivalents active when the task menu is active on the main menu bar and not when it is only a hierarchical.
Now click on the Navigator which will then come to the front. Nothing changes on the menu or other navigation bars. This is because the Navigator does not belong to a task as such. Many such universal windows act like this, such as ScratchPads, Calculators, etc.. They do not disrupt the task context you are in.
Tasks and windows operate on a first-in, first-out basis within limits set for the user and tasks do not close when all windows belonging to them are closed. Instead, they stay alive so that their menus can be brought forward for use. For example, click on the Country Maintenance window and then its close box at the top right. If the Navigator was below it, nothing will change on the menu bar. If the User Settings Maintenance window was below or it is now clicked on, you will switch into the Preferences task. Note that the System task tool is still available and clicking on it will switch you into the System Manager task and thus the Manager menu will replace the Preferences menu. You can now select another System Manager function. As you move around the program, your route will be mapped by the tasks you leave open on the task toolbar up to the user limit (typically 5) at which time the oldest task will be disposed of, along with any windows open in it.
Windows
Now we will move on to windows and some of their characteristic behaviour in Caliach Vision.
Bring the User Settings Maintenance to the front by clicking on it, clicking on its window toolbar button, using the Window menu, clicking on the Prefs task tool or operate File→Preferences→User Settings menu function. This is a typical data entry window with tab panes containing groups of data elements saved, in this case against a users record in the datafile. First, you can resize it and move it into a convenient position within the screen space (lots of real-estate is useful with Caliach Vision!). If you close the window and re-open it you will see that it opens in the same position and with the same size at it had when you closed it. This memory also extends to any lists and grids on windows such as those on the Custom Features and ScratchPad tab panes. Changing column widths, sort orders and even making columns invisible are all characteristics remembered for the next time the window is opened. Strictly speaking this is not remembered for a user as the data is actually saved to the Caliach Vision programme you are running so if you switch computers, you won’t get the same settings.
A word now about Grids and Lists. Click on the Custom Reports tab pane and you will see that it contains a table of entry boxes. We call this a Data Grid. If you move the mouse over the column boundaries the mouse icon changes to a divider. Click and drag to change the column width. You can also change the row height in the same way. Many of these data grids, as in this example, are for lists of data that you can add to. When wanting to add a line, simply click on the last line and tab (use the tab key) through the columns until after the last column, a new row will be added. To remove a line, a typical technique is to clear the cells of key data then when saved, such rows will be removed. Data Grids of this type are used where tabular data is routinely entered or changed. For data presentation only purposes, Headed Lists are used which is illustrated in the ScratchPad tab pane of the User Settings Maintenance window.
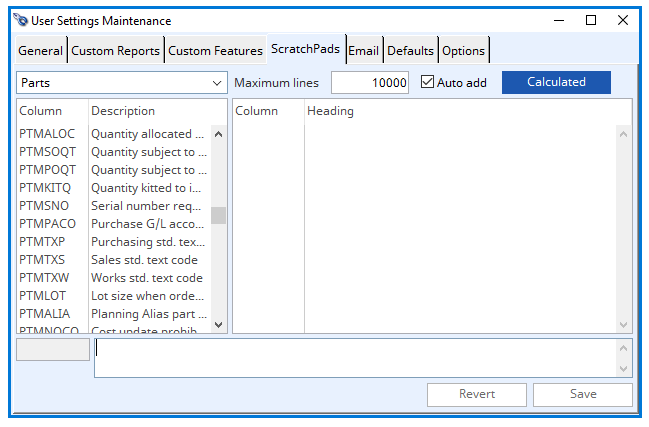
Lists
There are two headed lists here. When you first open the tab pane there will be nothing in the right hand list so to populate it, drag lines from the left onto the right. You can do this line by line but in this case, the list supports multi-line selection. To select multiple lines you can click on your first line and hold the Control (Ctrl) key to click and select others. You can also select an adjoining range by holding down the Shift key and clicking the final line of your range. Whether a list supports multi-line selection depends on the context. To drag-and-drop one or more selected lines, click on one of the selected lines and hold down the mouse button while traversing to the other list, then release the mouse button. In some cases, as in this right-hand list, you can drag-and-drop individual rows to reposition them. Rather unusually, you can edit data within the list, in this case the Heading column. Sometimes this is effected using a click-hover technique where you click the mouse button with no movement of the mouse position within a short period. In this case though, the click-hover technique is replaced with a double-click. The row/column cell will turn into an entry box where you can edit the data (as illustrated in Fig. 2.6 above). To complete the edit, click elsewhere or press the tab or enter key. Alternatively, you can edit the heading in the box at the bottom of the window.
Virtually all headed lists have other features in common too although some may only apply where the context permits. You can typically sort a list using any column as the sort column. Click on the Field column heading and you will see the list re-sorted into Field order. The heading of that column will go Bold indicating that this is the column of sort. Click on the same heading again and the list will be re-sorted, this time in reverse order. The heading will turn to Italic-Bold. Now try the Description column. This is an extremely powerful feature of Caliach Vision. To find out the biggest single item sale you have made to a particular customer becomes a trivial few-second activity with this powerful list sorting capability.
Some lists contain many lines and to find a specific row can take time by scrolling through. There is a quick-find technique that can be useful although this can take two forms depending on a User Setting. Click on the General tab pane of the User Settings Maintenance window. In the lower left, there is a checkbox “Old (pre V4) List Searching“, which is either on or off, as follows:

- Off – type in characters and it finds the first line matching the characters. After a pause, type some more characters and it searches for those. The pause is quite short (40/60ths of a second by default) which is good for speed-typists or you can lengthen the timer in the setting shown.
- On – type in characters at your leisure. To do another search you have to click on a list line with the mouse before typing in your new search.
Let’s choose to check this setting, then click on the Save button. Now return to the ScratchPads tab pane to try it out.
Click on a line in the left hand list and type the following; P, T, M, P, H. Each time you type a letter after PTM a new line will be selected and when you reach H, PTMPHYQ will be selected. It operates without regard for case. The mechanism works from the left but prefixing your typing with a asterisk (*) will find any text match in the displayed row. If you then press +, the next match will be located.
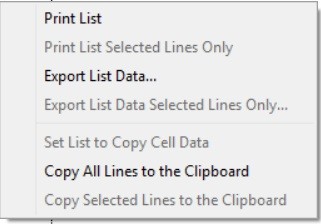
Most headed lists have a context menu with a number of powerful functions that act on the list. Right-click on the body of the right hand list to open a context menu. You can use this to print the whole list or just selected lines as viewed or you can export the underlying list data for use in another program.
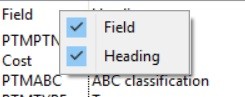
If you right-click on the heading part of the list, you will open a context menu in which you can choose to hide/show columns. Your choices here are remembered the next time you open the window. ScratchPads are especially powerful headed lists because you can design what columns they show and even have columns of calculated data.
Finally, although not specific to lists, it is worth pointing out here that the appearance of all objects within the programme can be customised for a particular installation using the File→Advanced→Environment feature ?. With this you can choose font, size and emphasis, 3D effect, colours and all manner of other appearance characteristics for object groups. This is an advanced topic however and is only mentioned here in passing.
Data Entry and Updating
You may have noticed earlier that after the drag-and-drop operation on the two lists, the Revert and Save buttons on the bottom right of the User Settings Maintenance window became enabled, where before they were disabled and greyed-out. This is because you had changed the data and now have the option of saving your changes or reverting back to that previously stored. Now click on the window close box as though you wanted to discard the window.
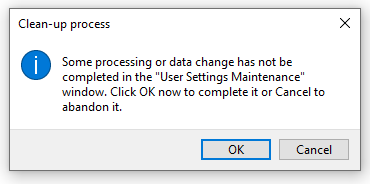
This warning offers you a second chance to confirm your changes or abandon them which is typical of the way Caliach Vision responds to data changes by the user. When windows are opened and a record or process is invoked, active buttons will prompt the user to proceed. If they are greyed-out, it means that changes have not been made or otherwise data has not been prepared for processing. In this case click OK on the message and you will return to the window where you can then press Revert to return the data to its saved condition. Clicking Cancel on the message would allow the window to close with the data changes unsaved.
Typically, when data is viewed and the user has update privileges, the data will immediately be in an editable state. To proceed with changes, the user simply makes the changes without need for further action. This can appear at first to be reckless but in practice it is by far the more intuitive and convenient approach. Find a record, change data, save or revert – is the sequence of actions, much like you would edit a word processing document.
Drilling Down to Details
Drill-down is the term used when you activate a function that provides further detail or takes you elsewhere to explore relevant associated data. Caliach Vision provides for this in abundance using a number of techniques, most of which are not explicitly indicated otherwise windows would be littered with icons and instructions making the user view cluttered. Where a useful drill-down is appropriate, just assume that it is available to you.
To illustrate this we will open the Part Maintenance window. Go to the Masters main menu, then Parts and View from the hierarchical menu. The Part Maintenance window will open empty of data. Move the mouse over the display box to the right of Part number. You will notice that the mouse pointer icon changes to a drill-bit icon indicating that you can drill-down on this box. Double-click and the display box will change to data entry mode and you are in Find mode for a part. This is actually the same as operating Masters→Parts→Find using the menus. Type in PSU and press the Enter key or click on the OK button. The window will populate with the master data for the part number PSU00001.

Move the mouse over the Last Modified date/time display field in the middle of the window. The mouse cursor changes to a pointer with a ±. This indicates that a calculator can operate on the data. Right-click and you can operate the single line context menu Date Calculator which opens a calculator with the date/time loaded. If the field was in data entry mode you would be able to use the calculator to apply a calculated date. Calculator drill-down is available on almost all date- and numeric data display or entry boxes.
Now move the mouse to the Physical quantity display box below. While this also has a Calculator context menu, if you double-click on the box, you open the Inventory Movement listing window for the part. Lists also offer drill-down where appropriate. In this case where the Reference column has meaningful data, further drill-down into the document detail is possible. Double-click on the line with WO-000006 in the column. This action will open the Work Order Review window for the 000006 Work Order.
Sometimes with lists, where there is more than one possible drill-down, the column and row are relevant for your double-click. For example, close windows so you are back with the Parts Maintenance window on top. Click on the Ledgers tab pane and then double-click on the Sales posting account code 010100-0000. The Account Review window will open listing the transactions recorded in this general ledger sales account. Note that the Document column of the second line shows IN-000019. Double-click on that line and an Invoice Details window will open containing full details of this dispatch invoice. Close that window to return to the Account Review window. Now horizontally scroll the list right so that you expose the Contra a/c column. For the second line, this will show RFAX001 indicating that the posting came from the Accounts Receivable (sales) ledger and the customer account FAX001. Double-click in this column and on the second list line (i.e. in the cell containing RFAX001) and instead of the Invoice Review window opening, you will get the Account Review window for the customer, FAX001.

The one final form of drill-down is the context menu availability on key code fields. To illustrate this, close any open windows back to the Parts Maintenance window and click on the Planning tab pane. There you will see that the part has a Primary supplier of EIS. Right-click on the supplier code entry field on top of EIS. The Supplier menu will open and if you select View, the Supplier Maintenance window populated with EIS’s data will open. Wherever master data (Parts, Customers, Suppliers, Accounts, etc.) codes are shown in data display boxes, this form of drill-down is available.
Drill-down is an important part of Caliach Vision’s user friendliness. As you progress through this tutorial into other functional windows, try out these techniques. Wherever it makes sense to have drill-down. it will be available.
Security and User Access
All functionality is accessed through the menu system and users’ access can be controlled to each menu line. This is set through the File→System Manager→Privileges and Settings menu path. In addition to menu lines, window tab panes can be disabled to prevent the users’ viewing or editing of data.
The whole system works on a Group-User structure. Groups can be set up and access privileges afforded to them. Then users can be set to belong to a group, or a number of groups. The users’ subsequent privileges then depend on their membership of groups.
For still finer control a specific user can then have particular access privileges outside those either afforded by their group membership, or despite it.
Any drill-down access will respect the menu functional access so that, for example, if the user has no access to Inventory History, any drill-down showing that data will not operate and the user will receive a privileges violation message.
Data can be extracted from the database by other external programs using ODBC and this too is provided with a secure access system so that sensitive data can be protected from unauthorised viewing.
Settings, which include such things as options, ScratchPad design, custom reports and custom features are controlled on a License-system-group-user-terminal hierarchy. This ensures convenient management of access to appropriate users.
There must always be at least one user that is set as an Administrator. When set as an Administrator, a user has access to everything, regardless of group membership. SYS is set as an Administrator in the Training Demonstration example.
Reports and Destinations
Caliach Vision has the extensive reporting capabilities you would expect but in addition, it also has many report destinations that can be used for different purposes. There are generally two types of report – general data listing reports and documents such as invoices, purchase orders, etc..
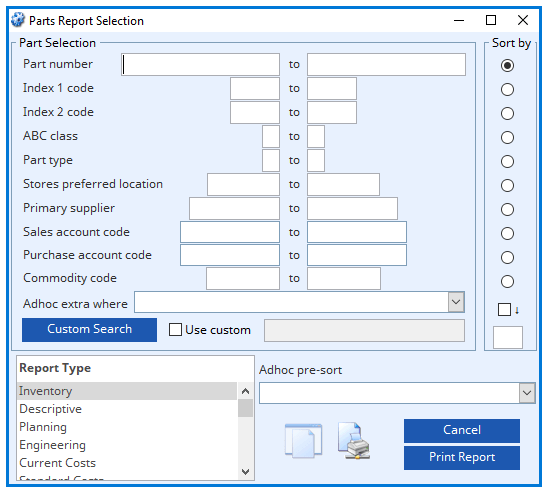
As you navigate around the program, you will normally find that at the bottom of a tasks hierarchical menu are the Print Report functions. For example, operate Masters→Parts→Print Reports and you will open a reporting window typical of many in the programme (see Fig. 2.17 above).
In the upper left there is a section which has a number of standard selection ranges that you can populate with restrictions. For example you could enter D in the first box and E in the second to get all parts with numbers starting with D. These ranges are inclusive so if you added a further range restriction, that would additionally apply. You can also apply a custom search.
The upper right section controls the sort order of the report. Simply click on a radio button to change the order in which records are listed in that report.
In the lower left is a list of the available Report Types, each of which is a different design, contains different data and may be accompanied by options that the user can control. The Caliach Vision development team can customise any report to meet your business need. These custom designs are then added to the list of reports available in this, or other print report windows. There is almost no limit to the sophistication that can be built into custom reports including graphs, cross file data analysis, etc..
Such report selection windows in Caliach Vision offer you ranges to limit the data obtained for the report and a sort selection by radio button. Additionally, there are typically 4 non-obvious tools you can use: Adhoc extra, which lets you put in an additional SQL clause to control the output (this is saved for future re-use). Adhoc pre-sort lets you apply your own sort rules (likewise saved). There is also a Reverse Sort checkbox and finally a Limit. Appropriate use of these controls could, for instance, report the top 10 selling items over a period or the bottom 10, lowest sellers.
Finally, controls on the lower right set the destination for the report. The two icon buttons are quick-change controls for the Screen and Printer destinations. You can right-click on them or the Print Report button to select from the Report Destination context menu, or you can select from the task toolbar drop-down list.

When exploring the demonstration program, printing to Screen is the most useful as from that, you can go on to a Preview and/or Printer. The Disk destination allows you to save the report in full detail and re-print it on another occasion using the File→Print Report from Disk function which is useful for archiving reports. Clipboard, Port and File destinations are rarely used as they are text conversions of the report output. HTML File, Rich Text File and Acrobat PDF File destinations all convert the report into an external standard. HTML and Rich Text (RTF) standards are relatively crude standards so generally produce degraded formatting but may still be useful. The PDF conversion is very accurate and produces good results. Finally, there is an Email destination which creates a PDF (or optionally HTML) file rendition of the report and attaches it to an email that is sent directly from the program. The email system has to be set up for the post server you use so it is not generally available to the demonstration user, however you have considerable power and convenience available in this feature and its implementation.
Now that we have explored the help system, navigation around the programme and the general user interface, we can move on in the next section to look in detail at the way data is structured and manipulated.