Caliach ERP Tutorial
This tutorial is designed for those who are completely new to Caliach Vision ERP and want to know how to use the free Demonstration Software.
Implementation
- Approach to Implementation
- Data Transfer Utility
- Global Changes
- Test and Play Data
- Training and On-Site Assistance
- Going Live
There are numerous examples of good implementation projects and, if the software is good and plans are adhered too, the exercise can be relatively painless.
You may, however, have heard from friends or in the press, stories of companies being brought to their knees by failed or poorly managed ERP implementations. You may even have personal experience of such nightmares! There are plenty around and you would be right to be cautious and concerned with this aspect of the process.
If not properly planned and implemented, even with perfect software, the process can fail or, at the very least, seriously extend the time it takes to gain a return on the investment you make. The reason is that unlike many other computerisation projects, ERP uniquely extends across all operations of the business and is therefore subject to considerable commitment in time and attention from all administrative and managerial staff before it can become effective.
Approach to Implementation
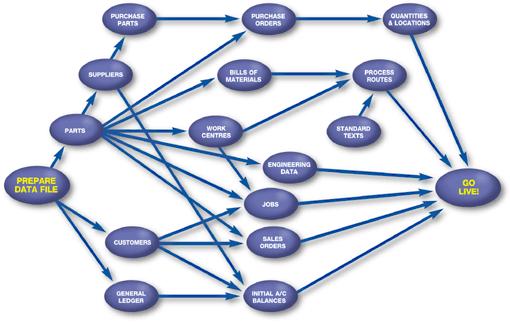
Caliach Vision can be implemented in stages, with benefits accruing right from the start. Typically, successful implementation strategies have fallen into three broad approaches:
- The Big-Bang Approach in which every facet and detail is prepared beforehand, all training completed, and a Go-Live date set for the change-over from existing systems.
- The Mini-Big-Bang Approach, in which all facets except the accounts package are implemented on the Go-Live date.
- The Phased Introduction Approach, in which the main elements are introduced progressively over time.
The choice you make will be largely determined by the extent of internal resources you are able to commit to the project. Help can be provided for planning, training and project management but there can be few successful implementations where line management has not been intensively involved in the implementation process. There is a great benefit to you if master data is already available in electronic form and this can significantly reduce the amount of implementation data entry but there is no substitute for careful procedural preparation and this requires manager effort well before the ‘go-live’ date. Staff need to be encouraged to take ownership of their respective areas of the system and the data they work with.
A significant factor for success is the degree to which your staff enjoys using the program. If it is easy and convenient to use, staff are going to be more inclined to use it and the data it holds is therefore going to be more accurate than otherwise. In addition, ease of use minimises staff training requirements in an implementation. This tutorial should have convinced you that Caliach Vision has ease-of-use as one of its core properties.
The remainder of this section illustrates some of the tools that Caliach Vision provides that make implementation quick and easy.
Data Transfer Utility
Whether you are migrating from a legacy system or from disparate islands of knowledge held on spreadsheets and/or home-made databases, that data in electronic form should be transferred into the new ERP system. As long as your data can be extracted into a form that can be read by a spreadsheet program, it can be transferred into Caliach Vision.
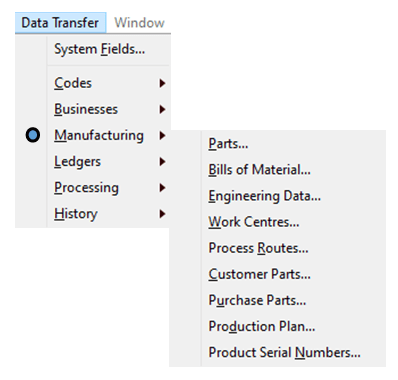
In the demonstration program, operate File→Advanced→Data Transfer Utility. A Data Transfer menu will be added to the main menu.

The hierarchical menu provides data transfer for a number of master and go-live data sets. All have both import and export capability.
First operate the Data Transfer→System Fields menu function. This opens a window that lists the data structure for each internal file (otherwise known as table or slot) in the database.
Click on a file on the left to view a list of fields (otherwise known as columns) on the right with details of their data type and limits and see whether or not that field is indexed. Indexed fields can be used for a rapid search and for relational linking. You can select a number of files in the left hand list and click on the Print Listing for Selected button to obtain a printed report.
This feature is useful when you are exploring what data needs to be populated during your import process.

The Import of data is a function which involves selecting the appropriate category in the hierarchical menu which then opens the data transfer window and loads it with the appropriate file information.
At the right side are the control options and actions you can take. You can choose from a number of different file formats, Tab delimited being the most common and useful when working with spreadsheet programs.
The Export Headings button should be used to prepare a template document where the first three rows contain the definitions for the columns. The file produced is then opened in your spreadsheet programme and you can populate it with your data, typically using cut and paste from another spreadsheet containing that data. Not all columns need to be populated with data as the import process will mostly provide defaults or starting values.
Once you have a set of data to import, save it in the appropriate format and then click on the Test Import Data button. This will not affect the datafile, it will simply carry out normal tests on your data and report any errors it finds. Errors reported can often be associated with inappropriate relationships. For example, when importing parts, a value in the preferred supplier column can only be for a supplier that already exists in the datafile. Errors are also reported for duplicate key field data, for example where you have two rows of parts with the same part number.
Once you are content with the quality of your data to be imported, you can then use the Import Data button to finally load your datafile. The import process cleans the data as much as it can, forcing codes to upper-case, imposing decimal rounding and minimum and maximum values where needed.
Because many import data sets require previous data to be already imported, such as the preferred supplier example given above, it is important that you import different data sets in the correct order. As a general rule use the order from top to bottom of the Data Transfer menu as your guide.
There are two other Data Transfer tools that are very useful during the implementation process. Users, Groups and System privileges and setting can be exported and imported. This is available under the System tab pane of File→System Manager→Privileges and Settings. With this feature you can set up all the users of your system with all privileges and settings in a training or temporary datafile and then transfer them into your new datafile en-mass. Similarly the Ledgers setup can be set the way you want it and then transferred using Ledgers→Ledger Manager→Special Data Transfers.
Global Changes
It is very often the case that the data available from your legacy systems is limited in comparison to Caliach Vision’s data structure, particularly if you have not being using an old integrated program. For example you may have parts data but do not have lead-time data for each part. Building up this additional data could be a very tedious business and may slow the implementation significantly.

A solution that can speed things up significantly is to use the Masters→Global Changes set of functions. These permit the mass-change of field values for a selected range of master data records. Let us take Parts as an example.
Operate Masters→Global Changes→Parts. The first tab pane is for selection of the parts that you intend to change. Leaving it blank will zap all parts with the change, so be careful! Switch to the second tab pane and by clicking on the checkbox and setting a value to change to, you can choose the fields you want to change.
The selection of parts that you want to change can be done by:
- Entering a set of From and To values in the selection boxes.
- Entering or choosing an Adhoc Extra Where.
- Designing and using a Custom Search.
- Right-clicking select Ad Hoc Where Clause.
- Dragging-and-dropping part lines from the Parts ScratchPad.
- Dragging-and-dropping part lines from the BoM and Where-Used Listings.
- Doing a Keyword Search results transfer.
- Using a combination of the above.
Global Changes is a very powerful feature of the programme and it should be used with extreme care as you may destroy detail. Privileges should be highly restricted for Global Changes functions.
Test and Play Data

When running an implementation, it is important to take regular backups of the data before any major import or global change is performed in case you make a mistake or destroy previous work. This is particularly easy task with Caliach Vision because it holds all its data in just a few files together in a directory.
Once you have a reasonable amount of master data loaded into the datafile, it is a good idea to copy the database set and use this as a Play Database (only available with a PostgreSQL database with a full license). Users can then use the File→Change Database menu function to log into that database to train and experiment with the system performing normal business processes without harming “Real” data.
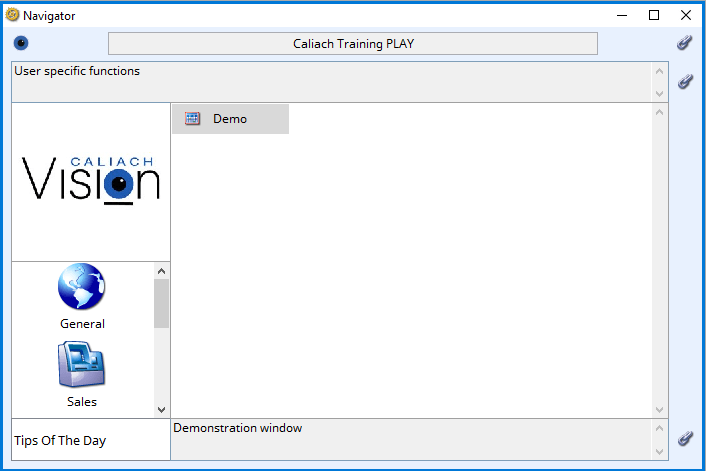
Once you have created a Play Datafile, you should make it absolutely clear to all users that this is what it is by changing the company name extension in File→System Manager→Company Details. The Navigator and the programme window title will then clearly show PLAY in the name. There will then be no confusion over which datafile they are operating in when implementing or training and experimenting.
Once you have a set of Play Data, users can train themselves on processes they will use on a day-to-day basis. They can experiment with functions they may be familiar with in the programme with master data, such as parts, customers and suppliers.
Training and On-Site Assistance
Every business is different and every ERP implementation will take a different course. It is, however, rare that businesses can carry out a complete implementation without getting some help from experts.
At Caliach, we generally see help on implementation falling into four categories:
- Software installation, initial setup and project planning assistance
- Data Transfer assistance
- Staff and System Manager Training
- Customisation assistance
If we take an average of a 10-user installation we can broadly say that one consultant-day is needed for each of items 1 and 2 and between three and eight days for items 3 and 4. The variability here is mostly governed by how much previous experience staff have in this sort of software and how much in the way of special requirements you may have which lead to customisation. These figures are offered simply as a guideline and a timetable and estimate will be drawn up after detailed discussions with you when we can more accurately gauge your specific requiremtns.
It is worth stressing that you should not skimp on training. An ERP system is a powerful programme and there is a lot that can be missed if you struggle to get to grips with it entirely by yourself.
Going Live
Because an ERP system spreads it’s tentacles throughout the business, there is a point in time at which it becomes operational and after which processes must be carried out using the system. Up until this go-live point you will be loading master data in preparation but from that point on, you need to plan for all appropriate activities being processed on the system.
In the most simple of cases the following must be done immediately before going live.
- Inventory stocktake.
- Load outstanding sales, jobs, purchase and works orders.
- Load ledger account initial balances.
This tutorial has now come to an end. It is only an introduction to Caliach Vision and is not meant as a substitute for individual training offered to businesses at a pace to suit their requirements.